Tuesday, 13 March 2018

Whimsy Stamps Inspiration Post - Wk 3

Hi there, and good morning to you all ðŸ’œ

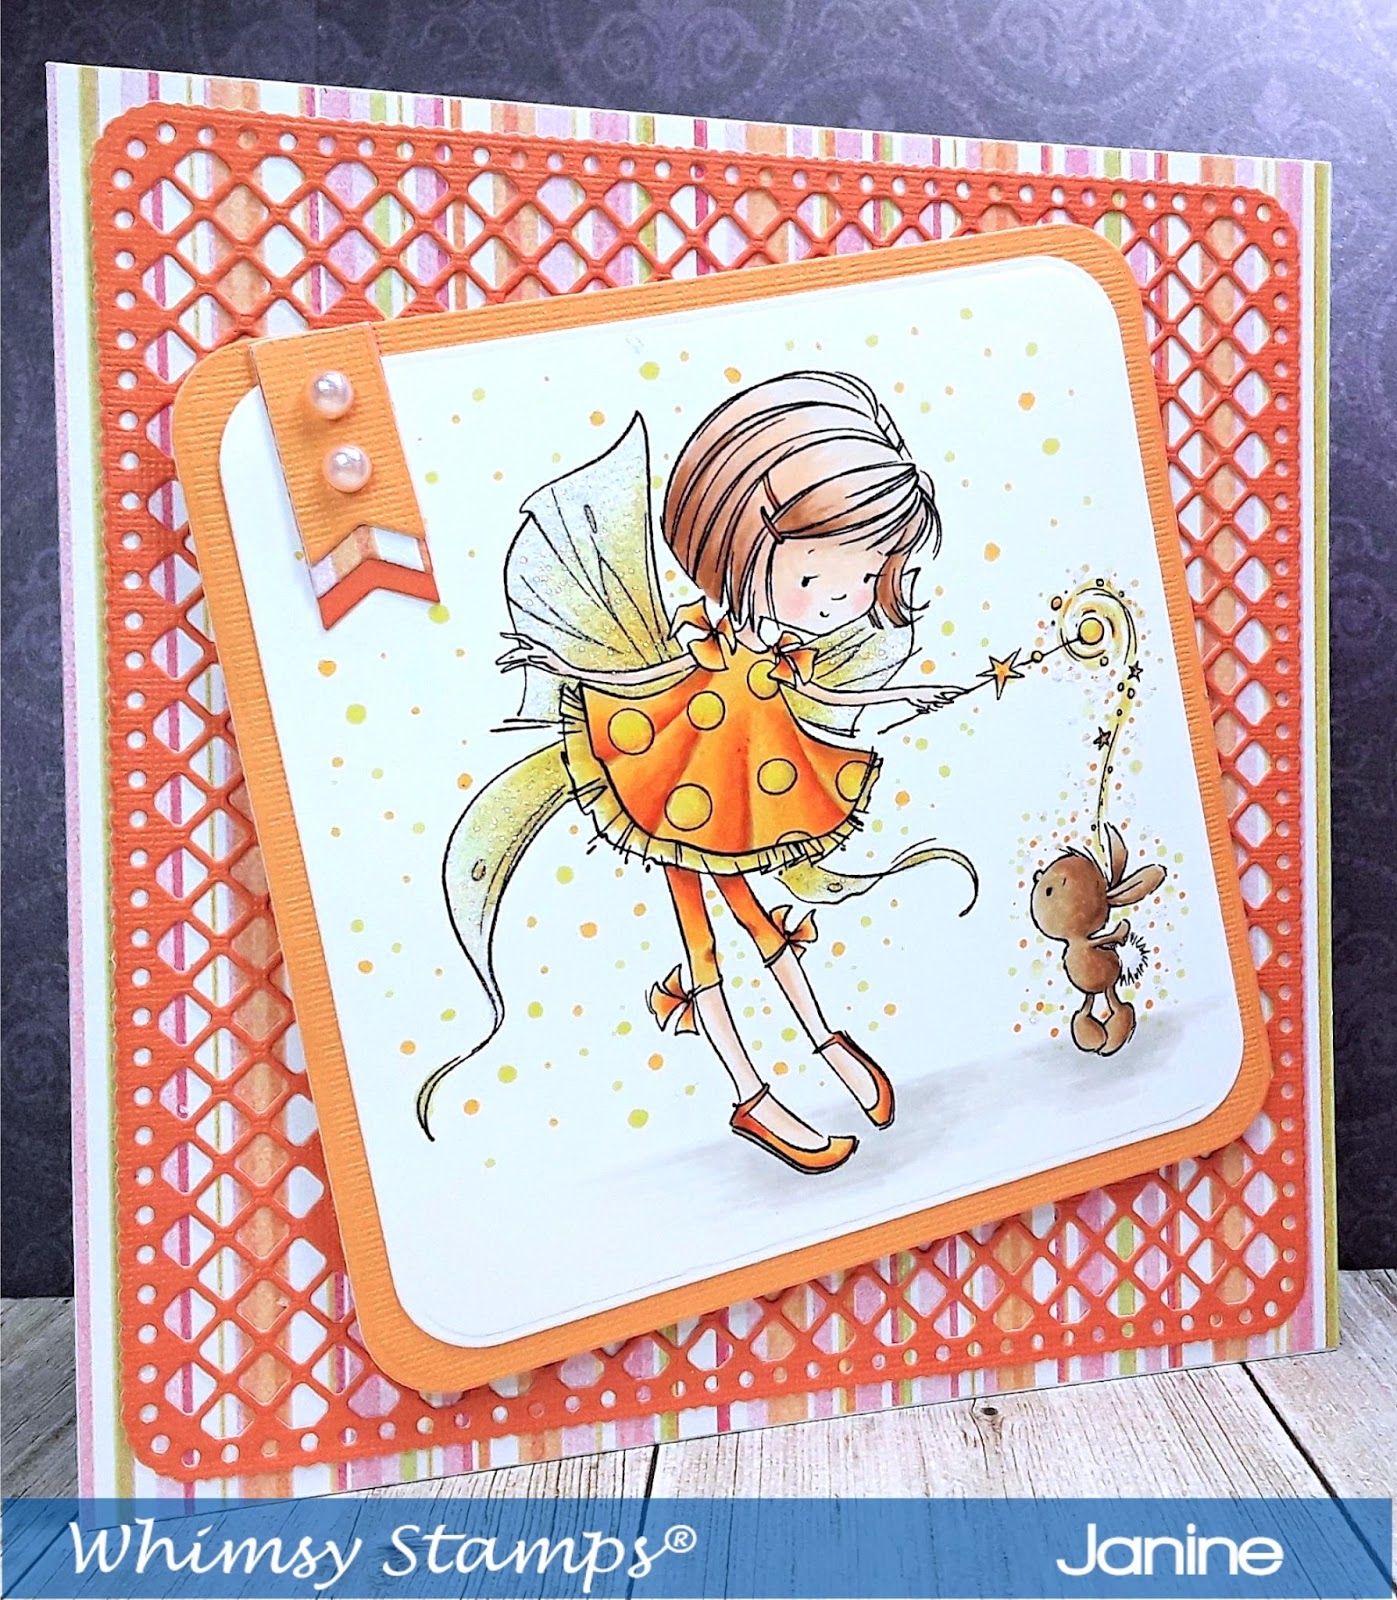
Today it's my turn to share another little Whimsy wonderfulness with you, this time with one of the new release rubber stamps.  One of my favourite things to colour has to be fairies, so you can imagine my joy at colouring this little beauty in - the stamp is called 'Make A Wish' by Marina Fedotova. I used my happy colour 'orange' as the colour scheme. I love using orange and yellow as they brighten my day, which is brilliant atm as the days in the UK have been so grey and miserable lately. So here's to spring, and here's to the sunshine. :) My crafty friend recently said orange was like ‘sunshine and happiness bottled’...and I totally agree with her (thanks Wends).

The Whimsy Creative Team have all been sharing a little bit about themselves on the Whimsy blog - so if you'd like to know about me just check it out my bio here.

All the links to the Whimsy products can be seen below. I hope you like it.


Here's What I Did
This is a really easy card to reproduce as the stamp and dies do all the work.

I covered a 6" x 6" card blank with some pretty patterned paper, then covered it with a square trellis die cut from orange card.

The fairy and bunny were stamped onto colouring card stock and hand coloured with Copic pens. I add dots in varying sizes around the bunny and fairy using the same colours used in her dress. Crystal glitter was added to the wings of the fairy and around her wand.  The images was then die cut into a rounded square and mounted onto a slightly larger square cut from pale orange cardstock, Both squares were attached to the card front using foam pads to add dimension.

To complete the card, die cut banners were cut down and added to the card front then topped with pearls.

Here's What I Used
Rubber Stamp: 'Make A Wish'

Other:
6" x 6" Card Blank, Neenah Card, Orange Card, Pale Orange Card, Square Rounded Corner Dies (Tattered Lace), Trellis Square Die (Tonic),  'One Birdie Lane' Paper Pad (LOTV),
Crystal Glitter, Pearls, Copic Pens, Banner Dies (Lawn Fawn)

Copics: Skin - E0000, E000, E00, E11, R30 / Hair - YR0000, YR000, YR00, E13, E99 / Dress, Leggings, Shoes - Y17, Y28, Y38, YR07, YR15, YR31 / Wands & Dots - Y02, Y35 / Background Dots & Wings - Y00, Y02, Y35 / Bunnies - W1, E31, E33, E35 / Ground - W0, W1

Why not, follow us on Facebook group, Pinterest, Instagram or on our Blog we'd loved to see you.

I'll see you all on the 15th March with my challenge card, so TTFN

Thank you so much for dropping by, don't forget to say hi :)

Challenges entered:

Hugs

x Janine x

Thursday, 8 March 2018

Garden Treasures Hunkydory/For the Love Stamps - March Launch

Morning everyone

Today I'm sharing the 'Garden Treasures' stamping samples I made for the Hunkydory/For The Love Of Stamps TV launch on Create & Craft TV on Tuesday. The stamps coincided with the launch of the 'Garden Treasures' paper kit. For my samples I also used the brand new paper pad and matt-tastic cardstock, which are both absolutely stunning. The artwork and colour palette is just beautiful.  to look at and play with. The stamps and cardstock are still available to buy from Create & Craft and will be available from Hunkydory Crafts very soon.

As always due to the number of cards I've produced I am unable to write up a tutorial for each one as my post would go on forever and a day. So if you want to know anything about the cards I've created please either email me or leave me a comment plus your email address, and I'll post the details on here. :) I have still posted a list of all the products I used.


I Used:
Garden Treasures Stamps - Work Of The Heart, Arranged With Love, Bright & Beautiful
Garden Treasures 5.5 x 5.5 Masks - Butterfly Dance (there is also the Simply Stonework and Terrific Trellis available), Co-ordinating Adorable Scorable Matt-astic Cardstock, Garden Treasures Paper Pad, Coloured Matt-tastic Card,
Some of the above products can also be purchase on Create & Craft's website here),

Other: Copic Pens, Zig Clean Color Pens, My Own Card Blanks, Enamel Dots, Sequins, Colour Cloud Ink - Rose Blush (Cosmic Shimmer), Crystal Glitter, Circle Dies (Tattered Lace), Oval Die (Tattered Lace), Label Die (Mag Freebie),  Silver Mirror Card, Clear Overlay Glitter Pen, Distressing Inks, Glue, Foam Pads, Pearls, Black Fine Liner Pen, Stitched Scallop Border Die (Lawn Fawn), MFT Extreme Black Ink, Watercolour Card (Crafter's Companion), Clear Glaze Pen, Glossy Accents, Silver Glitter Pen, Gems, Masking Sheets, Funky Foam

Hope you like them.

Big hugs

Janine x

Tuesday, 6 March 2018

Whimsy Stamps Inspiration Post - March (Wk 2)

Hi lovely peeps 💜

Today it's my turn to share a little Whimsy inspiration with you using one of our fabulous digital stamps.  I thought I would create a little Easter card, plus I love colouring up Crissy Armstrong's little bunnies, if you hadn't already guessed. This gorgeous little digital stamp is called 'Basket Of Bunnies' and ideal for Easter or for a new baby card. In additional to the stamp I used dies and papers from my own stash, and I created the sentiment myself.

All the links to the Whimsy products can be seen below. I hope you like it.


Here's What I Did
I covered a 6" x 6" card blank with some Easter themed patterned paper. From the same paper pad I die cut out a square rounded corner and added this to the card front.

The bunnies and the sentiment was printed straight onto colouring card stock and hand coloured with Copic pens. When the images was completely coloured in, it was attached flat to the card front and a clear glaze was added to the bunnies noses and eyes.

To complete the card a die cut embellishment was added using a die cut doily circle, dotted circle and a rabbit cut from glitter card.

Here's What I Used
Digital Stamp: Basket Of Bunnies'

Other:
6" x 6" Card Blank, Neenah Card, Orange & White Card, Orange Glitter Card, Sakura Clear Glaze Pen, Square Rounded Corner Dies (Tattered Lace), Double Dot Square & Circle Dies (Crealies), Circle Doily Edge Dies (Tattered Lace), Easter Mini Dies (Xcut), Trimcraft 'Springdrop' Paper Pad
Copics: Bunnies - W0, W1, W3, E02, E41, R20 / Basket - E33, E51, E53 / Bow - YR04, YR31, Y17 / Ground - B0000, B000

I'll see you all next week with more Whimsy wonderfulness.

Why not, follow us on Facebook group, Pinterest, Instagram or on our Blog we'd loved to see you.

Don't forget to join in with our 'Anything Goes' challenge, it will start on March 15th.

Thank you so much for dropping by, don't forget to say hi :)

Challenges entered:

Hugs

x Janine x

Saturday, 3 March 2018

Whimsy Stamps - March Release #2

Hi again peeps ðŸ’œ

I hope you like the new image I posted from Whimsy's new release the other day. Well here's another one for you....this time it's an Easter penguin. I just think it's totally adorable. I kept my card CAS so that you could see how cute it is.

The cute digital stamp I used is called 'Penguin Easter Bunny' and the rest of the card are bits and pieces from my crafty stash. All the links to the specific Whimsy products can be found below and the link to the general store is here.


Here's What I Did
I trimmed a square of patterned paper from my stash, edged it with ink then attached it to my card front.

The penguin digi stamp was printed directly onto some colouring card stock and coloured with Copic pens. White pen was added to the bow and small Easter egg. The completed image was then die cut into an oval, and pink and blue ink was sponged around the edges. When the topper was dry it was matted onto a lilac oval die cut. The completed topper was then added to the card front, along with a printed sentiment die cut into a banner; foam pads were added to raise it up.

To complete the card a die cut Easter egg cut from white glitter card and a few lilac pearls were added.

Here's What I Used
Digital Stamps: 'Penguin Easter Bunny'

Other: 6" x 6" Card Blank, Tonic 'Home Sweet Home' Oval Dies, Lilac Card, Colour Cloud Inks - Rose Blush & Summer Sky', Neenah Card, Graphics Program & Printer, Foam Pads, Lilac Pearls, White Glitter Card, Lawn Fawn 'Everyday Sentiment Banners' Dies, First Edition 'Spring Drop' Paper Pad, Xcut 'Easter' Mini Dies

Copics: Penguin - W0, W1, R000, R11, C3, C5, C7,0 / Beak & Feet - Y02, Y08, YR15 / Bunny Ears - C0, C1, R000, R11, R20, 0 / Basket - E31, E33, R11, R20, R22, Y02, Y08, YR15 / Ribbons & Egg - V01, V06, V12

Don't forget to join in with our 'Anything Goes' challenge #104, when it starts this month. Watch this space for the  link.

Why not, follow us on Facebook group, Pinterest, Instagram or on our Blog we'd loved to see you.

Thank you so much for dropping by, don't forget to say hi :)  I'll be back on Saturday 3rd March with another new release digi stamp....see you then.

Challenges entered:

Hugs

x Janine x

Wednesday, 28 February 2018

Whimsy Stamps - March Release #1

Hello peeps ðŸ’œ

Well it's the 1st day of March and it's Whimsy time. So today I'm sharing one of the new images in the March release, and it's perfect for St Paddy's Day, which is on Saturday 17th March.

This fabulous digital stamp is called 'Penguin Lucky Shamrock' and the fabulous digital paper is part of a collection called 'Distressed Polka Dots' and 'Snowdrops'. All the links to the specific Whimsy products can be found below and the link to the general store is here.


Here's What I Did
In my graphics program I created a shamrock cut out in the polka dot digital paper and placed a pale green pinstriped digital paper behind it so it would show through. Text was added to the top left of the paper, and printed out.  the paper was trimmed and added to a black mat, then attached to the card base.

The penguin digi stamp was printed 3 times onto colouring card stock, coloured with Copic pens and fussy cut out. The first penguin was completely cut out and only his feet was coloured in, the 2nd one had his whole body coloured in, and everything was cut out minus his feet; then the 3rd penguin had it's head coloured in and cut out. Everything was then layered up using foam pads and added to the card front.

To complete the card a glossy accents was added to the pint glass and glitter pen added the hat buckle.

Here's What I Used
Digital Stamps: 'Penguin Lucky Shamrock'
Digital Papers: 'Distressed Polka Dots' and 'Snowdrops' Digital Paper Collections

Other: 6" x 6" Card Blank, Black Card, Neenah Card, Graphics Program & Printer, Super Smooth Paper, Glossy Accents, Foam Pads, Gold Glitter Pen

Copics: Penguin - WO, W1, R000, R11, C1, C3, C 5, C7 / Waistcoat & Hat - YG03, YG17, YG67 / Beer & Glass - W1, W2, E31, E33 / Beak & Feet - Y02, Y08, YR15 / Shamrock - YG01, YG17, YG23

Don't forget to join in with our 'Anything Goes' challenge #104, when it starts this month. Watch this space for the  link.

Why not, follow us on Facebook group, Pinterest, Instagram or on our Blog we'd loved to see you.

Thank you so much for dropping by, don't forget to say hi :)  I'll be back on Saturday 3rd March with another new release digi stamp....see you then.

Challenges entered:

Hugs

x Janine x

Wednesday, 21 February 2018

Whimsy Stamps Inspiration Post (Week 4)

Hi lovely peeps 💜

Today it's my turn to share an inspirational card with you using one of the cute digital Whimsy stamps.  The digital stamp I've used is called 'Bunnies Brushing Teeth' and I've been dying to use it from the day I started with Whimsy. Isn't it the thing you've ever seen.

All the links to the Whimsy products can be seen below. I hope you like it.


Here's What I Did
I matted a 5" x 5 Kraft" card blank with pretty patterned paper leaving a slim border.  The image was sized and printed directly on Neenah colouring card, and coloured using Copic pens. The completed image was die cut into a circle and added to the doily edged circle which I cut from pink card, and both were added to the card front using foam pads. The word 'friend was die cut from coloured card and glued above the rabbits. Clear glaze pen was added to the noses and eyes of the rabbits to bring them to life.  Clear glitter was also added to the toothbrush.

To complete the card, 3 banners were die cut from coloured card, patterned paper and Kraft card, trimmed and glued together then attached to the top left corner of the card front along with as a few pearls.

Here's What I Used
Digital Stamp: 'Bunnies Brushing Teeth'

Other:
5" x 5" Kraft Card Blank, Cut & Make 'Friend' Die, Foam Pads, MFT Banner Die, Tattered Lace Doily Edge Circle Die, Crealies Double Dot Circle Die, Trimcraft 'Spring Drop' Paper Pad, Salmon Pink Card, Kraft card, Neenah Card, Graphics Program, Sakura Clear Glaze Pen, Crystal Glitter, Pearls

Copics: Bunnies - E02, E31, E33, E51, R20, R22, C2, C5, W02 / Toothbrush - E02, R20, R22 / Background - B0000, B000 / Ground - W0, W1, W2, W3

I'll see you all next week with more Whimsy wonderfulness.

Why not, follow us on Facebook group, Pinterest, Instagram or on our Blog we'd loved to see you.

We're having a little break on our challenge blog this month, but make sure you join us in March for #104.

Thank you so much for dropping by, don't forget to say hi :)

Challenges entered:

Hugs

x Janine x

Friday, 9 February 2018

Whimsy Stamps Inspiration Post - February (wk 2)

Hi lovely peeps 💜

Today it's my turn to share an inspirational card with you using one of the fabulous digital Whimsy stamps and papers.  This little cutie pie is called 'Bunny Boxers' which very apt, and the digi papers I used come from the Hearts Galore collection and Amour collection, which are beautiful. When I made this card I had my hubbie in mind, so I plan to give it to him for Valentines so I kept it CAS. The bunny was actually coloured digitally, which is a first for me, and I'm still learning how to use it. I used my new Ipad Pro (a Xmas present from my hubbie) and a fabulous app called Procreate.

All the links to the Whimsy products can be seen below. I hope you like it.


Here's What I Did
I attached a piece of red mirror card to a 7" x 7" card blank leaving a slim border. The patterned paper was printed directly onto thin white card and trimmed down to leave a slim border; a heart was die cut into the centre. The card was attached to the card front using foam pads to raise it up.

The bunny was hand coloured digitally using an Ipad Pro, Apple pencil and the Procreate App. When completed the bunny was printed and cut out, then a glaze pen was used on the hearts on his boxer shorts. The bunny was attached to the front of the aperture - it was glue flat onto the patterned card and foam pads added where the bunny lay over the mirror card. The words 'I Love U' and a few hearts were die cut from patterned paper and glued flat inside the aperture.

To complete the card 3 red enamel were added to the top left corner of the card front.

Here's What I Used
Digital Stamp: 'Bunny Boxers'
Digital Papers: 'Hearts Galore' and 'Amour'

Other:
7" x 7" Card Blank, Red Mirror Card, Thin White Card, Joanna Sheen Super Smooth Card, Red Enamel Dots, Sizzix Heart Dies, Cut & Make 'Love' Die, Diamond Press 'Block Alpha Capitals', Diamond Press 'Love Today' Dies &B Stamps, Foam Pads, Graphics Program, Ipad Pro, Ipad Pencil, Procreate, Sakura Clear Glaze Pen

I'll see you all next week with more Whimsy wonderfulness.

Why not, follow us on Facebook group, Pinterest, Instagram or on our Blog we'd loved to see you.

Don't forget to join in with our 'Anything Goes' challenge #103, you still have time - here is the link.

Thank you so much for dropping by, don't forget to say hi :)

Challenges entered:

Hugs

x Janine x

Monday, 5 February 2018

For The Love Of Stamps By Hunkydory - February Laucnh

Afternoon everyone

Today I'm sharing my 10 Design Team samples for the February launch of the 'For The Love Of Stamps' By Hunkydory. The collection this month was a mixed bag of goodies, everything from Cops to Cake. The stamps launched on Create & Craft TV on Saturday and sold out in about 45 minutes, it was amazing. However, the stamps are available from Hunkydory Crafts, you can find them along with the masks and magazine here.

Due to the number of cards I've produced I am unable to write up a tutorial for each one as my post would go on forever. So if you want to know anything about the cards I've created please either email me or leave me a comment plus your email address, and I'll post the details on here. :) I have still posted a list of all the products I used.


I Used:
February Launch Stamps & Masks - You're Nicked, A Slice Of Happiness, Totally Quackers
Cardstock, Paper Pads, Masks etc - Adorable Scorable Matt-tastic, Hunkydory Card Blanks, Hunkydory Kraft Card, Ink Me Card, Colour Me CardPretty Pastels, Perfectly Natural, Splendid Stripes, Polka Dots (Out Of Stock) Paper Pads, Black Stamping Card, Fantastic Firework Mask

Some of the above products can also be purchase on Create & Craft's website.

Other: Copic Pens, Zig Clean Color Pens, My Own Card Blanks, Enamel Dots, Crystal Glitter, Circle Dies (Tattered Lace), Square Die (Tattered Lace), Oval Dies (Tattered Lace), Fishtale Banner Die (Lawn Fawn), Red & Silver Mirror Card, Clear Overlay Glitter Pen, Distressing Inks, Oxide Inks, Peach Glitter Card, Collall Tacky Glue Foam Pads, White Embossing Powder, Brick Embossing Folder (Crafter's Companion), Pearls, Black Fine Liner Pen,  Sparkle Pens, Martha Stewart Border Punch, Versamark Ink, Versafine Black Ink, Memento Black Ink, Watercolour Card (Crafter's Companion), Clear Glaze Pen, Cloud Template, Graphics Program, Glossy Accents, Silver Glitter Pen, Corner Rounder

Hope you like them.

Big hugs

Janine x

Saturday, 3 February 2018

Whimsy Stamps - February Release #2

Hi guys 💜

Today I'm sharing the second of my Design Team cards for the new February release stamps and papers from Whimsy Stamps. There's lots of new stuff in both digital and rubber, plus dies and stencils.  Everything is just stunning. x

For today's card I'm using the most sweetest little gnome and his home :) and one of the new digital papers. I coloured everything with Copic pens.  All the links to the specific Whimsy products can be found below and the link to the general store is here,


Here's What I Did
A piece of aqua coloured card was trimmed and attached to a 7" x 7" white card blank. A frame was created from strong white card using a large square die, then a smaller die cut into the centre to create the aperture, This was repeated using white funky foam, and the pair were glued together using strong glue. The patterned paper was printed out and the stamped and coloured images were added to it.
 
White pen was used to highlight the dots on the toadstools, and a glaze pen was added over the top. A little crystal glitter was added to the centre of each of the sunflowers.

The completed topper and frame was glued to the card front, and to finish off enamel dots were added to the top and bottom of the frame.

Here's What I Used
Digital Papers: 'Aqua and Pink Mix' Paper Collection
Clear Stamps: 'Gnome Sweet Gnome'

Other: 7" x 7" Card Blank, Copic Pens, Aqua Card, Sheena Douglas Stamping Card, Neenah Card, Tattered Lace Square Dies, Crystal Glitter, Graphics Program, Super Smooth Paper, Sakura Glaze and White Pen, Enamel Dots, Collall Tacky Glue

Copics: Sunflowers - Y06, Y08, Y17, Y38 / Leaves/Grasses - YG01, YG03, YG05, YG17 / Plant Pot Home - YR04, YR07, E08, R27 / Toadstools - R14, R32, R37,  E43, E71, E77 / Flowers - Y02, Y17 / Snail - E43, E71, E77, BG10, BG15, BG49 / Stones - E43, E71, E77 / Gnome - E000, R20, R30, W0, E43, BG10, BG15, BG23, BG49

Don't forget to join in with our 'Anything Goes' challenge #103, you still have time - here is the link.

Why not, follow us on Facebook group, Pinterest, Instagram or on our Blog we'd loved to see you.

Thank you so much for dropping by, don't forget to say hi :) I'll be back tomorrow with more Whimsy wonderfulness.

Challenges entered:

Hugs

x Janine x

Thursday, 1 February 2018

Whimsy Stamps - February Release #1

H everyone ðŸ’œ

Today I'm sharing the first of my Design Team cards showing off one of the new February release images from Whimsy Stamps. there are loads both in digital and rubber plus dies and stencils.

For my 1st card I'm using the cutest little kitten digi stamp, it's call 'Very Present Helpers'...mmm, I'm not sure they're helping very much to be honest....but they are cute. Lol  hope you like it. (the photos are shown on different angles...honestly. Lol)

All the links to the specific Whimsy products can be found below and the link to the general store is here.


Here's What I DidI used pretty shaped card base, and thankfully I have a die set that matches it prefect so I die cut a mat from Kraft card and edged it with pink Oxide inks. The paper was printed onto smooth paper and die cut small than the Kraft mat and again edged with oxide ink. Both mats were added to the card base.

The kitten digi stamp was printed onto colouring card stock and die cut into a circle. Oxide inks was added to the edge of the circle to draw the eye in. The kittens were coloured using Copics and dots were added to the parcel using a white pen. To complete the image clear glitter was added to the parcel ribbon and bow.

Three die cut banners were attached to the circle topper and shaped to match the circle, this was finished off using a pink enamel dot. The finished topper was attached to a die cut scalloped circle and added to the card front using foam pads.

To complete the card a clear glaze pen was used on the eyes and noses of the kittens.

Here's What I Used
Digital Papers: 'Gingham Mix' Paper Collection
Digital Stamps: 'Very Present Helpers'

Other: Shaped Card Blank, Kraft Card, Colouring Card (Joanna Sheen), MFT 'Banner' Die, Crystal Glitter, Go Kreate 'Frilly #10' Die, Tonic 'Have A Beautiful Day' Die, Crealies XXL 'Stitched Circle' Die, Graphics Program, Super Smooth Paper, Pink & Red Card, 'Candied Apple' & 'Abandoned Coral' Oxides, Sakura Glaze and White Pen
Copics: Kittens - WO, W3, W5, R11, R14 / Present - R11, R32, R37 / Ribbon - R14, R17, R20, R22

Don't forget to join in with our 'Anything Goes' challenge #103, you still have time - here is the link.

Why not, follow us on Facebook group, Pinterest, Instagram or on our Blog we'd loved to see you.

Thank you so much for dropping by, don't forget to say hi :) I'll be back tomorrow with more Whimsy wonderfulness.

Challenges entered:

Hugs

x Janine x