Showing posts with label Mother's Day. Show all posts

Sunday, 19 March 2023

Lili Of The Valley - Alphabet Bunnies #2

 Happy Mother's Day

To all the mums out there in the world and the ones in our thoughts - Happy Mother's Day. Just remember how special you are. xxx

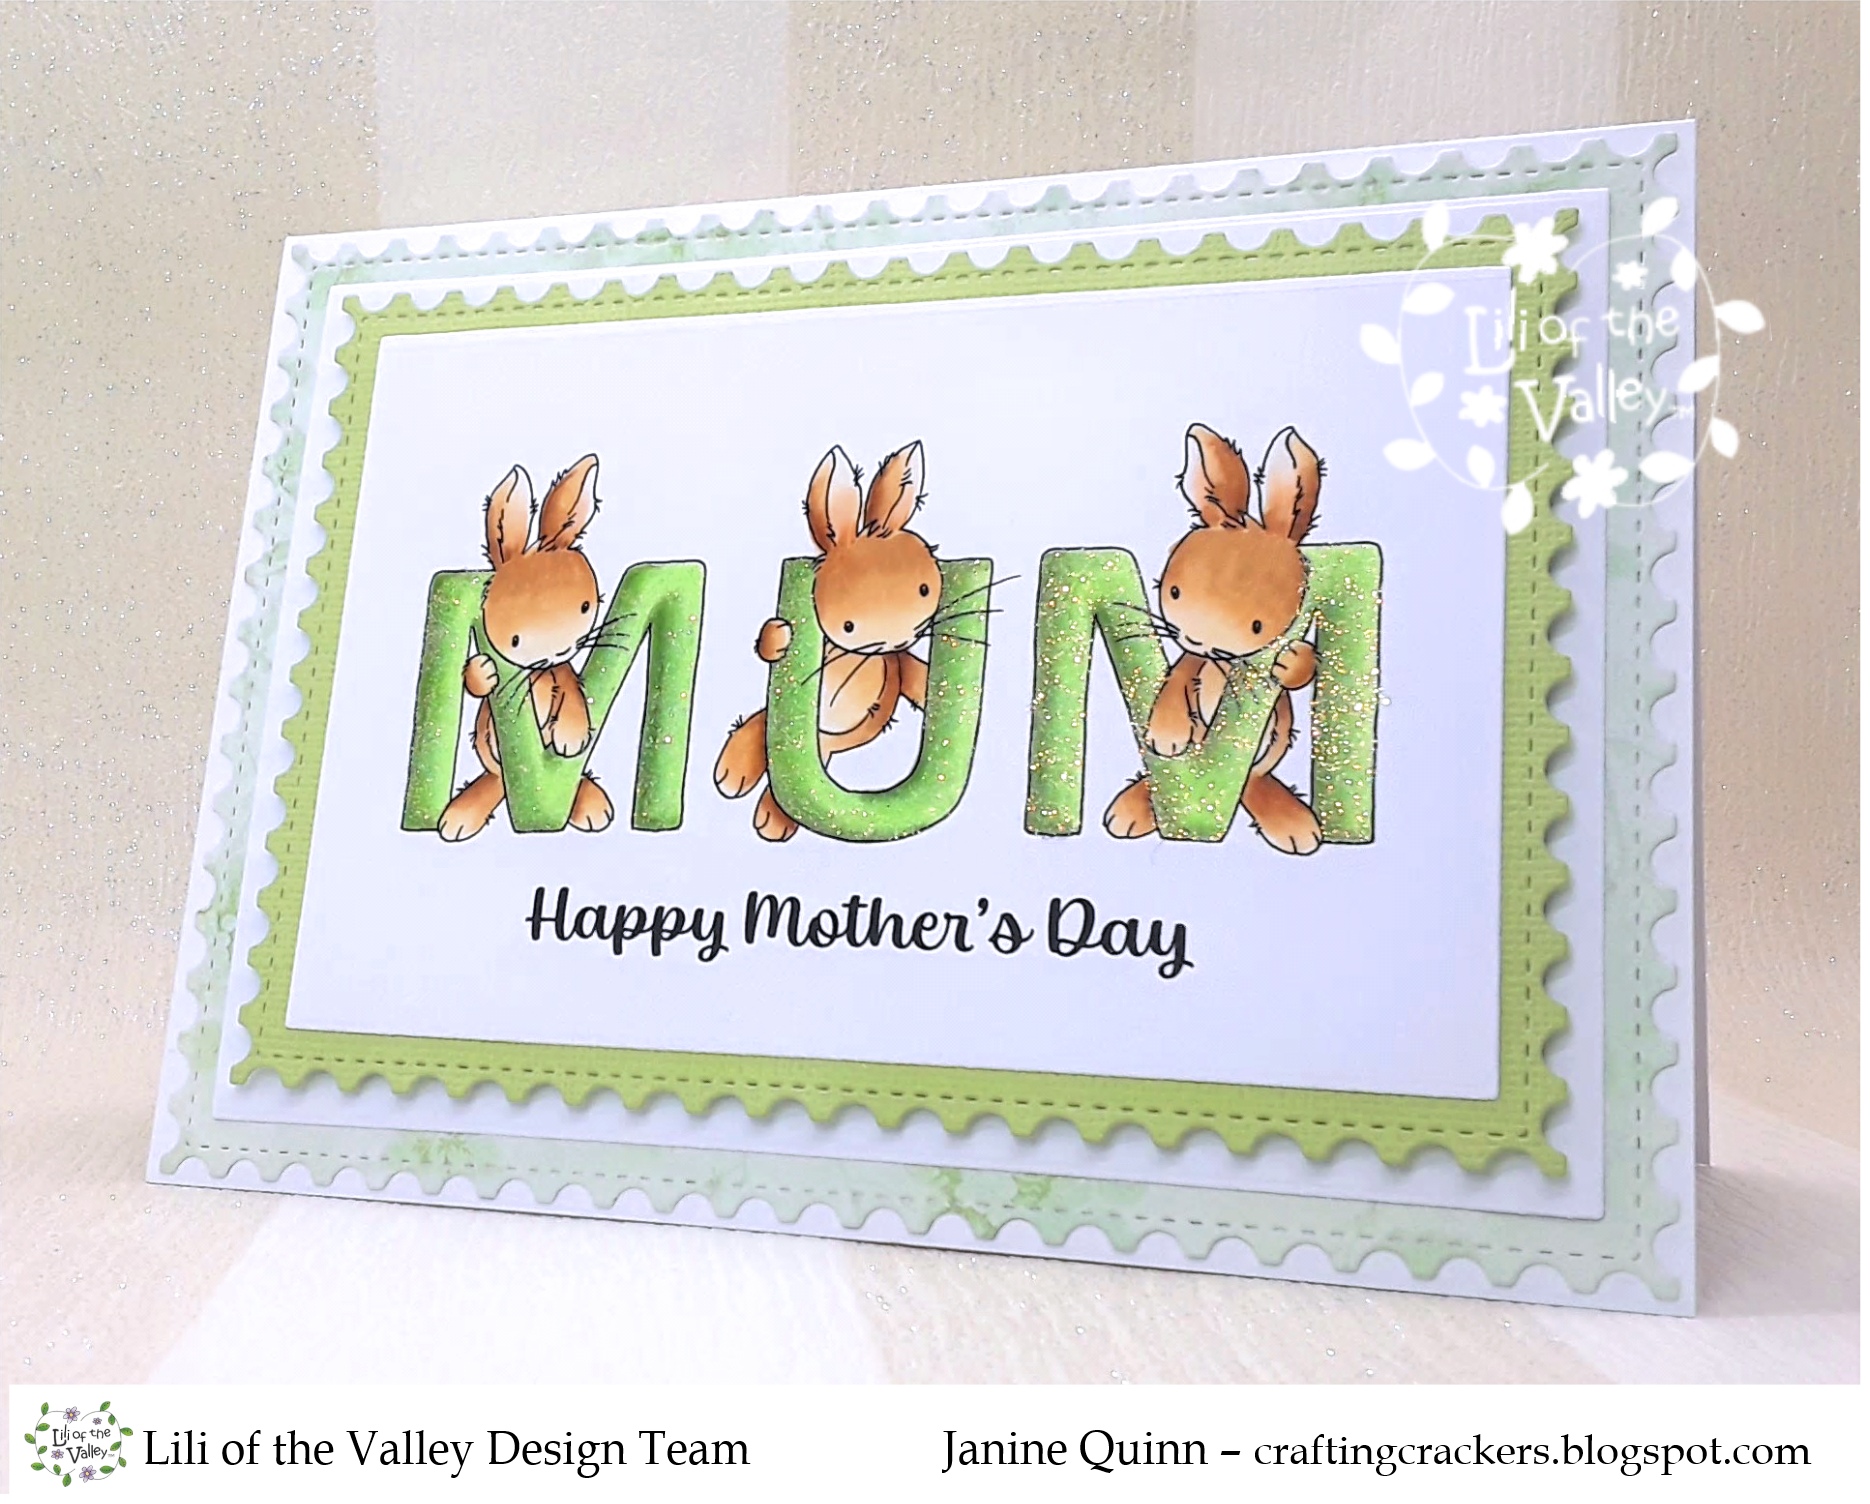
Well I'm back as promised, with another sneak peak of the new Lili Of The Valley 'Bunny Alphabet' polymer stamps and digi stamps launch. As mentioned yesterday the launch will take place on Create & Craft TV on Monday 20th @ 5pm (GMT), and then in the LOTV Etsy store soon after.  The bunnie letters work brilliantly both singularly as shown yesterday or combined together as shown in the card below, and are perfect for every occasions.

For today's card I created a Mother's Day card in memory of my lovely mum who I lost a few years ago....she would've loved these little bunnies. As I used the digital version of the stamps I used the letter 'M' twice and flipped one of them, and added the letter 'U'. I also enlarged the letters a little. I used Copic pens to colour everything up, I just loved using green with white together as it makes for such a crisp and clean card. I hope you like it. 

For your information, here is the link to the LOTV Online  Shop and the LOTV Etsy Store to check out all the stampsFYI you can use both sites to purchase the stamps. 


Here's What I Did & Used
A piece of pretty green patterned paper was die cut using a large postage edged rectangle frame die; the rectangle was glued flat to the front of a top fold 5" x 7" card blank. A slightly smaller straight edged rectangle cut from white card was stuck into the centre of this. 

I imported the 2 'M' letters and the 'U' into my software program and flipped one of the M's, and then typed up a sentiment. I resized all the elements to fit my project. I printed out everything onto Copic friendly card, and coloured it up using my pens. The completed scene was die cut into a rectangle and matted onto a postage edged frame cut from green card, and funky foam was added to the back. To finish the card, I added glitter to all the letters to make it sparkle. 

Polymer Stamp Set: Bunny Alphabet 
Digi Stamp Set Bunny Alphabet

Copic Pens: Bunnie - E50, E53, E57, E31, E33, R30 / Letter M & U - YG11, G21, G82, G94

Other: 5" x 7" White Card Blank, Make It Colour Card, Green & White Card, 'My Sweet Provence' Paper Pad (Lemoncraft), 'Nobel Collection-Postage Stamp Frame'' Die Set (Creative Expressions),  Clear Glitter, Double Sided Tape, Funky Foam, Glue
(Font use for typed sentiment -Baguet Script)

If you wish to ask a question about any of my cards please leave me a message in the comment with your email address, otherwise I cannot contact you. Alternatively email me at jsnine.quinn@gmail.com

Or why not join us on social media at  'We Love Lili Of the Valley' Facebook Group run by the Design Team, the official Lili Of The Valley Facebook page and on Instagram.  We'd loved to see you.

Please Note - I am part of the Lili Of The Valley's Design Team and I receive their lovely images to play with and share with you; I do not receive any monetary reimbursement for my samples, however on occasion I receive a free stamp set as a thank you gesture for my advertisements or participation. I do, what I do for fun and relaxation. Thank you. x

Thank you so much for dropping by, and please don't forget to say hi :)  I'll be back soon with more sneaky peeks of the fabulous new LOTV Love stamps. TTFN

Hugs

x Janine x

Saturday, 19 March 2022

Amanda Jayne Designs - Belle Holding Magnolia

Hi there

I recently shared a bear in a bunny outfit card that I made for Amanda Jayne Designs as a Guest Designer. Well a few days ago I was asked by Amanda if I would join her new Design Team, and I said yes. So as promised I have another card to share with you, this time with a cute bunny digi stamp, paper and sentiment. Next week I have another AJD card to share with you, after that I will be sharing one card/project a month alongside my other DT duties. 

For today's card I used a cute bunny digi stamp called 'Belle Holding Magnolia', one of the papers from the 'Crochet Hearts' paper collection plus a Mother's Day sentiment. To add colour to the images I used my Copic pens. The digi stamp and lots of other fabulous design are available in her Etsy store, where there's an offer on atm - buy 3 and get 10% off or buy 5 and get 25% off, so grab yourself a bargain. I hope you like it. (For sale - £4.50 + P&P - requests by email please)  

For your information, here is the link to the Amanda Jayne Designs Etsy Store to check out all the digi stamps and papers.


Here's What I Did
First I printed off the pretty crochet paper onto some good quality printer paper, then added it to the card front leaving a slim border around the edge. 

I imported the little bunny and the Grandma sentiment into my software, and then resized them both to fit my project. The design was printed onto colouring card then die cut into an rectangle, Copic pens were used to colour it. The finished picture was glued to an rectangle mat cut from pink card, then funky foam was added to the back.

The topper, die cut flowers and leaves were attached the centre of the card. To finish off I added large pink pearls to the centre of the flowers, and smaller pearls and gems around the bunny.  

Here's What I Used 
Digi Stamps: 'Belle Holding Magnolia'
Digi Paper: Crochet Hearts
Digi Sentiment: Mother's Day sentiment

Copic Pens: Bunny - E31, E33, E35, R11, R20 / Flowers & Grass - RV10, RV13, RV14, YG01, YG03, YG17, Y15

Other: 6" x 6" White Scalloped Card Blank, Make It Colour Card, Pale Pink, Deep Pink & Green Card, Cherish The Moment Rectangle Frame Set (Tonic), Stitch Bloom Dies (MFT), Botanicals - Vintage Lace Die Set (Crafter's Companion), Fabulous Flower Dies (Hunkydory), Funky Foam, Pink & White Pearls, Gems, Glue, Double Sided Tape, White Pen

We have a lovely facebook group called Amanda Jayne Design Inspiration Group, or why not follow Amanda Jayne Designs on Instagam @amandajaynedesigns

If you wish to ask a question about any of my cards please leave me a message in the comment with your email address, otherwise I cannot contact you. Alternatively email me at jsnine.quinn@gmail.com

Please Note - I am Guest Designing for Amanda Jayne Designs and I receive her lovely digi images to play with and share with you; I do not receive any monetary reimbursement for my samples, advertisements or my participation. I do, what I do for fun and relaxation. Thank you. x

Thank you so much for dropping by, and please don't forget to say hi :)  I'll be back soon with more cards using Amanda Jayne Designs stamps. TTFN

Hugs

x Janine x

Wednesday, 16 March 2022

Amanda Jayne Designs - Bertie Bear In Bunny Suit

 Hi there

Today I'm wearing another hat so to speak, as I'm Guest Designing for Amanda Jayne Designs. The lovely Amanda has designed some gorgeous new digi stamps, sentiments and papers and asked if I would create some cards with them, so of course I said yes. 

I have 3 cards to share with you over the next few days, starting with the one below - I used the sweet bear stamp 'Bertie Bear In Bunny Suit', on e of the papers from the 'Crochet Hearts' paper collection and a Mother's Day sentiment. To add colour to the images I used my Copic pens. The digi stamp and lots of other fabulous design are available in her Etsy store, where there's an offer on atm - buy 3 and get 10% off or buy 5 and get 25% off, so grab yourself a bargain. I hope you like it. (For sale - £4.50 + P&P - requests by email please)  

For your information, here is the link to the Amanda Jayne Designs Etsy Store to check out all the digi stamps and papers.


Here's What I Did
First I printed off the pretty crochet paper onto some good quality printer paper, then added it to the card front leaving a slim border around the edge. 

Next using my software I used the same paper and digitally cut out a heart shape then added a shadow behind it. A sentiment was also added and placed beneath the heart, both elements were resized so they would fit a 4½" x 4½" square. The complete image was printed directly onto white card, then die cut into a fancy edged square. Funky foam was added to the back of the square and glued to the centre of the card front.

Using my software again I imported the bear and resized it so it would fit inside the heart, then printed it onto colouring card stock. I coloured the bunnie using Copic pens, then fussy cut it out. The cut out bear was glued to the centre of the heart.

To finish the card I added a few pearls to the top of the card plus a little blue heart near the sentiment.

Here's What I Used 
Digi Paper: Crochet Hearts
Digi Sentiment: Mother's Day sentiment

Copic Pens: Bears - E31, E33, E35, R11, R20 / Bunny Suit - C0, C1 / Flowers & Grass - B0000, B12, B14, YG01, YG03, YG17

Other: 6" x 6" White  Card Blank, Make It Colour Card, Blue Glitter Card, Decorative Nested Square Die Set (Craft Buddy), Heart Die (MFT), Funky Foam, Blue Pearls, White Pen, Glue, Double Sided Tape

If you wish to ask a question about any of my cards please leave me a message in the comment with your email address, otherwise I cannot contact you. Alternatively email me at jsnine.quinn@gmail.com

Or why not follow Amanda Jayne Designs on Instagam @amandajaynedesigns

Please Note - I am Guest Designing for Amanda Jayne Designs and I receive her lovely digi images to play with and share with you; I do not receive any monetary reimbursement for my samples, advertisements or my participation. I do, what I do for fun and relaxation. Thank you. x

Thank you so much for dropping by, and please don't forget to say hi :)  I'll be back soon with more cards using Amanda Jayne Designs stamps. TTFN

Hugs

x Janine x

Tuesday, 2 March 2021

Lili Of The Valley - Mother's Day Collection 2021 #1

Hi everyone

How are you all doing? Are you all still coping with the pandemic and the all lockdowns/restrictions? I do hope so. Fingers crossed with all the vaccinations going on around the world, especially here in the UK we will get back to a new 'normal' very soon. I miss my daughter and her partner who I haven't seen in person for over a year, and I miss going out with my hubbie and friends for a coffee and a slice of cake. I hit the big '60' next month and it looks like it's going to be a quiet celebration...just me and hubbie. Bang goes my plans of a cruise holiday etc, a pamper day or a little tea party with friends and family. Awww well! But hey-ho I might get my vaccination for my birthday instead...how cool will that be.

Anyhow onto my card, today I'm sharing a sneaky peak of a new digi stamp, paper and sentiment from Lili Of The Valley. The Mother's Day/Spring/Easter collections will be launched in their Etsy shop this Thursday (4th March). For my card I have used the 'Shoes, Shoes, Shoes' stamp, 'Purple Damask' paper and a sentiment from the 'Simply Cute' set. I used Copic pens to colour with. I hope you like her. (This card will be available to buy in my Etsy store)

For your information, here is the link to the LOTV Etsy Store to check out all the digi stampsand the LOTV online store to check out the rest of their goodies.


Here's What I Did
To start with I printed off a the digital paper onto smooth printer paper and trimmed it down. I added the paper to the front of a 5" x 5" card blank, leaving a slim border around the edge. 

Using my graphics software I imported the gorgeous little girl image and a sentiment, then resized them to fit my project. The image and sentiment were printed directly onto colouring cardstock and die cut with doily circle die - the centre section popped out. The image was coloured in using Copic pens and mounted onto a lilac die cut circle. Foam were added to the back of the circle topper and attached to the centre of the doily frame. To finish the card I added the sentiment and a die cut flower and leaves. 

Here's What I Used
Digital Stamp: Shoes, Shoes, Shoes
Digital  Paper: Purple Damask 
Digital Sentiment: Simply Cute

Copic Pens: Skin - E000, E00, E01, E11 / Hair - E34, E99 / Hat, Dress, Shoes - V01, V04, V06, V12, V15, V17 / Socks - B0000, B000 / Presents -V01, V04, V06 Y15, Y17 / Ground - W0, W2, W3

Other: 5" x 5" White Card Blank, Make It Colour Blending Card, Fabulous Flower Dies (Hunkydory), Doily Circle Die (Joy! Crafts), Cosmos Flower Dies (Creative Expression), White Card, Lilac Card, Flower Gem, White Pen, Glue, Double Sided Tape, Foam Pads

Or why not join us on social media at  'We Love Lili Of the Valley' Facebook Group run by the Design Team, the official Lili Of The Valley Facebook page and on Instagram.  We'd loved to see you.

Please Note - I am part of the Lili Of The Valley's Design Team and I receive their lovely digi images to play with and share with you; I do not receive any monetary reimbursement for my samples, advertisements or my participation. I do, what I do for fun and relaxation. Thank you. x

Thank you so much for dropping by, and please don't forget to say hi :)  I'll be back soon with more sneaky peeks of the fabulous new LOTV Spring stamps. TTFN

Challenges entered:

Hugs

x Janine x

Sunday, 23 February 2020

Lili Of The Valley - Mother's Day/Spring Collection Sneak Peak #2

Hi everyone

I'm back with another sneaky peak of another 2 digi stamps from the 'Mother's Day/Spring' collection, being launched by Lili Of The Valley (LOTV) in their Etsy store on Tuesday 25th February.  As mentioned in my previous post, the new digi stamps include lots of sweet images and sentiments perfect for Mother's Day, Easter, Birthdays etc. :) You're going to love the new collection, the stamps and sentiments are fabulous.

For this card, I've used one of the pretty images called 'A Little Lovewhich I coloured with Copic pens and one of the new sentiment 'With Love On Mother's Day'. I will add the links to the new stamps once the launch has taken place.I hope you like it. x

For your information, here is the link to the LOTV Etsy Store to check out all the digi stampsand the LOTV online store to check out the rest of their goodies.


Here's What I Did
Using my graphics software I imported the sweet bunnie digi stamp and then resized and printed it directly onto colouring cardstock. The image was die cut it into a rectangle and coloured using Copic pens. Glitter was added to the hearts and flowers.

The sentiment was imported into my graphics software and resized, this was then printed directly onto some pretty patterned paper. Using the same same die as before, the patterned paper was cut into a rectangle, and the top section was cut off using a curved die. The paper was glued to the top section of the rectangle containing the coloured image.  Funky foam was attached to the back of the rectangle and then added to the card front.

To finish the card heart stick on embellishments were added around the sentiment.

Here's What I Used
Digital Stamp: A Little Love
Digital Sentiment Stamp: With Love On Mother's Day 

Copic Pens: Rabbit Fur - E31, E33, E50, R20 / Dresses - Y11, Y15, Y17, YR23 / Grass - YG01, YG03, YG17 / Flowers - R27, YR16 / Hearts - R22, R27

Other: 5" x 7" White Card Blank, Make It Color Blending Card, 'Wallflower' Paper Pad (The Works), Nobles Dies - Double Pierced Background Rectangle (Creative Expressions), Simple Stitched Hillside Border Die (Lawn Fawn), Glitter, Heart Stickers, Glue, Double Sided Tape, Funky Foam

Or why not join us on social media at  'We Love Lili Of the Valley' Facebook Group run by the Design Team, the official Lili Of The Valley Facebook page and on Instagram.  We'd loved to see you.

Please Note - I am part of the Lili Of ~The Valley's Design Team and I receive their lovely images to play with and share with you; I do not receive any kind of payment for my samples or my participation. Thank you. x

Thank you so much for dropping by, and please don't forget to say hi :)  I'll be back soon with more sneaky peeks of the fabulous new LOTV Love stamps. TTFN

Challenges entered:

Hugs

x Janine x

Saturday, 22 February 2020

Lili Of The Valley - Mother's Day/Spring Collection Sneak Peak #1

Hi everyone

I'm excitingly sharing a fabulous peak at 2 of the new digi stamps from the 'Mother's Day/Spring' collection, being launched by Lili Of The Valley (LOTV) in their Etsy store on Tuesday 25th February.  The new digi stamps include lots of sweet images and sentiments perfect for Mother's Day, Birthdays, Easter...or just because. :) You're going to love the new stamps and sentiments they're absolutely gorgeous.

So for my card today, I've used one of the pretty images called 'Time For You' which I coloured with Copic pens and one of the new sentiment 'For A Special Mum'. I will add the links to the new stamps once the launch has taken place.I hope you like it. x

For your information, here is the link to the LOTV Etsy Store to check out all the digi stampsand the LOTV online store to check out the rest of their goodies.


Here's What I Did
I trimmed down a piece of pretty patterned paper, and added it to the front of my 6" x 6" white card blank, leaving a border around the edge.

I imported the pretty girl digi stamp and the sentiment into my graphics program, then resized them to fit my project. The image was then printed directly onto colouring card stock and die cut into a circle. The image was coloured in using Copic pens, then glitter was added to the butterflies and flowers.

The completed picture was added to a die cut scalloped circle cut from orange card. The topper was mounted onto the front of the card using foam pads to add a little height.  To finish my card I added a few gems at the top and bottom of the card.

Here's What I Used
Digital Stamp: Time For You 
Digital Sentiment Stamp: For A Special Mum 

Copic Pens: Skin - E000, E00, E02, E11 / Hair - C3, C5, C7, 100 / Hat, Butterflies & Mug - YR23, YR31, Y35, Y38 / Flowers & Leaves - Y02, Y08, Y17, B000, B00, B02, YG01, YG03, YG17, RV10, RV13, RV14, V01, V04

Other: 6" x 6" White Card Blank, Make It Color Blending Card, 'Wallflower' Paper Pad (The Works),  Orange Card, Stitched Collection - Scallop Circle Dies (Creative Expressions), Glitter, Glue, Double Sided Tape, Gems

Or why not join us on social media at  'We Love Lili Of the Valley' Facebook Group run by the Design Team, the official Lili Of The Valley Facebook page and on Instagram.  We'd loved to see you.

Please Note - I am part of the Lili Of ~The Valley's Design Team and I receive their lovely images to play with and share with you; I do not receive any kind of payment for my samples or my participation. Thank you. x

Thank you so much for dropping by, and please don't forget to say hi :)  I'll be back soon with more sneaky peeks of the fabulous new LOTV Love stamps. TTFN

Challenges entered:

Hugs

x Janine x

Sunday, 26 March 2017

Crafter's Companion Inspirers Design Team - March Project #3

Happy Mother's Day Everyone

To all the mum's out there, and for all the mum's we've loved and lost, we love you!


For my last March Crafter's Companion Design Team project I have made a Mother's Day card to celebrate this fabulous day. This card was made with my mum in mind, and it's going to be given to her later on today (I hope she likes it!). She has been so strong over the past 2 months after having open heart surgery at the age of 77. I have been taking care of her 24/7 at her home, and during this time we have had both challenging times and some funny moments which have made us closer. Thankfully she is now well on the way to recovery. So here's to my mum...I love you!

For my card today I used a Sheena Douglass flower die and a flower die from one of Sara's Signature collections, plus some mouldable foam which reacts to heat and makes the most beautiful flowers. Thanks for looking 💚


Here's What I Did
I used 7" x 7" scalloped card blank which I matted with peach card and patterned paper from the CD (Fabric Paper #13). I glued a die cut panel across the centre of the card with a small doily over the top of it.

Next I die cut 5 large flower shape from peach Foamiran using the Rosey Outlook die and 8 from the white Foamiran using the large and small Floral Duo dies. Using a warm iron I carefully placed the 1st die cut on the surface for a second using a wooden stick, then folded the petals up and twisted them and let to cool. I repeated the same process for all the large flowers then I carefully unfolded them and stretched out the individual petals. I started by creating a bud, this was done by hot gluing one of the flower shapes tightly around a small ball of kitchen foil and overlapping the petals to hide the foil. Using the hot glue gun again I glued the next flower die cut around the bud making sure I slightly offset the petals, and then repeated this for the next 3 layers to form the rose.

The small white flowers were first coloured on both sides using some oil pastels and a sponge. Next the flowers were held against the iron as before, then the petals were folded together and then twisted between my fingers, and left to cool. These were then unfolded and one flower was hot glued over the top of another, offsetting the petals to create 2 large and 2 small flowers.  The same process was used for the die cut leaves.

To assemble the card I added some die cut flourishes cut from green glitter card first, then the focal flower which was hot glued into place, and the small flowers were added on either side. Different sized pearls were glued around and inside the flowers. To finish off I added a computer generated greeting and a die cut sentiment.

Here's What I Used
Crafter's Companion Products: Sheena Douglass - Perfect Partners Country Cottage Die  'A Rosey Outlook',  Sara Signature Collection - English Country Garden 'Lazy Daisy' and 'Floral Duo', Die'sire 'Mam', Sara Signature Collection - Butterfly Lullaby 'Fancy Flourishes', Core'dinations 'Pastel' Paper Pad, Crafter's Inspiration Magazine #13 Freebie CD (Digital Papers)

Other: Pearls, Computer Generated Sentiment, Doily, Foamiran, Iron, Hot Glue Gun, Gemini, Oil Pastel (Peach & Pink)

Don't forget....if you want to see more Crafter's Companion creations made my lovely teamies why not join our Facebook page - just search for Crafter's Companion UK or USA, and for more magazine inspiration definitely checked out the Crafters' Companion Inspiration Magazine group.

Just a little heads up...we are also on Twitter, Instagram and have a Pinterest Board, so why not follow us.I look forward to seeing you soon. Why not leave me a message so I know who's out there or if you have any questions about the products - I'd love to hear from you :)

I look forward to seeing you soon. Why not leave me a message so I know who's out there - I'd love to hear from you!!

Challenge Entered:

Hugs & kisses

x Janine x

Sunday, 15 March 2015

Happy Mother's Day (UK)

Good morning to you all.
 
I want to wish my mum and all the mum's out there a very
 
Happy Mother's Day

I thought I would share the card I made for my mum and then the beautiful flowers I received from my daughter yesterday by Interflora.

I'm actually writing this post on Saturday night ready for Sunday morning (15th) so my mum won't see her card; then when I open my card from my daughter I'll share that with you too. Unfortunately my daughter can't be with me today (so I'm spending Mother's Day totally on my own --- sob!!) as she works in London and it's too far for her to travel home just for one day - I'll miss her loads. But I'm sure we'll have a chat or something during the day.

Anyhow here's the card I've made for my mum (I hope she likes it) ----


How I Did It
The plant pot, patterned paper mat and insert were all created and cut out using my Silhouette machine. I added a fancy punched out panel to the top of the plant pot at the front and back, making made the one at the front much taller so I could add my flowers and leaves onto it.
 
 Apart from the 3 felt roses all the flowers and leaves were die cut, then inked around the edges and glued onto the card along with a tag. To finish off I added a few die cut hearts and a sprinkling of sequins to both the front, and on the inside.
 
What I Used
Cardstock (CS): Trimcraft 'What A Hoot' Paper Pad, Green, Brown, Pink, White, Blue, Cream CS, Glitter CS
Dies: MFT 'Blueprint '3 and 14', Spellbinders 'Rose Creation', Xcut 'Glorious Gerber' and 'Petal Posy', MFT 'Gerber Daisy', Memory Box 'Cross Stitched Hearts',  Tattered Lace 'Embellishments', Creative Expressions 'Camellia Complete Petals', Magazine Freebie 'Tag',
Other: Silhouette Machine, Martha Stewart Punch, Distressing Inks, Sequins, Gems, Felt Roses, CraftArtist 2
 
My Flowers
And here are the flowers my gorgeous girl sent me for Mummy's Day - they're filled with my favourites - Freesias, Roses and Lavender. They smell divine!!!
 
 
My Card
 
(when I open it!)
 
 
I hope you all have a fabulous day!!!
 
Hugs
 
Janine
xxx


Sunday, 18 March 2012

Happy Mother's Day

Happy Mother's Day to all the mums out there, and to those that have passed on you'll always be in our hearts and minds. We love you!

My gorgeous daughter Heather bought me a beautiful bouquet yesterday (I know it was a day early but who cares). We also made a cake together with lashings of pink/strawberry frosting and little pink and white sugar flowers. I had a slice, or should I say a 'chunk' this morning with a cup of coffee...it was divine! No doubt it will be on Heather's blog at some point, as she documents everything.  She also bought me a beautiful art deco card and a lovely necklace...talk about being spoilt. It I didn't have to cook a Sunday lunch I would have described it as a perfect day...lol!! Never mind.