Thursday 30 October 2014

Sugar Nellie DT Card & Sugar Bowl Challenge #118

Good morning my sugary friends.

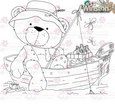
As both my Sugar Nellie and Sugar Bowl Design Team duties clash today I decided to combine them together. I know you'll probably be preparing for Halloween, dark nights and cold autumn days, but if you're anything like me you're probably already starting to think about Christmas cards, and Christmas lists and so on. So to get you in the mood I thought I would make a Christmas card using the digi stamp 'Forest Friends' - isn't it cute. The theme for the challenge over at The Sugar Bowl this month is Anything Goes, so grab your Sugar Nellie stamp and join the fun.

To see more Sugar Nellie creations made my lovely teamies why not drop by the Sugar Nellie blog or join our Facebook page (just search for the Official Sugar Nellie Group)


Here's What I Did
I used a shaped white card base and matted and layered die cut cardstock on top. I printed off the sweet Sugar Nellie image and die cut it into a circle, together with a scalloped circle mat. The image was coloured with Copic markers and touched up with pencils, to add a little interest I stamped snowflakes around the circle using distressing inks. To finish off I added a die cut snowflake and a wooden one together with some gems and a touch of glitter.

Here's everything I used:
Digi Stamp:  Forest Friends by Sugar Nellie @ Funkykits
Paper/Cardstock (CS): Craftwork Cards 'Super Smooth', Hobbycraft Christmas Paper Pack, HobbyCraft A4 Christmas Card Pack
Copics: Skin - E0000, E000, E00, E02 / Hair - C1, C2, C3, C5, C7, 100 / Jacket, Boots, Ribbons, Presents (Red) - R35, R37 / Toggles & Sledge - Y35 / Fawn - E15, E33, E35, E51 / Hat, Socks, Presents (Green) - G03 / Squirrels - E13, E08/ Robins - E33, E35, R30 / Ground - B000, B00, BG10
Prisma Pencils - Dark Green, Olive Green, Grass Green, Canary Yellow, Goldenrod, Peach, Salmon Pink, Rouge Carmine, Crimson Lake, Sienna Brown, Burnt Ochre, Light Umber
Dies: Tonic Layering Circles and Scallop Circle, MFT Die-namics 'Snowflakes'
Other: Serif CraftArtist2, Gems, Glitter, Distressing Inks
 
So don't forget to drop by The Sugar Bowl and check out what the rest of my fabulous DT sweeties have created to inspire you; and why not join in with this month's challenge while you're there.

Just a little reminder  --- if you decide to enter the Sugar Bowl challenge you can make anything you like but you MUST use a stamp from the Sugar Nellie store. Both digital (instant download) and rubber stamps are available to buy from Funkykits.

There's a fab prize up for grabs so it's definitely worth entering, so go on and spread the sugar love to all your friends.

I can't wait to see all your lovely makes. Have fun.

Hugs

Janine x

Tuesday 28 October 2014

Polkadoodles Digi Queen DT Wk 9 - Winston

Good morning everyone!

I just love the Winston CD from Polkadoodles, and I couldn't resist this fabby digi stamp of Winston chillin' out in his boat; I think he's so cool.  To colour this gorgeous image in I thought I would take inspiration from Nikky and use my Pan Pastels - it was a bit of a learning curve but I'm happy with the results.


You can get the digi here

Here's What I Did
I thought I would create a CAS card so the main focus would be on Winston. I matted and layered plain Cardstock onto my base and added faux stitching around the edges. The digi stamp was printed directly onto some artist quality paper designed for pastels, but these could easily be any cardstock. I used a fine paint brush to apply my Pan Pastels and when everything was completed I used a few pencils to add a little extra shade and dimension.  I punched out the corners of my completed topper and matted it onto some co-coordinating card. To finish off I wrapped some jute around the edge of the card and added some hand drawn fish and a few buttons. 
 
Here's What I Used
Digi Stamps: Winston
Paper/Cardstock (CS): Cream Card Base, Artist Pastel CS, Basal CS
Pan Pastels: Turquoise, Bright Yellow Green, Phthalo Green, Burnt Sienna Shade, Permanent Red, Permanent Red Tint, Violet Tint, Titanium White, Diarylide Yellow, Black
Other: Buttons, Jute, Corner Punch, Bronze & Black Sharpie Pen, White Pen, Pencils
 
To see more fabulous designs to inspire you why not check out the fab makes from the Digi Queen girls our at our challenge blog over at  Polkadoodles towers.

Thank you for dropping by - why not leave me a message I'd love to hear from you.

Thank you everyone!

Hugs
 x Janine x


Saturday 18 October 2014

Sweet Stampin' Challenge - Halloween

BOO!!! 
It's Sweet Stampin' time again, and our theme this week is HALLOWEEN (hence the Boo!)

I thought I would use a digi stamp I last used for my daughter's Halloween card last year; it's such a sweet image and couldn't resist using it again.


Here's What I did
I used a 6" x 6" white card base to start with. To create the layout with the digi stamp and sky background I used CraftArtist 2, the layout was then printed it off. I printed out another 2 copies of the digi stamp and coloured sections of it in with Copics, these were then fussy cut out and mounted onto the base image using foam pads. Everything was then matted and layered onto purple, black and orange CS; everything was then added to the card base. To finish off I added a touch of glitter to the stars - even at Halloween you need a bit of sparkle. :)

Here's everything I used:
Stamp: 'Scene It Halloween Witch' By Bugaboo
Paper/Cardstock (CS): Black, Purple, Orange CS
Copics: Skin - E0000, E000, E00, E02 / Hair, Broom Head & Fence - E35, E37, E53 / Dress, Hat, Shoes, Houses & Broom Handle - C3, C5, C7, 100 / Buckles - Y15 / Windows & Stars - Y08 / Pockets, Sleeves & Hat Band - V01, V04 / Hat Patches, Door & roofs - YG00, YG03, YG09/ Pumpkin - YR00, YR04, YR07, YR68, YG03
Other: CraftArtist 2, Glitter, Foam Pads
 
So why not drop by the Sweet Stampin' Challenge blog and check out what my fab Design Team girlies have made to inspire you. So come on why not join in with the fun and enter your card/project into our 'Halloween' challenge we'd love to see you. REMEMBER you must include a stamped element on your card!

This week's sponsor and prize is from Crafty Devils

I look forward to seeing what you create.

Challenges entered: 

Hugs

Janine x

Thursday 16 October 2014

Sugar Nellie - Hey Little Birdie

Good morning sugar fans! 

It's Thursday and my turn to share my little bit of sugary heaven with you. I decided to use this little sweetheart on a card; it's called 'Hey Little Birdie' and it's a digital stamp which I coloured with Copic pens. The stamp is available to buy and download from Funkykits the home of Sugar Nellie. I was inspired to use her after spotting her on one of the new topper sheets created by Hobby House for Sugar Nellie.

To see more Sugar Nellie creations made my lovely teamies why not drop by the Sugar Nellie blog or join our Facebook page (just search for the Official Sugar Nellie Group)


Here's What I Did
I've bought a new paper pad by Lawn Fawn which I've fallen in love with, and I can definitely see more purchases falling my way in the immediate future lol. I've also just bought a new bow die - it's brilliant to use and looks amazing when made up as you can see on my card.

This week I decided to create a CAS 5" x 5" card and use 2 colours to give a clean and crisp look. I printed my digital stamp onto some smooth cardstock and die cut it into a square.  The image was then coloured with Copics markers and one Flexmarker as my Blue Green decided to run out :(  I stamped snowflakes onto my finished topper using 2nd gen distressing ink (because the ink pad was too new and very juicy).  I matted and layered plain CS and patterned paper onto the card base and added my finished image on top.  To finish off I placed tiny stars 'n' dots around her and added glitter to the wings etc; lastly I added some die cut holly leaves, berries and a bow. 
Here's What I Used
Digital Stamp: Sugar Nellie 'Hey Little Birdie' available from Funkykits
Stamp: HobbyArt 'Snowy Christmas'
Paper/Cardstock (CS): 5" x 5" Scallop Card Base, Aqua and Red CS, Craftwork Digital Smooth CS, Lawn Fawn 'Peace Joy Love'
Copics: Skin - E0000, E000, E00, E02 / Hair - C1, C2, C3, C5, C7, 100 / Dress, Hat, Presents - BG000, BG01, BG10 and Flexmarker - Aquamarine  / Jacket,  Tights, Flowers - R30, R32, R35, R37, R46, R59 / Boots & Robin - E21, E50, E53, R30 / Wings -R30, R32 / Ground - W0, W1, W3, W5
Dies: MFT Die-namics Blueprint 8, Marianne 'Bow' LR0326, Signature 'Holly Berries'
Other: Serif CraftArtist 2, Glitter, Snowflake Gem, Distressing Ink 'Peacock Feather'

Don't forget to  join us in our challenge over at the Sugar Bowl - there's still  time to enter with a great prize up for grabs. The theme this month is 'Anything Goes' so it's really easy. DON'T FORGET TO ENTER THE CHALLENGE YOU MUST USE a Sugar Nellie stamp. 

I look forward to seeing you soon.

Challenge Entered:
 
Hugs
 
x Janine x

Tuesday 14 October 2014

There's 2 cards today - Inky Chicks & Polkadoodles --SEE BELOW

Inky Chicks - Christimas

Good evening everyone!

Well here in the UK the night's are definitely pulling in quickly - and that means winter time and Christmas is fast approaching. I'm not sure if to smile or frown --- lol. 

So on this dark Tuesday evening I'm here to share my Inky Chicks DT card with you, and the theme this week is Christmas --- I know I said the 'C' word.  So I decided to use this stamp from Hobbyart which I've had for a few years. I did actually use this stamp for my family Christmas cards a few years ago, and I just love it. It's such a pretty and versatile stamp, as it can be stamped and used as a flat image or can be stamped several times and decoupaged - which is exactly what I did on this occasion.


Here's What I did
I stamped the house 3 times and colour it with Promarkers and Flexmarkers, then fussy cut sections out which I layered up to give dimension. The house topper was matted onto some complimentary cardstock, and added to the kraft card base which was cut down to make a slim card. To finish off I added an embellished bow.and a touch of glitter to the snowy areas.

Here's everything I used:
Stamp: Hobbyart 'Christmas House' 
Paper/Cardstock (CS): Kraft Card, Kanban, Papermania
Promarkers/Flexmarkers: Various Colours Used (oops, sorry I don't have a list)
Other: Glitter, Ribbon, Snowflake Embellishment

So why not drop by the Inky Chicks Challenge blog, and check out what my fab Design Team girlies have made to inspire you. So come on why not join in with the fun and enter your card/project into our 'Christmas' challenge this week..

This week's sponsor and prize is from Live and Love Crafts,

I look forward to seeing what you create.

Challenges entered: 

Hugs

Janine x

Polkadoodles - Digi Queens Week 7

Hello and good morning Polkadoodlers -

Wow, I can't believe another fortnight as flown by!

Anyhoo, it's my delight to share my Digi Queen themed card with you this week - and the theme is Halloween.  It's one of those themes that you either love or hate --- it's a bit like marmite. :)

For my card I used Polkadoodles Witchie Witchie 2013 Digi Download Bundle for the tree/owl and bats (there's loads of fab Halloween stuff in the bundle), and the gorgeous girl is a digi stamp called Witchie Skeleton 2013.  The links can be found below.

Here's What I Did
To start with I made an A5 black card base. I matted orange and black card onto the base along with the orange swirly coloured paper which was made using Pan Pastels. The tree/owl, girl, bats and pumpkin are all Polkadoodles images which I coloured my Copic pens.  All the coloured elements were fussy cut out and glued onto the card base along with my die cut fence. To finish off I punched out a few dots from black glitter card.

To colour her hair I selected 3 purple shades - dark, mid and light and 2 shades of green - light and mid. Purple - I started at the crown with the deepest shade and flicked a little way out, then using my mid shade and starting where the deep shade finished I flicked further towards the area where I thought the light would hit, ensuring I left a white area.  Green - Then from the edge of her hair I started with my mid shade and flicked towards the purple, again not too far. Using my lightest shade of green I flicked towards the purple, again leaving a small area of white.

Using my lightest purple shade I coloured in the white area that was left, and blended up towards the mid purple shade and down to the light green until they blended together. This effect is simple to do but it might take a few goes to get it right - it also looks fab on fairy wings too.

Here's What I Used
Digi Stamps: 'Witchie Witchie' 2013 Download Bundle and 'Witchie Skeleton' 2013
Paper/Cardstock (CS): , Papermainia Coloured CS, Craftwork Cards Super Smooth Colouring CS, Black CS, Black Glitter CS
Copics: Skin - E0000, E000, E00, E02 / Hair - YG03, YG11, V000, V01, V04 / Bows - Y00, Y38, YR07, YR68, / Tree - C2, C3, C5, C7, 100 / Costume - C2, C3, C5, C7, 100 Y02, Y38 / Pumpkin - Y00, YR04, YR07, YR68, W2, W3, YG03, YG06, YG663, YG67, 100 / Bats - C3, C5, V01 / Mask - V000, V01, V04
Pan Pastels: Permanent Red, Phthalo Green Orange, Dairylide Yellow
To see more fabulous designs to inspire you why not check out the fab makes from the Digi Queen girls our at our challenge blog over at  Polkadoodles towers.

Thank you for dropping by - why not leave me a message I'd love to hear from you.

Thank you everyone!

Hugs
 x Janine x

Tuesday 7 October 2014

Sugar Nelllie & All Dressed Up Blog Hop

- Hello Sugar Fans and All Dress up Fans -
Well hello and good morning to you all it's Blog Hop Day!!!
Our joint hop is to celebrate All Dressed Up's (ADU) recent birthday and to launch their stamps being available in both rubber and digital from Sugar Nellie.
We're having a BIG blog hop today combining both the Design Teams from Sugar Nellie and ADU's Dressy Girls.
So here's my card ---- or should I say 'book' for the hop. It's a book because I loved all the images so much I couldn't decide on just one, so I coloured all 4 of them. LOL 
Here's What I Did
I taped together 2 5" x 5" card blanks together to make a book so that it folded inwards - placing a strip of ribbon between the cards so that it can be tied together when closed. After printing all the images onto my colouring cardstock I coloured each of them with Copic Markers. I used the same colourway throughout all of the pictures, to finish off I added dots around the images. I then die cut 2 frames and 2 mounts in both blue and pink CS and layered them up. Using the left over squares from the frames I adhered some doubled sided paper to them and die cut my flowers, snowflakes and leaves. I peeled off the backing paper and added some crystal glitter - these were added to my frames as embellishments. I attached  3 of the panels to the inside of the card base and one on the back.  The front has a typed greeting in the same colour way as the rest of the book.

Here's What I Used
Stamp: New 'All Dressed Up' stamps available from Sugar Nellie at Funkykits
Paper/Cardstock (CS): Craftwork Super Smooth Digital CS, Topsy Turvy CS, Double Sided Adhesive Paper
Copics: Skin: E0000, E000, E00, E11, R30 / Pink Shades - / Blue shades -  / Blonde/Red Hair - YR0000, YR000, YR00, E13, E99 / Black Hair - C1, C2, C3, C5, C7, 000

Dies: Tonic Square Layering Dies, MFT Die-namic 'Flower Trio & Leaves Trio', MFT Die-namics 'Snowflakes', Tattered Lace 'Embellishments'
Other: Glitter, Ribbon
 
SO ONTO THE HOP ----
You should have arrived here from Holly's blog one of the Dressy Girl's.
Your next stop is - Keeley 
If you get lost along the way, here's the full blog hop list
Valou
There's lot's of goodies up for grabs but you must follow two simple rules -
1. You must complete the blog hop and make sure you leave a comment on each of the blog of the Sugar Nellie girl's and  the Dressing Girl's.
2. You must also create a card using the freebie donated by ADU, which is available on the All Dressing Up's blog and then add your completed card/project to Mr Linky on the ADU blog. 
The prizes are: 
Prize: the four new digital images
Crafty Ribbons

Prize:  £10 voucher
Petal Lu

Prize:  Petal Lu Lucky Dip (a box of 50 blooms)
Prize:  $30.00 gift certificate
Prize:  goody bag or gift voucher
Prize:  2 prizes, each one being a magazine subscription from the time it is entered to June
Prize - online voucher to a class
Prize - Make It Crafty blending card
Prize - £10 voucher
The hop will run for two weeks, so you have until 21st of October to get your card made and uploaded to the ADU blog. Good luck!
Don't forget to leave a comment on every blog along your travels. 
Hugs
 
x Janine x 
 

Saturday 4 October 2014

Sweet Stampin' Challenge - Autumn

Helloooooo and good morning everyone ---- it's Sweet Stampin' time again

Our timely theme this week is Autumn, and I don't know about you, but to me that represents an orange, yellow, red and brown colour scheme. So to reflect this I created my autumnal card or should I say my Tango'd card --- lol :)


Here's What I did
I used a A5 scallop white card base. Using the non shimmery side of a piece of Centura Pearl card I distressed the whole area using a selection of autumnal colours; to add a little extra interest in certain areas I used a piece of punched out waste as a mask with a darker shade of distressing ink. Then using pages from an old children's book (bought from a charity shop) I stamped 2 large and 1 small flower twice, and stamped 3 leaves. I coloured the flowers and leaves using Copic markers, cut out them all out and layered up the flowers.  I scribbled 3 stems onto my distressed card and attached my flowers and leaves.  To finish off I added a border strip, gems and a few butterflies.

Here's everything I used:
Stamp: Hero Art 'Dotted Flowers'
Paper/Cardstock (CS): Centura Pearl, Black CS
Distressing Inks: Mustard seed, Squeezed Lemonade, Spiced Marmalade, Fired Brick, Tea Dye
Copics: Y35, Y38, YR04, YR68, R35, 100, YG23
Other: Old Book Pages, Punched Waste, Butterfly Punch, Black Fineliner Pen
 
So why not drop by the Sweet Stampin' Challenge blog and check out what my fab Design Team girlies have made to inspire you. So come on why not join in with the fun and enter your card/project into our 'Autumn' challenge we'd love to see you. REMEMBER you must include a stamped element on your card!

This week's sponsor and prize is Bunny Zoe - £10 Voucher

I look forward to seeing what you create.

Challenges entered: 

Hugs

Janine x

Thursday 2 October 2014

Sugar Nellie DT Post - New Furry Friends

- Hello Sugar Fans -
 
Well hello and good morning to you all. It's Thursday and it's Sugar Nellie time!
Yay!!!!  I get the fab job of  introducing one of the new digital stamps from the 'Furry Friends' collection - this fabby stamp is called Golf Buddy and it's available from Funkykits in digital format. How cool is this for a golfing fan or the golfer in the family. I made them both very dark and furry - but they would look equally as brilliant in a much softer colourway. 


Here's What I Did
My card is actually a tear drop shaped card as I wanted to make them appear as though they were on a hillside. To make my card base - I cut a 5" x 7" piece of strong card for the back, and then cut a 5" x 7½" piece of strong acetate for the front.  I scored ½" in from one end of the acetate which I then scored and folded over to make a flap; I added taped to the flap usually strong tape (red tape) this was stuck to the back of the piece of card. 

To decorate my card - I added blue card (sky) to my card then glued cut out hills on top of this (distressing ink was added to the edges first), I also tucked a cut out flag/post behind one of the hills. At the edge of the card I glued on a punched out border being careful not too place my tape too close to the inner edge - as this is where the acetate will be tucked into (see above picture). I coloured my 'Golf Buddy' image with Copics and cut all the pieces out, these were glued to the front of my acetate along with a hill shape to compliment the background hills. To finish off I added a few die cut clouds.

When the acetate is untucked from the border edge the card lies flat for postage.   
Here's What I Used
Digi Stamp: 'Golf Buddy' available Sugar Nellie at Funkykits
Paper/Cardstock (CS): Centura Pearl, First Edition 'Spring Drop', Craftwork CS Digital Super Smooth, Acetate
Copic Pens: Dog - E31, E35, E37, E57 / Cap & Ball - Y11, Y15, Y38, R22, R27, R29, R59 / Grass - YG17 / Flag & Golf Bag - Y15, Y35, Y38, R22, R27, R29, R59 / Golf Clubs: C1, C2, C3 / Rabbit - W1, W2, W3, W5, W7, R000 
Dies: Joy 'Clouds'
Other: Martha Stewart Border Punch, Distressing Ink
 
To see more Sugar Nellie creations made by my fab Sugar Nellie DT buddies, why not drop by the Sugar Nellie blog, or join our Facebook page (just search for the Official Sugar Nellie Group).

Thank you for dropping by - why not leave me a message I'd love to hear from you.

Don't forget about Sugar Nellie challenge over at The Sugar Bowl - there's 2 fab prizes up for grabs.

Challenge Entered:
 
Hugs
 
x Janine x