
Hi there everyone
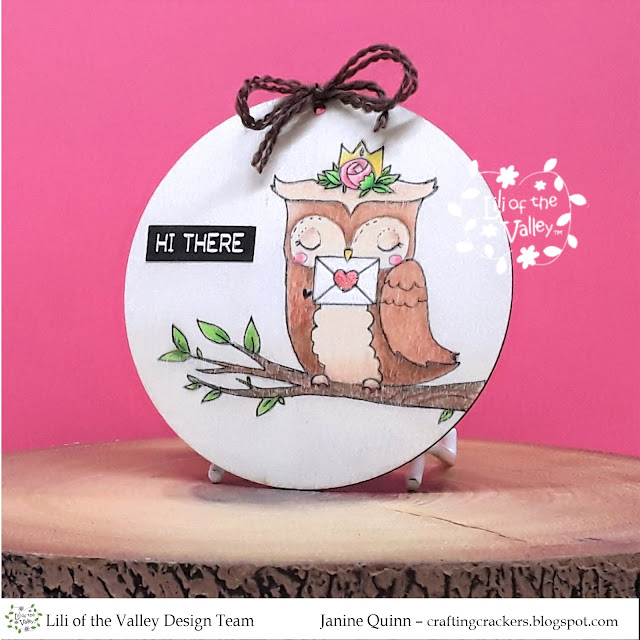
Today I'm sharing a piece of art I created on a wood slice using one of the new stamps released by Lili Of The Valley last week. The stamp is from the 'Love Letters' collection and I used Prismacolor pencils to colour with.
Did know, you can stamp your image onto wood using a permanent or waterproof ink like Stazon or Ranger Archival ink; then colour with it whatever takes your fancy eg pencils, Copics and even paints such as watercolour and acrylics etc. However, what's unusual about my piece of art is that I actually used a digi stamp and pencils on wood. I flipped the image, printed it out and coloured it with my pencils. I know crazy eh! After doing lots of research I found a way to do this. You should also be able to use paints if you print out using an Epson printer as their ink is usually water resistant - however, I haven't tried this as I've only got a Canon Pixma printer atm. Check out below how I did this, then have a go and send me your feedback. Obviously you can use this for any digital stamp. :)
Please note that as a LOTV Design Team member I was given permission by the company to use the digital version of the image, as the polymer stamp version wasn't available at the time.
For your information, here is the link to the LOTV Etsy Store to check out all the digi stamps, and the LOTV online store to check out the rest of their goodies.
Here's What I Did
First I made sure the wood slice was smooth, dry and dust free. Next I imported the owl into my software program and resized it to fit a 4" x 4" circle and flipped it. I printed this onto a piece of copier paper so I knew what the image placement was. I use a top loading printer (it feeds in from the top) and made sure that the image was sited on bottom of the page, meaning it printed out last. This ensured that the plain copier paper would feed into the printer first, which was crucial for the next step.
Once the image has been printed out I attached a piece of wax paper sufficient to cover the image and tape this in place with removeable tape. I changed my printer setting to 'Photo' printing, and choose the Glossy photo paper option (this ensured that the ink stayed wetter for longer). I put the paper back into the printer ensuring the wax paper was going to be the last thing to print out, and pressed print.
The next step was crucial, I very carefully removed the wax paper from the copier paper and placed it face down onto the wood slice. I made sure that I did this confidently so as to not move or smudge the image once it was down. Whilst keeping the paper in place with one hand, I carefully pressed and smoothed out the lines of the image (from the centre outwards), I just used my fingers (but I did use an old credit card on another image). Keeping the paper in place I lifted a corner of the paper to check everything was ok, as the transfer only takes a few seconds. Once I was happy with everything I removed the wax paper. I wiped over the surface of paper with a paper towel just to make sure there was no ink residue left, as this can be reused again, and again. The image instantly dried onto the wood, so I coloured the image in using my pencils. To finish off I added a little glitter to the heart, a printed out sentiment and a little bow. FYI - if I was planning on giving this away I would probably spray it with varnish to protect it.
If I get enough requests I will create a proper handout using this method. :)
Here's What I Used
Polymer Stamp: Love Letter Collection
Digital Sentiment: Embossed Labels
Prismacolor Pencils: Owl - Bunt ochre, Sienna Brown, Light Umber, Blush Pink, Pink, Beige / Flowers & Crown - Blush Pink, Pink, Canary Yellow, Yellowed Orange, Spring green, Olive Green, Envelop - White, Blush Pink, Poppy Red / Branch - Light Umber, Spring Green, Olive Green
Other: 4" x 4" Wooden Slice, Wax Paper, Copier Paper, White Card, Glitter, Embroidery Thread
Or why not join us on social media at 'We Love Lili Of the Valley' Facebook Group run by the Design Team, the official Lili Of The Valley Facebook page and on Instagram. We'd loved to see you.
Please Note - I am part of the Lili Of The Valley's Design Team and I receive their lovely digi images to play with and share with you; I do not receive any monetary reimbursement for my samples, advertisements or my participation. I do, what I do for fun and relaxation. Thank you. x
Thank you so much for dropping by, and please don't forget to say hi :) I'll be back soon with more sneaky peeks of the fabulous new LOTV Spring stamps. TTFN
Challenges entered:
Hugs
x Janine x


