Tuesday 16 November 2021

Lili Of The Valley - Decorating The Christmas Tree

Hello everyone

Today I'm sharing one of my latest Lili Of The Valley Christmas cards (I know...I've mentioned the dreaded 'C' word again (oops shame on me!). Anyhow, this card was created using one of the Christmas digi stamps released last year called Decorating The Christmas Tree, I think it's super cute, and it was such a pleasure colour up. I used Copic pens to colour everything. As always I hope you like it. x (For Sale - £4.50 + P&P - email me for information)

For your information, here is the link to the LOTV Etsy Store to check out all the digi stampsand the LOTV online store to check out the rest of their goodies.
Here's What I Did
I added trimmed down a piece of Christmas patterned paper slightly smaller than my 6" x 6" card blank and attached it to the card front. Using my graphics software I imported the sweet tree decorating group, and resized it to fit my rectangle die. I coloured the image using Copic pens. I adhered the die cut sentiment 'Believe' onto the front of the card (I die cut it 3 times from red card and glued them together). Around the image and sentiment I placed die cut snowflakes cut from white glitter card.

The image was then matted onto a red die cut rectangle, then funky foam was added to the back. The completed topper was glued to the centre of the card front. To finish off the card I add a little glitter and a few pearls

You can email me at jsnine.quinn@gmail.com if you require more information about how I created this card. 

Here's What I Used 

Copics: Tree - YG01, YG03, YG17, YG67, E29 / Rabbit - R30, 10, W1, W3, W5 / Owl - E31, E33, E35, B000, Y15, Y17 / Reindeer - E31, E33, E34, E35, E37 / Mice - E50, E51, E53, E57 / Robin - E31, E33, E35, R05, R30 / Fox - E000, E08, E13, E15, E18, E51, E51 / Baubles - R14, R17, B14, Y17, Y38, BG13, BG15, V04, V05 / Snow - B0000, B000

Other: 6" x 6" White Scalloped Card Blank, Make It Colour Card, Red Card, White Glitter Card, Old Christmas Paper Pad (Unknown), Cherish The Moment Dies (Tonic), Sentiment from Festive Frames - Snowball Die Set (Creative Expressions), Mini Snowflake Dies (Lawn Fawn), Pearls, Glitter, Glue, Double Sided Tape

Or why not join us on social media at  'We Love Lili Of the Valley' Facebook Group run by the Design Team, the official Lili Of The Valley Facebook page and on Instagram.  We'd loved to see you.

Please Note - I am part of the Lili Of The Valley's Design Team and I receive their lovely digi images to play with and share with you; I do not receive any monetary reimbursement for my samples, advertisements or my participation. I do, what I do for fun and relaxation. Thank you. x

Thank you so much for dropping by, and please don't forget to say hi :)  I'll be back soon with more sneaky peeks of the fabulous new LOTV Spring stamps. TTFN

Challenges entered:

Hugs

x Janine x

Wednesday 3 November 2021

Lili Of The Valley - You Are My Sunshine

  Hi everyone

Today I'm sharing one of my latest cards using one of the sweet bear digi stamps from Lili Of The Valley. The stamp I've used is called 'You Are My Sunshine' and I used Copic pens to colour with. This is such a gorgeous stamp and looks amazing with different coloured flowers. I hope you like it. x 

For your information, here is the link to the LOTV Etsy Store to check out all the digi stampsand the LOTV online store to check out the rest of their goodies.

Here's What I Did
I added trimmed down a piece of pretty pink patterned paper slightly smaller than my 6" x 6" card blank and attached it to the card front. Using my graphics software I imported the sweet little bear and added a typed sentiment, then resized them both. I die cut the image with a square die. I coloured the image using Copic pens. Foam was added to the back of the completed topper and glued to the centre of the card front. To finish off the card I add a little glitter to the flowers. 

Here's What I Used 
Digital  Stamp:  You Are My Sunshine

Copics: Bear - E31, E33, E34, E35, E37 / Butterfly - B000, B00, B04 / Flowers - RV000, RV02, RV10, RV23, RV34, Y15, Y38 / Leaves - YG012, YG03, YG17, YG63, YG67

Other: 6" x 6" White Card Blank, Make It Colour Card, Pink Card, Country Meadow Paper Pad (LOTV) Decorative Nested Square Dies (Craft Buddy), Funky Foam, Glitter, Glue, Double Sided Tape

Or why not join us on social media at  'We Love Lili Of the Valley' Facebook Group run by the Design Team, the official Lili Of The Valley Facebook page and on Instagram.  We'd loved to see you.

Please Note - I am part of the Lili Of The Valley's Design Team and I receive their lovely digi images to play with and share with you; I do not receive any monetary reimbursement for my samples, advertisements or my participation. I do, what I do for fun and relaxation. Thank you. x

Thank you so much for dropping by, and please don't forget to say hi :)  I'll be back soon with more sneaky peeks of the fabulous new LOTV Spring stamps. TTFN

Challenges entered:

Hugs

x Janine x

Monday 27 September 2021

Lili Of The Valley - Christmouse Carols

 Hi everyone

Today I'm sharing one of my latest cards using the fabulous new digi stamps from Lili Of The Valley's 2nd Christmas launch. The stamp I've used is called 'Christmouse Carols' and the sentiment is from the 'Cute Christmas' collection. I used Copic pens to colour with. I hope you like it. x (For Sale - £4.50 + P&P - email me for information)

For your information, here is the link to the LOTV Etsy Store to check out all the digi stampsand the LOTV online store to check out the rest of their goodies.


Here's What I Did
I added trimmed down a piece of Christmas patterned paper slightly smaller than my 5" x 7" card blank and attached it to the card front. Using my graphics software I imported the super cute mice and sentiment, then resized them both to fit my rectangle die. I coloured the image using Copic pens. 

I added a few die cut shapes to the right hand side of the rectangle to add a little extra detail. The completed image was then matted onto a blue and white die cut rectangles. The completed topper was glued flat to the centre of the card front. To finish off the card I add a little glitter and a gem. 

You can email me at jsnine.quinn@gmail.com if you require more information about how I created this card. 

Here's What I Used 
Digital  Stamp: Christmouse Carols
Digital  Sentiment: Cute Christmas

Copics: Mice - E31, E33, E34, E35, E37, E50, E51, E53, E57, R20, R30 / Ground - B0000, B000 / Hats & Robes - B000, B24, B32, B63, B95, B97, C0 / Lantern - Y00, Y15, E51, E53 / Hymn Books - E51 / Sky - B0000, B000, B00

Other: 5" x 7" White Scalloped Card Blank, Make It Colour Card, Blue & White Card, 'Snowy Christmas' 12" x 12" Paper Pad (The Works), Blue Glitter Card, 5" x 7" Mat & Layer Dies (Gemini), Blueprint Die Sets (MFT), Snowflake Frame & Snowflake Dies (Sweet Dixie), Mini Snowflake Dies (Lawn Fawn), Gem, Glitter, Glue, Double Sided Tape

Or why not join us on social media at  'We Love Lili Of the Valley' Facebook Group run by the Design Team, the official Lili Of The Valley Facebook page and on Instagram.  We'd loved to see you.

Please Note - I am part of the Lili Of The Valley's Design Team and I receive their lovely digi images to play with and share with you; I do not receive any monetary reimbursement for my samples, advertisements or my participation. I do, what I do for fun and relaxation. Thank you. x

Thank you so much for dropping by, and please don't forget to say hi :)  I'll be back soon with more sneaky peeks of the fabulous new LOTV Spring stamps. TTFN

Challenges entered:

Hugs

x Janine x

Sunday 26 September 2021

Lili Of The Valley - Yule Dog

Hi everyone

Today I'm sharing one of my latest cards using the new digi stamps from Lili Of The Valley's 2nd Christmas launch. The stamp and sentiment I've used is called 'Yule Dog', and I used Copic pens to colour with. I hope you like it. x (For Sale - £4.50 + P&P - email me for information)

For your information, here is the link to the LOTV Etsy Store to check out all the digi stampsand the LOTV online store to check out the rest of their goodies.


Here's What I Did
First I added trimmed down a piece of patterned paper slightly smaller than my 6" x 6" card blank, to leave a slim border around the edge. I inked around the edges of the paper using blue distress ink and attached to the card front.

Using my graphics software I imported the cute little doggie and sentiment, then resized them both to fit my square die. The image was printed out again onto masking paper, and fussy cut out leaving a large section beneath the dog for the snowy area. I covered over the little doggie and added a little blue distressing inks to the sky. When the ink was dry I coloured the image using Copic pens and added a few squiggles to the sky with a few blue Copic pens for interest. Using a white pen I added dots to the sky for snow. 

I added die cut shapes to the left hand side of the square to add a little extra detail. The completed image was then mounted on a red scalloped square, and funky foam was added to the back. The topper was added to the centre of the card front. To finish off the card I add a little glitter and a gem. 

You can email me at jsnine.quinn@gmail.com if you require more information about how I created this card. 

Here's What I Used
Digital  Stamp: Yule Dog
Digital  Sentiment: Cute Christmas Collection

Copics: Dog - E31, E33, E34, E35, E37 / Ground - B0000, B000 / Hat - R05, R17, R27, R37, B0000, B000 / Holly, Berries & Flower - YG03, YG17, YG67, R05, R14, R27, R37, Y17 / Snow - B0000, C1 / Sky - B0000, B000, B00

Other: 6" x 6" White Card Blank, Make It Colour Card, Red & White Card, 'Snow Princess' Paper Pad (LOTV), Distress Inks (Tumbled Glass), Christmas Countdown Dies (Hunkydory), Scalloped Square Die (Spellbinder), Pierced Square Die (Crealies), Tag Die (Papercraft Essential Freebie), Sentiment Strip Die (MFT), Snowflake Frame & Snowflake Dies (Sweet Dixie), Blue Texture Paper (Tonic), Christmas Paper Scraps, Red Glitter Card, Gem, White Pen, Glitter, Funky Foam, Masking Paper, Glue, Double Sided Tape

Or why not join us on social media at  'We Love Lili Of the Valley' Facebook Group run by the Design Team, the official Lili Of The Valley Facebook page and on Instagram.  We'd loved to see you.

Please Note - I am part of the Lili Of The Valley's Design Team and I receive their lovely digi images to play with and share with you; I do not receive any monetary reimbursement for my samples, advertisements or my participation. I do, what I do for fun and relaxation. Thank you. x

Thank you so much for dropping by, and please don't forget to say hi :)  I'll be back soon with more sneaky peeks of the fabulous new LOTV Spring stamps. TTFN

Challenges entered:

Hugs

x Janine x

Friday 17 September 2021

Craft Consortium - Midnight Flight Collection

Hi everyone

Today I'm delighted to share my latest Craft Consortium projects with you using the brand new collection 'Midnight Flight' (in partnership with Melissa Lowry). It's dark and opulent tones are just stunning and perfect for any time of the year, especially autumn. I've made 4 cards using the beautiful 12" x 12" papers, enamel dots, sequins, wooden embellishments, and the new puffy stickers. 

The collection will launched as samples shared in a Mini You Tube Hop created by my lovely teamies at Craft Consortium. The hop starts today, so please check out the Craft Consortium Network facebook page for details.

This collection and other collections are available from the Craft Consortium's website and good craft retailer's websites. In the USA, it will be distributed by Notions Marketing. You can also go direct to the Craft Consortium's website here and sign up for an update on any future product launches. 


Craft Consortium Product Used
Paper Pad: Midnight Flight 12" x 12" and 6" x 6"

Other Things I Used: 
5" x 7", DL, 6" x 6" White & Black Card Blank, Black, Card (Deep Red, White, Green, Mustard), Gold Glitter Card, Acetate, Enjoy Life & Ornate Circle Die (Craft Consortium - Dienamic), Stitch Bloom Dies (MFT), Mini Blooms Dies (Taylored Expression), Envelope Edger Die (Whimsy Stamps), Stitched Rectangle Scallop Edge Frame (MFT), Ornate Label Die (Hunkydory), Nested Scallop Slim Dies (Lisa Horton),Confetti Pocket Die (Sizzix), Pierced Circle Dies (Crealies), Candied Apple & Worm Lipstick Distress Ink, Glitter Pen, Glitter, Gems, Foam Pads, Funky Foam, Glue, Double Side Tape

If you would like to know how I made a specific card/project or would like the colour list either email me at jsnine.quinn@gmail.com (yes the address is correct). Alternatively leave your request and your email address in the comment box. You MUST leave your email address otherwise I cannot reply to you. Thanks you. xx 

Why not follow us on Facebook - Craft Consortium NetworkCraft Consortium Ltd or our our Instagram page. We'd loved to see you. Thank you so much for dropping by, don't forget to say hi :) 

Please Note 
If you purchase any Craft Consortium products could I politely ask that you give feedback on their facebook page or website and let them know what you think.  Please support our Craft suppliers. Thank you. xxx - I am part of the Craft Consortium's Design Team and I receive their lovely products to play with and share with you; I do not receive any kind of payment for my samples or my participation. Thank you. x

I'll be back tomorrow with another card made using this fabulous collection, so see you then. TTFN!

Challenges entered:

Hugs

x Janine x

Saturday 4 September 2021

Lili Of The Valley - Festive Reindeer

 Hello everyone

On my blog today I'm sharing my latest card using a new Lili Of The Valley Christmas digi stamp and sentiments, they're are from a selection of images being released in the next week or so. The stamp I have used today is called 'Festive Reindeer', and I teamed it up with the sentiment 'Happy Christmas'. The reindeers are so cute, I really enjoyed colouring up these little guy. I used masking to add a inky background behind them, then teamed them up with a striped background created by me. The links will be added after the launch has taken place. I hope you like it. x (For Sale - £4.50 + P&P - email me for more info).

For your information, here is the link to the LOTV Etsy Store to check out all the digi stampsand the LOTV online store to check out the rest of their goodies.


Here's What I Did
First I added I created the striped background paper for the card. Using a stripe die set I cut lots of pieces of coloured card - white, deep blue, pale blue, pale green, green and silver glitter card. I glued the strips horizontally onto a piece of thin card to create my design, then die cut the rectangle out on a jaunty angle. The striped paper was glued flat onto the card front. 

Using my graphics software I imported the sweet little reindeer image along with the sentiment, then resized them both to fit my project. The image and sentiment were printed directly onto colouring cardstock and die cut into an oval. The image was printed out again onto masking paper, and fussy cut out leaving a large section beneath the reindeers for the snowy area. I covered over the reindeers and tree etc and added distressing inks to the sky (see the list and order below). When the ink was dry I added stars to the sky with a stencil and white ink to add a little more interest. 

When everything was dry I coloured the image using Copic pens and added snowflakes to the sky with a white pen. The finished picture was mounted onto a silver glittery oval, and funky foam was glued to the back. The complete topper was added to the front of the card. To finish the card I added a little glitter to the baubles, snow and star along with a few pearls. 

You can email me at jsnine.quinn@gmail.com if you require more information about how I created this card. 

Here's What I Used 
Digital  Stamp: Festive Reindeer
Digital  Sentiment: Happy Christmas 

Copics: Reindeer - E31, E33, E35, E50, E51, E53, E57, E59 / Tree - YG01, YG03, YG17, YG67, B99 / Ground - B0000, B000 / Baubles, Tinsel & Star - R14, R29, Y15, Y17, Y38

Other: 5" x 7" White Card Blank, Make It Colour Card, Deep Blue, Pale Blue. Pale Green Card, Silver Glitter Card, White Card, Distress Inks (from bottom to top - Squeezed Lemonade, Mustard Seed, Tumbled Glass, Salty Ocean, Faded Jeans, Black Soot), Stars Starry Night Stencil (Memory Box), Noble Double Pierced Rectangle Die (Creative Expressions), Quick Stripes Die (Mama Elephant), Home Sweet Home Oval Die Set (Tonic), Moonlight White Brilliance Ink, Pearls, White Pen, Glitter, Funky Foam, Masking Paper, Glue, Double Sided Tape

Or why not join us on social media at  'We Love Lili Of the Valley' Facebook Group run by the Design Team, the official Lili Of The Valley Facebook page and on Instagram.  We'd loved to see you.

Please Note - I am part of the Lili Of The Valley's Design Team and I receive their lovely digi images to play with and share with you; I do not receive any monetary reimbursement for my samples, advertisements or my participation. I do, what I do for fun and relaxation. Thank you. x

Thank you so much for dropping by, and please don't forget to say hi :)  I'll be back soon with more sneaky peeks of the fabulous new LOTV Spring stamps. TTFN

Challenges entered:

Hugs

x Janine x

Sunday 22 August 2021

Lili Of The Valley - Winter Together Simply Print

Hi, I'm back again 

As I mentioned yesterday I'm sharing my cards using the brand new Lili Of The Valley Christmas 'Simply Print' images, this is my 2nd card. For today's card I've used 'Winter Together' and one of the new 'Elegant Christmas' sentiments. If you are new to the Simply Prints, they are pre-coloured prints that come as a PDF and include 3 page of pre-sized images in A5, A6 and A7. Simply Prints are wonderful for a quick and easy card; just brilliant for batch making or if you don't like to colour. The image is perfect for a couple's card at Christmas time. I hope you like it. x

For your information, here is the link to the LOTV Etsy Store to check out all the digi stampsand the LOTV online store to check out the rest of their goodies.

Here's What I Did
To start I covered the front of a 5" x 7" blank card with a piece of green patterned paper which I trimmed down to allow for a slim border around the edge.  

Next I opened the PDF file of the Simply Print images, then clicked onto one of the images to activate the copy option, and copied it. I opened my graphics program and selected paste, this added the image into the program, then resized it to fit my project.  Next I add one of the new sentiments, but I removed the white background (making it transparent) in Word, and resaved it as a png file. I placed the sentiment next to the image and printed the whole image onto digital printer paper, then die cut it into a rectangle. The image was added to a scalloped rectangle die cut from red card; funky foam was glued to the back of it to give dimension. The full topper was attached to the card front. 

To finish the card I glued 2 die cut holly flourishes in opposite corners along with some gems. A little glitter was sprinkled around the image.

Here's What I Used
Simply Print: Winter Together

Other: 5" x 7" White Card Blank, Pro Print Paper, 'Back To Nature' Paper Pad (The Works), Red Card, Stitched Scalloped Rectangle Dies (Creative Expressions), Decorative Tag Die (Sweet Dixie), Funky Foam, Glue, Double Sided Tape, Glitter, Gems

Or why not join us on social media at  'We Love Lili Of the Valley' Facebook Group run by the Design Team, the official Lili Of The Valley Facebook page and on Instagram.  We'd loved to see you.

Please Note - I am part of the Lili Of The Valley's Design Team and I receive their lovely digi images to play with and share with you; I do not receive any monetary reimbursement for my samples, advertisements or my participation. I do, what I do for fun and relaxation. Thank you. x

Thank you so much for dropping by, and please don't forget to say hi :)  I'll be back soon with more sneaky peeks of the fabulous new LOTV Spring stamps. TTFN

Challenges entered:

Hugs

x Janine x

Saturday 21 August 2021

Lili Of The Valley - Teddy Stocking Simply Print

Hello everyone

Today I'm sharing the first of two of my cards using the brand new Lili Of The Valley Christmas 'Simply Print' images. For the card I'm sharing today I used 'Teddy Stocking' - the pre-coloured Simply prints come as a PDF and include 3 page of pre-sized images in A5, A6 and A7. Simply Prints are brilliant for a quick card or if you don't like to colour. However if you prefer, there is also as a digi stamp available so you can colour it yourself. I hope you like them.

For your information, here is the link to the LOTV Etsy Store to check out all the digi stampsand the LOTV online store to check out the rest of their goodies.

Here's What I Did - Teddy Stocking 
I opened the PDF file of the Simply Print images and printed off the A6 image onto good quality printer paper and trimmed it down. I die cut a rectangle scalloped frame from green card, the image was glued behind it. The complete topper was glued flat onto the front of a white card blank. To finish the card I added a few die cut snowflakes from green card, and glitter to the stars and berries. 

Here's What I Used
Simply Print: Teddy Stocking
Digi Stamp: Uncoloured digi stamp can be found here

Other: A6 White Card Blank, Pro Print Paper, Green Card, Stitched Rectangle Scalloped Edge Frame Die (MFT), Mini Snowflake Dies (Lawn Fawn), Glitter, Glue, Double Sided Tape

Or why not join us on social media at  'We Love Lili Of the Valley' Facebook Group run by the Design Team, the official Lili Of The Valley Facebook page and on Instagram.  We'd loved to see you.

Please Note - I am part of the Lili Of The Valley's Design Team and I receive their lovely digi images to play with and share with you; I do not receive any monetary reimbursement for my samples, advertisements or my participation. I do, what I do for fun and relaxation. Thank you. x

Thank you so much for dropping by, and please don't forget to say hi :)  I'll be back soon with more sneaky peeks of the fabulous new LOTV Spring stamps. TTFN

Challenges entered:

Hugs

x Janine x

Thursday 19 August 2021

Lili Of The Valley - Penguins Sledging

Hi guys

I'm here again sharing some Christmas magic with you from the wonderful Lili of The Valley. My card for today is using one of the cute digi stamps, this one is called 'Sledging Penguins', isn't it adorable. I just love colouring up these little characters. I've also included one of the new 'Elegant Christmas Sentiments', the links for both featured items are listed below. I hope you like it. x

For your information, here is the link to the LOTV Etsy Store to check out all the digi stampsand the LOTV online store to check out the rest of their goodies.


Here's What I Did
First I added a piece of lilac card to the front of my card blank, leaving a slim border around the edge. Using my graphics software I imported the cute penguins and a sentiment, then resized them both to fit my project. The image and sentiment were printed directly onto colouring cardstock and die cut with a square die. The image was printed out again onto masking paper, and fussy cut out including a large section beneath the penguins for the snowy area. I covered up the penguins and added distressing inks to the sky (see the list below), then splash a little water over it. To add a little more interest I watered down some white and black chalk paint, then splashed a little over the sky area as well.

When the background was dry I coloured the image using Copic pens. The finished picture was mounted onto a white square die cut frame, and funky foam was glued to the back of that. The complete topper was added to the front of the card. I added a little detail to the left of the card using a die cut snowflake, circle and banner, along with a little pearl. To finish the card I added a little glitter around the penguins. For Sale - £4.50 + P&P

You can email me at jsnine.quinn@gmail.com if you require more information about how I created this card. 

Here's What I Used
Digital  Stamp: Sledging Penguins
Digital  Sentiment: Elegant Christmas
Simply Print: Sledging Penguins

Copics: Penguins - C1, C3, C5, C7, Y15, Y35, Y38 / Hats, Jumpers, Scarves - V00, VO4, V06, YG00, YG01, YG03, YG17, B000, B12, B14,  / Ground - B0000, B000 / Sledge - E31, E33, E35 

Other: 6" x 6" White Scalloped Card Blank, Make It Colour Card, Lilac & Blue Card, Purple Glitter Card, White Card, Distress Inks (Tumbled Glass, Salty Ocean, Worn Lipstick, Wilted Violet, Dusty Concord), White & Black Chalk Paint, Decorative Nested Square (Craft Buddy), Snowflake Frame Die (Sweet Dixie), Dot Circle Die (Crealies), Banner die (MFT), Mini Heritage Christmas Dies (XCut), Pearl, Black Fineliner Pens, Glitter, Funky Foam, Masking Paper, Glue, Double Sided Tape

Or why not join us on social media at  'We Love Lili Of the Valley' Facebook Group run by the Design Team, the official Lili Of The Valley Facebook page and on Instagram.  We'd loved to see you.

Please Note - I am part of the Lili Of The Valley's Design Team and I receive their lovely digi images to play with and share with you; I do not receive any monetary reimbursement for my samples, advertisements or my participation. I do, what I do for fun and relaxation. Thank you. x

Thank you so much for dropping by, and please don't forget to say hi :)  I'll be back soon with more sneaky peeks of the fabulous new LOTV Spring stamps. TTFN

Challenges entered:

Hugs

x Janine x

Sunday 15 August 2021

Craft Consortium - Made By Elves Collection

 Hi everyone

I'm sharing my latest Craft Consortium projects with you....and it's Christmas Time in August. Yay! The new collections 'Made By Elves' is full of seasonal magic and lovely elves. The new collection has been created in partnership with the super talented Helz Cupperditch. Helz is the wonderful talent behind the 'Snomes', 'Sandy Paws', 'Polar Playtime' collections. The collection is full of sweet elves and their everyday Christmas activities. I've made 4 cards and coloured them up using Copic pens, for my last project I've made a perpetual calendar using the delicious papers. I'm pretty sure you will fall in love with this collection.

I'm sharing all 5 of the projects I made using the gorgeous stamps, papers and embellishments. The collection will launch on Create & Craft tomorrow (Monday 16th August) @ 2.15pm (GMT) - you can watch it on Satellite TV and online. The collection will then be available in the Craft Consortium shop and in good craft retailers. Links will be added after the launch has taken place. 

This collection and other collections are available from the Craft Consortium's website and good craft retailer's websites. In the USA, it will be distributed by Notions Marketing. You can also go direct to the Craft Consortium's website here and sign up for an update on any future product launches. 
Candy
Sleigh
Tree
Workshop
Made By Elves Paper Pad

Craft Consortium Product Used
Stamp Set: Sleigh, Tree, Workshop, Candy
Paper Pad: Made By Elves 12" x 12" and 6" x 6"
Embellishments: Enamel Dots

Other Things I Used: 
6” x 6”, 5” x 7” White Card Blank, 6” x 6” White Scalloped Card Blank, Make It Colour Card, Copic Pens, White Card, Pink Centura Pearl Card, White & Red Glitter Card, Deep Red Card, Green Card, Mini Snowflake Stamps (Hero Arts), Starry Night Stencil Memory Box), Winter Wonderland Stencil (Honey Bee Stamps), Stitched Circle Die (Crealies), Snowflake Frame (Sweet Dixie), Banner Die (MFT), Pearl Square & Plain Square Die (Tattered Lace), Pierced Dot Square Die (Crealies), Mini Merry Message Stamp (Mama Elephant), Stitched Scalloped Rectangle Dies (Creative Expression), Banner die (MFT), Mini Nordic Heart & Foliage Die (X Cut), Min Snowflake Dies (Sizzix), Holly & Swirls ‘Peace’ Frame Set (Sweet Dixie), Large Number Dies (Crafters Companion), Double Sided Tape, Red Liner Tape, Glue, Perpetual Calendar Tutorial Notes (My own), Frosted Aqua Colour Cloud Ink, Tumbled Glass Distress Ink, Mask It Paper, Glitter, White Pen, Funky Foam, Black Hybrid Ink, Glossy Accents, Double Sided Tape, Glue

If you would like to know how I made a specific card/project or would like the colour list either email me at jsnine.quinn@gmail.com (yes the address is correct). Alternatively leave your request and your email address in the comment box. You MUST leave your email address otherwise I cannot reply to you. Thanks you. xx 

Why not follow us on Facebook - Craft Consortium NetworkCraft Consortium Ltd or our our Instagram page. We'd loved to see you. Thank you so much for dropping by, don't forget to say hi :) 

Please Note 
If you purchase any Craft Consortium products could I politely ask that you give feedback on their facebook page or website and let them know what you think.  Please support our Craft suppliers. Thank you. xxx - I am part of the Craft Consortium's Design Team and I receive their lovely products to play with and share with you; I do not receive any kind of payment for my samples or my participation. Thank you. x

I'll be back tomorrow with another card made using this fabulous collection, so see you then. TTFN!

Challenges entered:

Hugs

x Janine x

Wednesday 11 August 2021

Lili Of The Valley - Hedgehog and Holly

 Hi everyone

Today, I'm continuing the gorgeous Christmas theme from yesterday as I have another new Lili of The Valley Christmas digi stamp to share with you. This time my card highlights some hedgehog loveliness called 'Hedgehog and Holly' which I coloured with Copic pens. I team it up with one of the new 'Elegant Christmas Sentiments' and some older LOTV patterned paper. I hope you like it. x (For Sale - £4.50 + P&P)

For your information, here is the link to the LOTV Etsy Store to check out all the digi stampsand the LOTV online store to check out the rest of their goodies.


Here's What I Did
First I trimmed down some green Christmas paper and glued it to the front of my card leaving a slim border around the edge. Next I imported the sweet hedgehog image and sentiment into my graphics program and resize them to fit my project. The image was printed directly onto colouring cardstock, and die cut with a Christmas tag. I coloured everything with Copic pens. I added green glitter card to the back of the cut out section on the bottom of the tag. 

I die cut another tag from deep red card and added red glitter card to the back of the cut out section. I glued the white tag over the red one and add funky foam on the back. The finished topper was glued to the card front. To finish the card I added a few die cut poinsettia, glitter and a few pearls. 

You can email me at jsnine.quinn@gmail.com (yes it's spelt right...lol) if you require more information about how I created this card. 

Here's What I Used
Digital  Stamp: Hedgehog and Holly
Digital  Sentiment: Elegant Christmas
Digi Stamp Collection: Christmas Collection
Simply Print: Hedgehog and Holly

Copics: Hedgehog - E31, E33, E35, E50, E51, E53 / Holly & Berries - G21, G82, G85, YG03, YG67, R05, R17 / Snow - C0, B000, BV00

Other: 5" x 7" White Card Blank, Make It Colour Card, Woodland Wishes Paper Pad (LOTV), Deep Red Card, Red & Green glitter Card, Decorative Tag Die (Sweet Dixie), Poinsettia Die (John Next Door), Pearls, Glitter, Funky Foam, Glue, Double Sided Tape

Or why not join us on social media at  'We Love Lili Of the Valley' Facebook Group run by the Design Team, the official Lili Of The Valley Facebook page and on Instagram.  We'd loved to see you.

Please Note - I am part of the Lili Of The Valley's Design Team and I receive their lovely digi images to play with and share with you; I do not receive any monetary reimbursement for my samples, advertisements or my participation. I do, what I do for fun and relaxation. Thank you. x

Thank you so much for dropping by, and please don't forget to say hi :)  I'll be back soon with more sneaky peeks of the fabulous new LOTV Spring stamps. TTFN

Challenges entered:

Hugs

x Janine x

Tuesday 10 August 2021

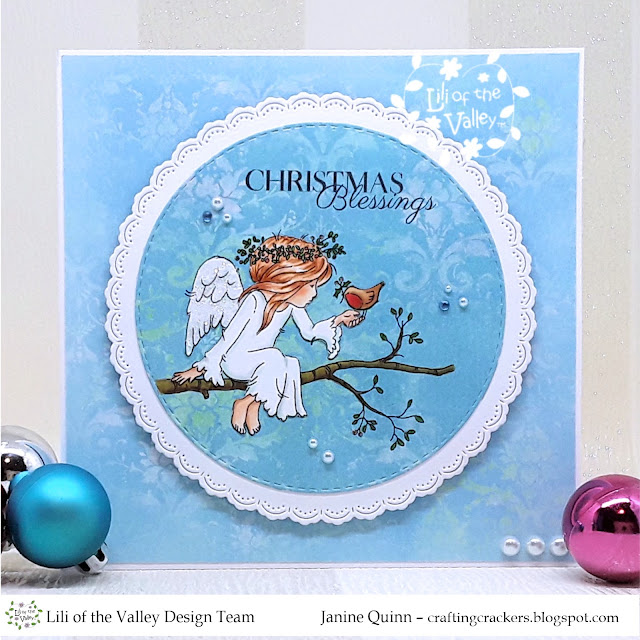
Lili Of The Valley - Christmas Angel

 Hi everyone

Well Christmas is most definitely in the air....well here in Lili of The Valley world it is. Lol Today Lili Of The Valley are launching the first of a huge selection of Christmas goodies ie digi stamps, Simply Prints and sentiments etc over the next few week. I will be sharing my cards during that time highlighting the new collection and I can't wait.  

So onto today's card, for this I have used one of the new digi stamps called 'Christmas Angel-Kindness' which I coloured with Copic pens. Isn't she beautiful! I team her up with one of the new 'Elegant Christmas Sentiments' and digi paper from a previous launch. Once the stamp and sentiment is available in store I will add the links to this post. I hope you like it. x (For Sale - £4.50 + P&P)

For your information, here is the link to the LOTV Etsy Store to check out all the digi stampsand the LOTV online store to check out the rest of their goodies.

Here's What I Did
First I imported the pretty digital paper in my graphics program, then printed it out onto some good quality printer paper. The paper was trimmed down to fit my card front, leaving a slim border around the edge. 

For the next part I used MS Word, and changed the white background on both the image and sentiment (as they're both JPGs) to a transparent background, then saved them both as a PNG images. I imported the digital paper into my graphics software and add the image and sentiment over the top, and resized them to fit my project. I printed out the paper with the images onto colouring card and die cut it into a circle. I coloured in the branch and some of the head wreath with Copic pens.

As the image on the circle was made into a transparent image it meant that you could see the patterned paper through it. To remedy this I printed out the same image again onto colouring card, coloured the angel and robin in using Copic pens, and fussy cut them out. Both images were then glued into place on the circle. The completed circle was glued onto a white doily die cut mat and funky foam was added to the back. The finished topper was glued to the centre of the card front. To finish the card I added a few pearls around the card and a little glitter to the angels wings. 

You can email me at jsnine.quinn@gmail.com if you require more information about how I created this card. 

Here's What I Used
Digital  Stamp: Christmas Angel
Digital  Sentiment: Elegant Christmas
Digi Stamp Collection: Christmas Collection
Digital Paper: Whimsical Damask
Simply Print: Christmas Angel

Copics: Skin - E000, E00,E02, E11 / Hair - YR000, YR00, E13, E99 / Gown & Wings - C0, BG10 / Garland & Holly -  YG17, R17 / Branch - E33, E35, E37, Y17, YG17, R17 / Robin - E31, E33, E35, R17

Other: 6" x 6" White Card Blank, Make It Colour Card, Pro Print Paper, White Navigator Card, Doily Edge Circle Die (Tattered Lace), Stitched Circle Die (Crealies), Pearls, Glitter, Funky Foam, Glue, Double Sided Tape

Or why not join us on social media at  'We Love Lili Of the Valley' Facebook Group run by the Design Team, the official Lili Of The Valley Facebook page and on Instagram.  We'd loved to see you.

Please Note - I am part of the Lili Of The Valley's Design Team and I receive their lovely digi images to play with and share with you; I do not receive any monetary reimbursement for my samples, advertisements or my participation. I do, what I do for fun and relaxation. Thank you. x

Thank you so much for dropping by, and please don't forget to say hi :)  I'll be back soon with more sneaky peeks of the fabulous new LOTV Spring stamps. TTFN

Challenges entered:

Hugs

x Janine x

Wednesday 7 July 2021

Craft Consortium - Sandy Paws Collection

Hi everyone

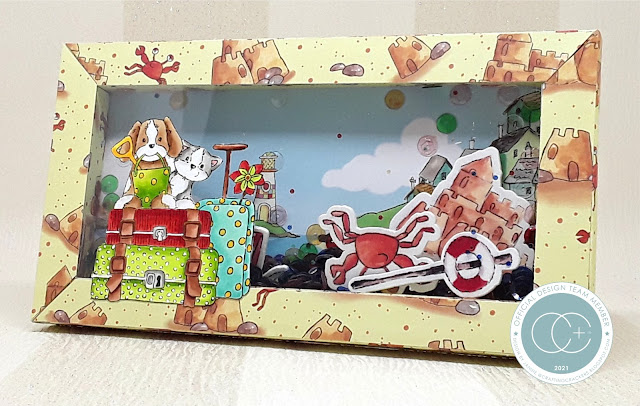
I'm sharing my latest Craft Consortium projects with you. The new collections 'Sandy Paws' offers lots of fabulous summertime magic and fun. The new collection has been created in partnership with the super talented Helz Cupperditch. Helz is the talent behind the 'Snomes', 'Gift of Giving', 'Polar Playtime' collections. The collection boasts cute dogs, cards and birds all in amazing seaside settings. Everything is just totally adorable! I used a mix of  Copic pens and pencils to colour up the stamps, and for my last project I made a 'Holiday' activity book - it includes scribbling, doodling and colouring pages along with 'colour me' postcards and crossword puzzles. The collection includes beautiful paper pads  (6" x 6" and 12" x 12"), stamp sets and embellishments. 

I'm sharing all 6 of the projects I made using the gorgeous stamps, papers and embellishments. The collection as already launched in the Craft Consortium shop and in good craft retailers. Links are given below the pictures.

This collection and other collections are available from the Craft Consortium's website and good craft retailer's websites. In the USA, it will be distributed by Notions Marketing. You can also go direct to the Craft Consortium's website here and sign up for an update on any future product launches. 


Craft Consortium Product Used

Other Things I Used: 
A5, 5” x 7”, 6” x 6” White Card Blanks, Make It Colour Card, Copic Pens, Prismacolor Pencils, Solar White & Desert Storm Neenah Card, Watercolour Card, Red Card, White Card, Tumbled Glass & Salty Ocean Distress Ink, Cloud Stencil (MFT), Stitched Scalloped Rectangle & Square Dies (Creative Expression), White Pen, Black Fineliner, Glossy Accents, Shadow Box Creation Die Set (Tonic), Acetate, Red Liner Tape, On The Edge Die (Crealies), My SVG Design, Gold Adhesive Foil, Electronic Cutting Machine, Cinch Machine & Wire (WRMK), Envelope Maker (WRMK), Doflex, Grey Board, Lined Paper, Copier Paper, Crossword Puzzles, Ribbon, Paper Clips, Funky Foam, Black Hybrid Ink, Double Sided Tape, Glue,  

If you would like to know how I made a specific card or would like the colour list either email me (my address is on the right). Alternatively leave your request and your email address in the comment box. YOU MUST leave your email address otherwise I cannot reply to you. Thanks you. xx 

Why not follow us on Facebook - Craft Consortium NetworkCraft Consortium Ltd or our our Instagram page. We'd loved to see you. Thank you so much for dropping by, don't forget to say hi :) 

Please Note 
If you purchase any Craft Consortium products could I politely ask that you give feedback on their facebook page or website and let them know what you think.  Please support our Craft suppliers. Thank you. xxx - I am part of the Craft Consortium's Design Team and I receive their lovely products to play with and share with you; I do not receive any kind of payment for my samples or my participation. Thank you. x

I'll be back tomorrow with another card made using this fabulous collection, so see you then. TTFN!

Challenges entered:

Hugs

x Janine x