Showing posts with label Handmade Bliss. Show all posts

Tuesday, 11 August 2015

Handmade Bliss Inspiration Card - Smarty Cat

-- Good morning everyone --
 
Hellooo, I'm here again showcasing one of my card using some of the many products you can find in the Handmade bliss store - check out the link below.

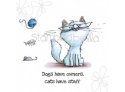
This week I decided to play with this gorgeous little character from Stamping Bella, it's called 'Smarty Cat'....don't you just love the glasses lol. I made her into a purrfect girly cat but you could quite easily made her into a Tom. All the Stamping Bella stamps are pre-mounted and stamps beautifully and cleanly.  


If you click on the link further down it will take you straight to the stamp. But why not check out
 the rest of the Stamping Bella collection and all the other fabulous American stamps and dies by click on the logo below.. 
 
http://www.handmadebliss.co.uk/home/4588338105
 
 Here's What I Did
I used a 5" x 5" scalloped card base which I matted with some blue card and patterned paper.  I stamped my images and the sentiment onto some white colouring card, and then using a Copic Fineliner pen I joined the ball of wool to the sentiment.  The scene was then die cut into a circle along with a blue mat. I coloured the image with Copic pens and added a little distressing ink for the sky. A border strip was made from blue card using a punch and die and this was attached to the card base along with the coloured topper.

To finish off I added a stamped out tag, glossy accents to the cat's glasses and a few pearls at the bottom of the card.
 
Here's What I Used
 
Other items used are from my crafty stash:
White 5" x 5" scalloped card base, Crealies XXL 'Stitched Circle' die, LOTV paper pad and tag stamp, Copic pens, pearls, distressing Inks, Bakers Twine, Glossy Accents, Copic fineliner pen.

If you would like to know more about the products or Copics pens colours I used please leave me a message in your comment, and I will get back to you. Make sure you include your email address in your message.
 
Don't forget our challenge
The theme this month is easy peasy, it's 'Anything Goes', just make a card using one or more of the products in the shop (you don't need to have bought it from there either). So come on and join in, we'd love to see you. To enter go to our blog here.

I can't wait to see your makes! And oh yes, why not leave me a message :)
 
Hugs
 
Janine x

Saturday, 1 August 2015

Handmade Bliss Challenge #4

Good morning everyone
 
Well it's the 1st of the month and which means it's challenge time over at Handmade Bliss. So here's my Design Team card for you today - our theme this month is a really easy one, it's 'Anything Goes'.
 
To enter you must use a product or products that is stocked in the Handmade Bliss store (even if you didn't actually buy it from there). We would appreciate it you could let us know in your blog post which product/s it is in please. To enter, go to our blog here and upload your make there.


http://www.handmadebliss.co.uk/shop/4588358199
 
Handmade Bliss shope stock lots of fabulous American brands such as My Favourite Things, Stamping Bella, Altenew, Doodlebug Designs, Taylored Expressions, Avery Elle etc, with more big names coming soon. Joanne (the store owner) also plans to stock USA brands that are new to the UK, so make sure you keep checking her store and this space of course. ;)

Here's What I Did
I used a cut down sheet of A3 card for my white card base which I matted and layered with patterned paper. Using another piece of the white card I die cut it into a rectangle and then die cut into the centre using an oval die to create a frame. I laid the frame onto my patterned paper and stamped my image on top and removed the frame (this was for placement later).

The image was stamped again onto colouring card stock, coloured with Copic pens and fussy cut out. I die cut a selection of clouds borders from vellum and glued these behind my frame and added the frame to my card base. I attached the girl and balloons to the card directly over the top of the stamped image that I did earlier, I used foam tape behind the top of the balloons to add a little dimension.

To finish off I added white dots and clear glitter to some of the balloons, scattered a few sequins around the sky and added a few gloss dots at the corners.

Here's What I Used
 

Other items used are from my crafty stash: White Card, LOTV Patterned Paper, Vellum, White Pen, Wink Of Stella Clear Glitter Pen, Foam Tape, Copic Pens, Sequins, Crealies XXL Dies, Crystal Gloss Dots.

If you would like to know the Copic colours I used, please leave me a message in the comment box along with your email address and I will get back to you.
 
So come on what are you waiting for, we'd love to see your card/project in in our Anything Goes Challenge (but remember the rules).,,,and there's a great prize for the winner too. Click here to go to our blog and enter - while you're there don't forget to check out what my teamies have created to inspire you.  Oh yes, and don't forget to visit the store too!!!

Why not leave me a message and let me know what you'd like to see stocked in the store :)
Hugs
x Janine x 

Wednesday, 1 July 2015

Handmade Bliss Challenge #3 - Sketch

Good morning everyone

I'm here to share my Handmade Bliss Design Team challenge card with you today - our theme this month is 'Sketch'To enter you must use the sketch provide (see below) and use any product or products that is stocked in the Handmade Bliss store (even if you didn't actually buy it from there). We would appreciate it you could let us know which product/s it is please. To enter, go to our blog here and upload your make.

The sketch


http://www.handmadebliss.co.uk/shop/4588358199
 
Handmade Bliss shope stock lots of fabulous American brands such as My Favourite Things, Stamping Bella, Altenew, Doodlebug Designs, Taylored Expressions, Avery Elle etc, with more big names coming soon. Joanne (the store owner) also plans to stock USA brands that are new to the UK, so make sure you keep checking her store and this space of course. ;)

Here's What I Did
I used a 6" x 6" scalloped white card base which I matted and layered with patterned paper on top of which I added another strip of paper which I edged with black pen. The boot was stamped directly onto a piece of colouring cardstock and die cut into a circle, the gnome was also stamped but onto a separate piece of card. Both images were colouring using Copic pens and the gnome was fussy cut out.

The stamped and coloured boot was added to a die cut scalloped circle; the gnome was attached on top using foam tape to give extra dimension. The sentiment was stamped onto a piece of white card and matted onto some blue, this was then cut into a fishtail banner and added the card base along with the finished gnome topper. To finish off I added punched out butterflies and paper flowers, and using a white pen I add dots to the flowers and snail shell.

Here's What I Used
 

Other items used are from my crafty stash: White Card Base, Coloured Card, Patterned Paper, Flowers, Butterfly Punch, White and Black Pen, Foam Tape, Copic Pens

If you would like to know the Copic colours I used, please leave me a message in the comment box along with your email address and I will get back to you.
 
So come on what are you waiting for, we'd love to see your card/project in in our Sketch Challenge (but remember the rules).,,,and there's a great prize for the winner too. Click here to go to our blog and enter - while you're there don't forget to check out what my teamies have created to inspire you.  Oh yes, and don't forget to visit the store too!!!

Why not leave me a message and let me know what you'd like to see stocked in the store :)
Hugs
x Janine x 

Thursday, 11 June 2015

Handmade Bliss - Inspiration Card

-- Good morning everyone --
 
Hellooo, I'm here again showcasing my card using some of the products you can find in the Handmade bliss store - you can find the list below. The Alley Way stamp set I used is called 'Ooh La La', it's brilliant for a girly card.
 
 http://www.handmadebliss.co.uk/shop/4588358199


Here's What I Did
I cut down an A4 sheet of black card and scored it in half to create my base. The bottom corners were rounded off and I attached a piece of wide red ribbon around the bottom portion of the card.

Next I stamped lipsticks 4 times onto colouring cardstock and coloured them with Copic pens, which I then cut out. The ends of the lipsticks were glittered - 3 in silver and 1 in red. I die cut a rectangle using a stitched edged die, and attached the lipsticks using foam tape to create a little dimension. I stamped my sentiment and added glitter dots. The completed topper was then matted and layered onto black and red card, and added to my card base.

Note: If you prefer you can also buy SVG files direct from the TAW store, which will allow you to cut out the stamp elements using an electronic cutting machine.
 
Here's What I Used
 
 
Other items used are from my crafty stash: Black, Red, White Card, Mama Elephant Die, Silver and Red Glitter Pen, Copic Pens, Foam Pads, Red Ribbon, Corner Rounder
 
Don't forget our challenge
The theme this month is 'Colour Swatch' which makes it nice and easy, so come and join in. To enter go to our blog here.

I can't wait to see your makes! And oh yes, why not leave me a message :)
 
Hugs
 
Janine x

Monday, 1 June 2015

Handmade Bliss Challenge #2 - Colour Swatch

Good morning everyone

I'm here to share my Handmade Bliss Design Team challenge card with you today - our theme this month is 'Colour Swatch'. To enter you must use 2/3 colours from the swatch shown below and make a card/project using any product or products that is stocked in the Handmade Bliss store (even if you didn't actually buy it from there). We would appreciate it you could let us know which product/s it is please. To enter, go to our blog here and upload your make.

 
For my challenge card I've used one of the fabby Stamping Bella stamps called 'Nice To See You Petunia'  I'm so in love with Stamping Bella stamps and the new June release are just fabulous, and they're coming soon to Handmade Bliss. Yay!!!


http://www.handmadebliss.co.uk/shop/4588358199
 
 Here's What I Did
I used a 6" x 6" white card base which I matted and layered with 2 different patterned papers. I then stamped my piggy image and grass onto some colouring card and die cut it into a circle. To allow me to create the cloudy sky without colouring over the images I made masks for all creatures - this was done by stamping the whole image again onto copier paper and cutting everything out. Using removal tape I placed all the masks on top of the creatures and coloured the sky using my cloud cut out and distressing ink. When the sky was dry I coloured everything else with Copics and added glossy accents to the spectacle lens.

The finished picture was glued onto a die cut scalloped circle and attached to the card base. To finish off I added a die cut flower, leaves and a sentiment tile.

Here's What I Used
 

Other items used are from my crafty stash: White Card Base, Blue, Yellow, Teal Card, Grass Stamp, Stitched Circle Dies, MFT Dies, Foam Pads, Distressing Ink, Glossy Accents, Ribbon, Button. Sentiment Tile, Copics (if you need to know the colours I used just message me and I'll send you the list - make sure you include your email address).
 
So come on what are you waiting for, we'd love to see your card/project in in our Colour Challenge (but remember the rules). And there's a great prize of for the winner too. Click here to go to our blog and enter.  Oh yes, and don't forget to visit the store too!!!

Why not leave me a message and let me know what you'd like to see stocked in the store :)
 
Hugs
 
x Janine x 

Thursday, 14 May 2015

Handmade Bliss - Showcase Card (1)

-- Good morning everyone --
 
As I mentioned the other day I am now a new Design Team member for the lovely new online store
 
 http://www.handmadebliss.co.uk/shop/4588358199
 
My card today showcases some of the products you can find instore - you can find the list below.


Here's What I Did
I used a 5" x 5" scalloped white card base. I then die cut a square from white card and die cut another square inside it, to create a frame. I added foam tape to the back of the frame to raise it up, and placed a die cut and embossed pink square inside it. Next I stamped all my elements firstly onto plain white card and again onto patterned paper and glued them into place. To add more definition I added a little colour and glitter to them using pens. I added a die cut a green border strip and the finished perfume bottle, nail varnish and lipstick to the inside of the frame. Some of the elements were raised up with foam tape to create a little dimension. To finish off I added glitter dots and sequins.

I decided to keep the card base and background subtle because I wanted the fab makeup stamps from the set to stand out, and the patterned paper I used for the paper piecing was very pretty and bright and did the job perfectly.

Note: If you prefer you can also buy SVG files direct from the TAW store, which will allow you to cut out the stamp elements using an electronic cutting machine.   
 
Here's What I Used
 
 
Other items used are from my crafty stash: Scalloped Card Base, White, Pink, Green Card, Square Dies, Sequins, Mask, Glitter Pen, Copic Pens, Foam Pads, Sequins, Star Stencil Mask.
 
Don't forget our challenge
The theme this month is 'Anything Goes' which makes it nice and easy, so come and join in. To enter, go to our blog here.

I can't wait to see your makes! And oh yes, why not leave me a message :)
 
Hugs
 
Janine x

Friday, 1 May 2015

Handmade Bliss Design Team and Challenge

Good morning everyone, just a little news for you!
 
I've just become a Design Team member for a lovely new online store called Handmade BlissI noticed that there was a call out for their 1st ever Design Team when I was doing a wee bit of window shopping at the store. So I thought what the heck I might give it a go, never ever thinking I would be successful. Anyhow, the following morning I received a lovely email back inviting me to join the team. I'm so excited to be part of something new, and I get to play with lots of my favourite products and be with lovely friends.

http://www.handmadebliss.co.uk/shop/4588358199
 
Our design team consist of 4 fab members, and each month we will share 2 card/projects with you. We will be showcasing products available in the Handmade Bliss shop; the store stock lots of fab American brands such as The Alley Way, Doodlebug Designs, Stamping Bella, Taylored Expressions, Avery Elle etc, with more big names coming soon. Joanne (the store owner) also plans to stock USA brands that are new to the UK, so make sure you keep checking her store and this space of course. ;)
 
Our Challenges
On the 1st of each month we will start a new themed challenge on our blog and it will run until the 28th of the month, and then a winner will be select by random and announced. Our 1st challenge starts today, and the theme is 'Anything Goes', which makes it nice and easy, so come and join in. To enter, go to our blog here.
 
Sooooo, to kick of our 1st challenge (Anything Goes) here is my card. I decided to keep my card bight and girly - the handbag was paper pieced using my patterned paper pad, then added a few sequins and dots for a little bit of sparkle to finish it off.


 Here's What I Did
I used a 7" x 7" white card base which I matted and layered with black card and patterned paper. I then die cut a circle from white card, added yellow distress ink around the edge and also matted it onto black card. The circle was then cut just off centre.  I matted more patterned paper onto a strip of black card and wrapped yellow ribbon around it. Both the circle and strip were both added to my card base along with a matching bow.

The handbag was stamped onto white card and again onto patterned paper from the pad and these were then both cut out and glued together.  The shoes were stamps in black ink onto white card and also cut out, I added a little glitter to the bows. Both the shoes and handbag were added to the card inside the circle. To finish off I added a double layered die cut 'happy' sentiment, and placed glitter enamel dots and sequins around the card to add a little glitz.

Note: If you prefer you can also buy SVG files direct from the TAW store, which will allow you to cut out the stamp elements using an electronic cutting machine.

Here's What I Used
 
 
Other items used are from my crafty stash: White Card Base, White & Black Card, Circle Dies, Sequins, Foam Pads, Sequins, Distressing Ink, Ribbon, Black Pen
 
So come on what are you waiting for, we'd love to see your card/project in in our 1st ever challenge. And there's a great prize of for the winner too. Click here to go to our blog.  Don't forget to visit the store too!!!

I can't wait to see your makes! And oh yes, why not leave me a message :)
 
Hugs
 
Janine x

PS If you viewed my blog earlier and a different card was shown here - Sorry my error I posted the wrong card. Oop!!! :)