Showing posts with label Stamping Bella. Show all posts

Thursday, 6 April 2017

My Mum's Craft Shop DT - Chatty Squidgy

Hi there everyone 💜

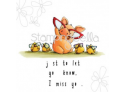
Today I'm here with another My Mum's Craft Shop (MMCS) Design Team card for you. I've chosen one of the stamps from the gorgeous Stamping Bella Squidgy range. I just think that these little characters so sooo sweet. I've been wanting to colour up one of these little cuties for ages, but just haven't had the opportunity until now...so for my card I chose 'Chatty Squidgy.' and coloured her with Copics. To complete my card I used a few dies and a stencil from My Favorite Things (MFT).  Hope you like it.


A Little Close Up For You

Here's What I Did
First I stamped my image onto Neenah card and die cut it into a square and then cut another square from lilac card. The image was also stamped again onto a post-it note and cut out, this was then placed over the image to protect it. Using a stencil, pale pink ink was gently sponged through it making sure not to make it too dark. The stencil was carefully removed and the image was coloured using alcohol markers.

The completed image was added to the lilac mat, then attached to the card font using foam tape. Next the words 'Hi' and 'There' were die cut from  Neenah card stock and funky foam.  Before removing the die cut words from the Neenah card they were coloured using 2 different coloured marker pens (pink & lilac) - the top and bottom were coloured and blended to create an ombre effect. The finished words were glue to the funky foam and glitter was added to them - these were then added to the card front.

To finish off I added 3 lilac pearls to the bottom of the card, and a sprinkling of some sequin waste.

Here's What I Used
Stamps: Stamping Bella 'Chatty Squidgy'
Stencil: My Favourite Thing 'Radiating Rays'
Dies: My Favourite Thing 'Blueprints #8, My Favourite Things 'Hello There'
Paper & Cardstock (CS): 5" x 5" Scalloped Card Blank, Lilac Card, Neenah
Copics:  Skin - E0000, E000, E00, E11, R30 / Hair - YR000, YR00, E13, E99 /  Dress & Bow - V000, V01, V04, V05, V09 / Shoes & Telephone - Y000, Y00, Y02, Y08, Y17
Other: Foam Tape, White Funky Foam, Memento Ink (Tuxedo Black, Lulu Lavender, Angel Pink), Post-it Note, Glitter, Lilac Pearls, Sponges, Sequin Waste

If you wish to purchase any of the above items from My Mum's Craft Shop and an item is out of stock simply email/ring the shop to make an order. Thank you.

Why not, follow us on Facebook group, Pinterest or on our Blog we'd loved to see you.

Thank you so much for dropping by, don't forget to say hi :) 

Challenges entered:

Hugs

x Janine x

Saturday, 26 March 2016

Stamping Bella - Sally and Her Snail

Hi everyone

As I don't have a Design Team card to share with you today, I thought I would share instead a card I made using one of my favourite Stamping Bella stamps. I used Aqua markers to colour with and with glitter pen over the top of the snail shell and flowers.

I love adding yellow and lilac together as they really work together well. I decided to make quite a CAS card and kept the embellishment simple.


Here's What I Did
Firstly I matted my 7" x 7" card base with a piece of pretty patterned paper and another strip across it.

Next I printed my image directly onto my watercolour card stock and coloured it with watercolour Aqua markers, to add a little extra definition I used pencils in a few places.  The finish image was die cut into a square and matted onto a larger die cut square and added to the card base using foam tape.

To finish off I added pearls, a die cut flower and leaves, plus glitter pen to the flowers and the snail shells.

Here's What I Used
Stamp: Stamping Bella 'Tiny Townie - Sally & Her Snail'
Paper/Cardstock (CS): Watercolour CS, LOTV 'Promises' Paper Pad, 7" x 7" Scalloped Card Base, Purple, Green and Lemon CS
Aqua Pens: Face/Skin - Peach, Topaz, Desert, Blossom / Hair - Yellow, Sunflower, Boulder, Chestnut/ Background - Aquamarine / Outfit, Shoes, Butterfly & Flowers - Purple, Red Violet, Orchid, Aquamarine, Sunflower / Tights - Aquamarine, Teal / Snail Shell - Sunflower, Gold / Snail Body - Bud Green, Fawn / Grass & Leaves - Bud Green, Moss
Dies: Crealies 'XXL Stitched Square', Tattered Lace 'Pearl Squares', MFT Die-namic - Blueprint '14'
Other: Foam Tape, Bakers Twine, Wink Of Stella 'Clear Glitter' Pen, Pearls

Why not leave me a message so I know who's out there - I'd love to hear from you!!

Call back soon :)

Challenge Entered:
Spectrum Noir (Facebook Challenge-March) - Sparkle

Hugs & kisses

x Janine x

Saturday, 20 February 2016

Sweet Stampin' - Glittler & Sparkle

Hello and good morning everyone ---

Well it's Saturday and Sweet Stampintime - so I'm here to share my Design Team card with you. Our theme this week is 'Glitter & Sparkle'  So come grab your stamp and glitter, and make card or project with us.

For my card this week's card I'm sharing a Christmas card I made for my daughter and boyfriend (their first couple's card....aw!). As soon as I spotted this Stamping Bella stamp I thought of them...as penguins mate for life, plus it's soooo cute. Using the patterned paper as inspiration I decided to go with lilac for the main colour. I coloured the image with Copic pens, and added a die cut poinsettia and a fancy border frame to finish it off.


Here's What I Did
To create my card I matted a 7" x 7" white scalloped card base with lilac card and pretty patterned paper. Next I stamped my image onto colouring card stock and coloured it with Copic pens and die cut it into a square. The finished image was matted and layered onto co-ordinating card and attached to a die cut border which I attached from behind to create a frame, this was then added to the card base using foam tape.

To finish off I used glitter on the trees and snow, and added a die cut poinsettia and a few leaves.

Here's What I Used
Stamp: Stamping Bella 'Warm & Fussy Penguins'
Copics: Penguins - C0, C1, C3, C5, C7, Y11, Y17, B0000 / Trees - YG01, YG03, YG17, YG67, G28 / Scarf - BV02, BV04, BV13, BV17, BV31 /  Heart - R14, R27 / Snow - B0000, C0 / Sky -B0000, R0000, R00 /Penguin Hats - BV04, BV31
Dies: Crealies 'XXL Stitched Square',  Spellbinders 'Poinsettia', Memory Box 'Holly Branch'
Paper & Cardstock (CS): 7" x 7" Card Base, Lilac CS, Lilac Glitter CS, Centura Pearl CS, Neenah, LOTV 'Snow Princess' Paper Pad
Other: Glitter, Gem, White Pen, Martha Stewart 'Branch' Punch

So why not drop by the Sweet Stampin' Challenge blog and check out what my fab Design Team girlies have made to inspire you. So come on why not join in with the fun and enter your card/project into our 'Glitter & Sparkle' challenge we'd love to see your entries. 
 
BUT REMEMBER you must include a stamped element on your card, follow our theme and link back to the Sweet Stampin' blog for a chance to win a prize!  Have fun and good luck.
 
This week's prize is Crafts And Me
 
Thank you so much for dropping by and why not leave me a message to say hi :)

Challenges entered: 
 
Hugs
x Janine x

Tuesday, 11 August 2015

Handmade Bliss Inspiration Card - Smarty Cat

-- Good morning everyone --
 
Hellooo, I'm here again showcasing one of my card using some of the many products you can find in the Handmade bliss store - check out the link below.

This week I decided to play with this gorgeous little character from Stamping Bella, it's called 'Smarty Cat'....don't you just love the glasses lol. I made her into a purrfect girly cat but you could quite easily made her into a Tom. All the Stamping Bella stamps are pre-mounted and stamps beautifully and cleanly.  


If you click on the link further down it will take you straight to the stamp. But why not check out
 the rest of the Stamping Bella collection and all the other fabulous American stamps and dies by click on the logo below.. 
 
http://www.handmadebliss.co.uk/home/4588338105
 
 Here's What I Did
I used a 5" x 5" scalloped card base which I matted with some blue card and patterned paper.  I stamped my images and the sentiment onto some white colouring card, and then using a Copic Fineliner pen I joined the ball of wool to the sentiment.  The scene was then die cut into a circle along with a blue mat. I coloured the image with Copic pens and added a little distressing ink for the sky. A border strip was made from blue card using a punch and die and this was attached to the card base along with the coloured topper.

To finish off I added a stamped out tag, glossy accents to the cat's glasses and a few pearls at the bottom of the card.
 
Here's What I Used
 
Other items used are from my crafty stash:
White 5" x 5" scalloped card base, Crealies XXL 'Stitched Circle' die, LOTV paper pad and tag stamp, Copic pens, pearls, distressing Inks, Bakers Twine, Glossy Accents, Copic fineliner pen.

If you would like to know more about the products or Copics pens colours I used please leave me a message in your comment, and I will get back to you. Make sure you include your email address in your message.
 
Don't forget our challenge
The theme this month is easy peasy, it's 'Anything Goes', just make a card using one or more of the products in the shop (you don't need to have bought it from there either). So come on and join in, we'd love to see you. To enter go to our blog here.

I can't wait to see your makes! And oh yes, why not leave me a message :)
 
Hugs
 
Janine x

Saturday, 1 August 2015

Handmade Bliss Challenge #4

Good morning everyone
 
Well it's the 1st of the month and which means it's challenge time over at Handmade Bliss. So here's my Design Team card for you today - our theme this month is a really easy one, it's 'Anything Goes'.
 
To enter you must use a product or products that is stocked in the Handmade Bliss store (even if you didn't actually buy it from there). We would appreciate it you could let us know in your blog post which product/s it is in please. To enter, go to our blog here and upload your make there.


http://www.handmadebliss.co.uk/shop/4588358199
 
Handmade Bliss shope stock lots of fabulous American brands such as My Favourite Things, Stamping Bella, Altenew, Doodlebug Designs, Taylored Expressions, Avery Elle etc, with more big names coming soon. Joanne (the store owner) also plans to stock USA brands that are new to the UK, so make sure you keep checking her store and this space of course. ;)

Here's What I Did
I used a cut down sheet of A3 card for my white card base which I matted and layered with patterned paper. Using another piece of the white card I die cut it into a rectangle and then die cut into the centre using an oval die to create a frame. I laid the frame onto my patterned paper and stamped my image on top and removed the frame (this was for placement later).

The image was stamped again onto colouring card stock, coloured with Copic pens and fussy cut out. I die cut a selection of clouds borders from vellum and glued these behind my frame and added the frame to my card base. I attached the girl and balloons to the card directly over the top of the stamped image that I did earlier, I used foam tape behind the top of the balloons to add a little dimension.

To finish off I added white dots and clear glitter to some of the balloons, scattered a few sequins around the sky and added a few gloss dots at the corners.

Here's What I Used
 

Other items used are from my crafty stash: White Card, LOTV Patterned Paper, Vellum, White Pen, Wink Of Stella Clear Glitter Pen, Foam Tape, Copic Pens, Sequins, Crealies XXL Dies, Crystal Gloss Dots.

If you would like to know the Copic colours I used, please leave me a message in the comment box along with your email address and I will get back to you.
 
So come on what are you waiting for, we'd love to see your card/project in in our Anything Goes Challenge (but remember the rules).,,,and there's a great prize for the winner too. Click here to go to our blog and enter - while you're there don't forget to check out what my teamies have created to inspire you.  Oh yes, and don't forget to visit the store too!!!

Why not leave me a message and let me know what you'd like to see stocked in the store :)
Hugs
x Janine x 

Saturday, 11 July 2015

Handmade Bliss Inspiration Card - New Stamping Bella

-- Good morning everyone --
 
Hellooo, I'm here again showcasing my card using some of the products you can find in the Handmade bliss store - you can find the list below. I've been lucky enough to play with one of the new Stamping Bella rubber stamps, this little cutie is called 'Tiny Townie Sally Rides Her Snail. The stamp is pre-mounted onto ez-mount foam, and stamps beautifully.  


If you click on the link below it will take you straight to the stamp, but why not check out
 the rest of the Stamping Bella collection as there's some pretty awesome one.  
 
http://www.handmadebliss.co.uk/shop-page/4588358200/stamping-bella---tiny-townie-sally-rides-her-snail/9841732
 
Here's What I Did
I used a 5" x 7" card base which I matted with some patterned paper.  I then stamped my image and sentiment onto some white colouring card, and using a curved border die I cut across it. The image was coloured using Copic pens and was attached to the base card along with the top section.

To finish off I added crystal drops in complimentary colours, a touch of glitter and a flower button.
 
Here's What I Used


Other items used are from my crafty stash:
White 5" x 7" card base, Simon Says Border Die, LOTV paper pad, Copic Pens, Tonic Crystal Drops, Glitter

If you would like to know more about the products or Copics pens colours I used please leave me a message in your comment, and I will get back to you. Make sure you include your email address in your message.
 
Don't forget our challenge
The theme this month is 'Sketch', simply make a card using the layout shown and use one or more of the products shown in the shop (you don't need to have bought it from there either). So come on and join in, we'd love to see you. To enter go to our blog here.

I can't wait to see your makes! And oh yes, why not leave me a message :)
 
Hugs
 
Janine x

Monday, 1 June 2015

Handmade Bliss Challenge #2 - Colour Swatch

Good morning everyone

I'm here to share my Handmade Bliss Design Team challenge card with you today - our theme this month is 'Colour Swatch'. To enter you must use 2/3 colours from the swatch shown below and make a card/project using any product or products that is stocked in the Handmade Bliss store (even if you didn't actually buy it from there). We would appreciate it you could let us know which product/s it is please. To enter, go to our blog here and upload your make.

 
For my challenge card I've used one of the fabby Stamping Bella stamps called 'Nice To See You Petunia'  I'm so in love with Stamping Bella stamps and the new June release are just fabulous, and they're coming soon to Handmade Bliss. Yay!!!


http://www.handmadebliss.co.uk/shop/4588358199
 
 Here's What I Did
I used a 6" x 6" white card base which I matted and layered with 2 different patterned papers. I then stamped my piggy image and grass onto some colouring card and die cut it into a circle. To allow me to create the cloudy sky without colouring over the images I made masks for all creatures - this was done by stamping the whole image again onto copier paper and cutting everything out. Using removal tape I placed all the masks on top of the creatures and coloured the sky using my cloud cut out and distressing ink. When the sky was dry I coloured everything else with Copics and added glossy accents to the spectacle lens.

The finished picture was glued onto a die cut scalloped circle and attached to the card base. To finish off I added a die cut flower, leaves and a sentiment tile.

Here's What I Used
 

Other items used are from my crafty stash: White Card Base, Blue, Yellow, Teal Card, Grass Stamp, Stitched Circle Dies, MFT Dies, Foam Pads, Distressing Ink, Glossy Accents, Ribbon, Button. Sentiment Tile, Copics (if you need to know the colours I used just message me and I'll send you the list - make sure you include your email address).
 
So come on what are you waiting for, we'd love to see your card/project in in our Colour Challenge (but remember the rules). And there's a great prize of for the winner too. Click here to go to our blog and enter.  Oh yes, and don't forget to visit the store too!!!

Why not leave me a message and let me know what you'd like to see stocked in the store :)
 
Hugs
 
x Janine x