Monday 28 September 2020

Craft Consortium - Happy Haunting Sneaky Peak

 Morning everyone

Well I think that autumn has officially hit the UK, the fleece and heating are on. I do love autumn, the freshness of the season, the gorgeous colours and most of all, Halloween. Soooo, on  that note I have a wonderful new launch to share with you from Craft Consortium (in partnership with Helz Cuppleditch) called 'Happy Haunting'. This new collection really ticked all my boxes, and I know you will love them too. x

So today I'm sharing all 4 of the cards I made using the gorgeous stamps and papers, I did make some bunting using the papers but unfortunately I couldn't take a photo of it (once Craft Consortium have shared it, I will add it on my blog post. The collection is now available to pre-order on the Craft Consortium website - see the links below the photos. It will be available in all good retailers and in the US from the 5th October.

This collection and other collections are available from the Craft Consortium's website and good craft retailer's websites. In the USA, it will be distributed by Notions Marketing. You can also go direct to the Craft Consortium's website here and sign up for an update on any future product launches. 
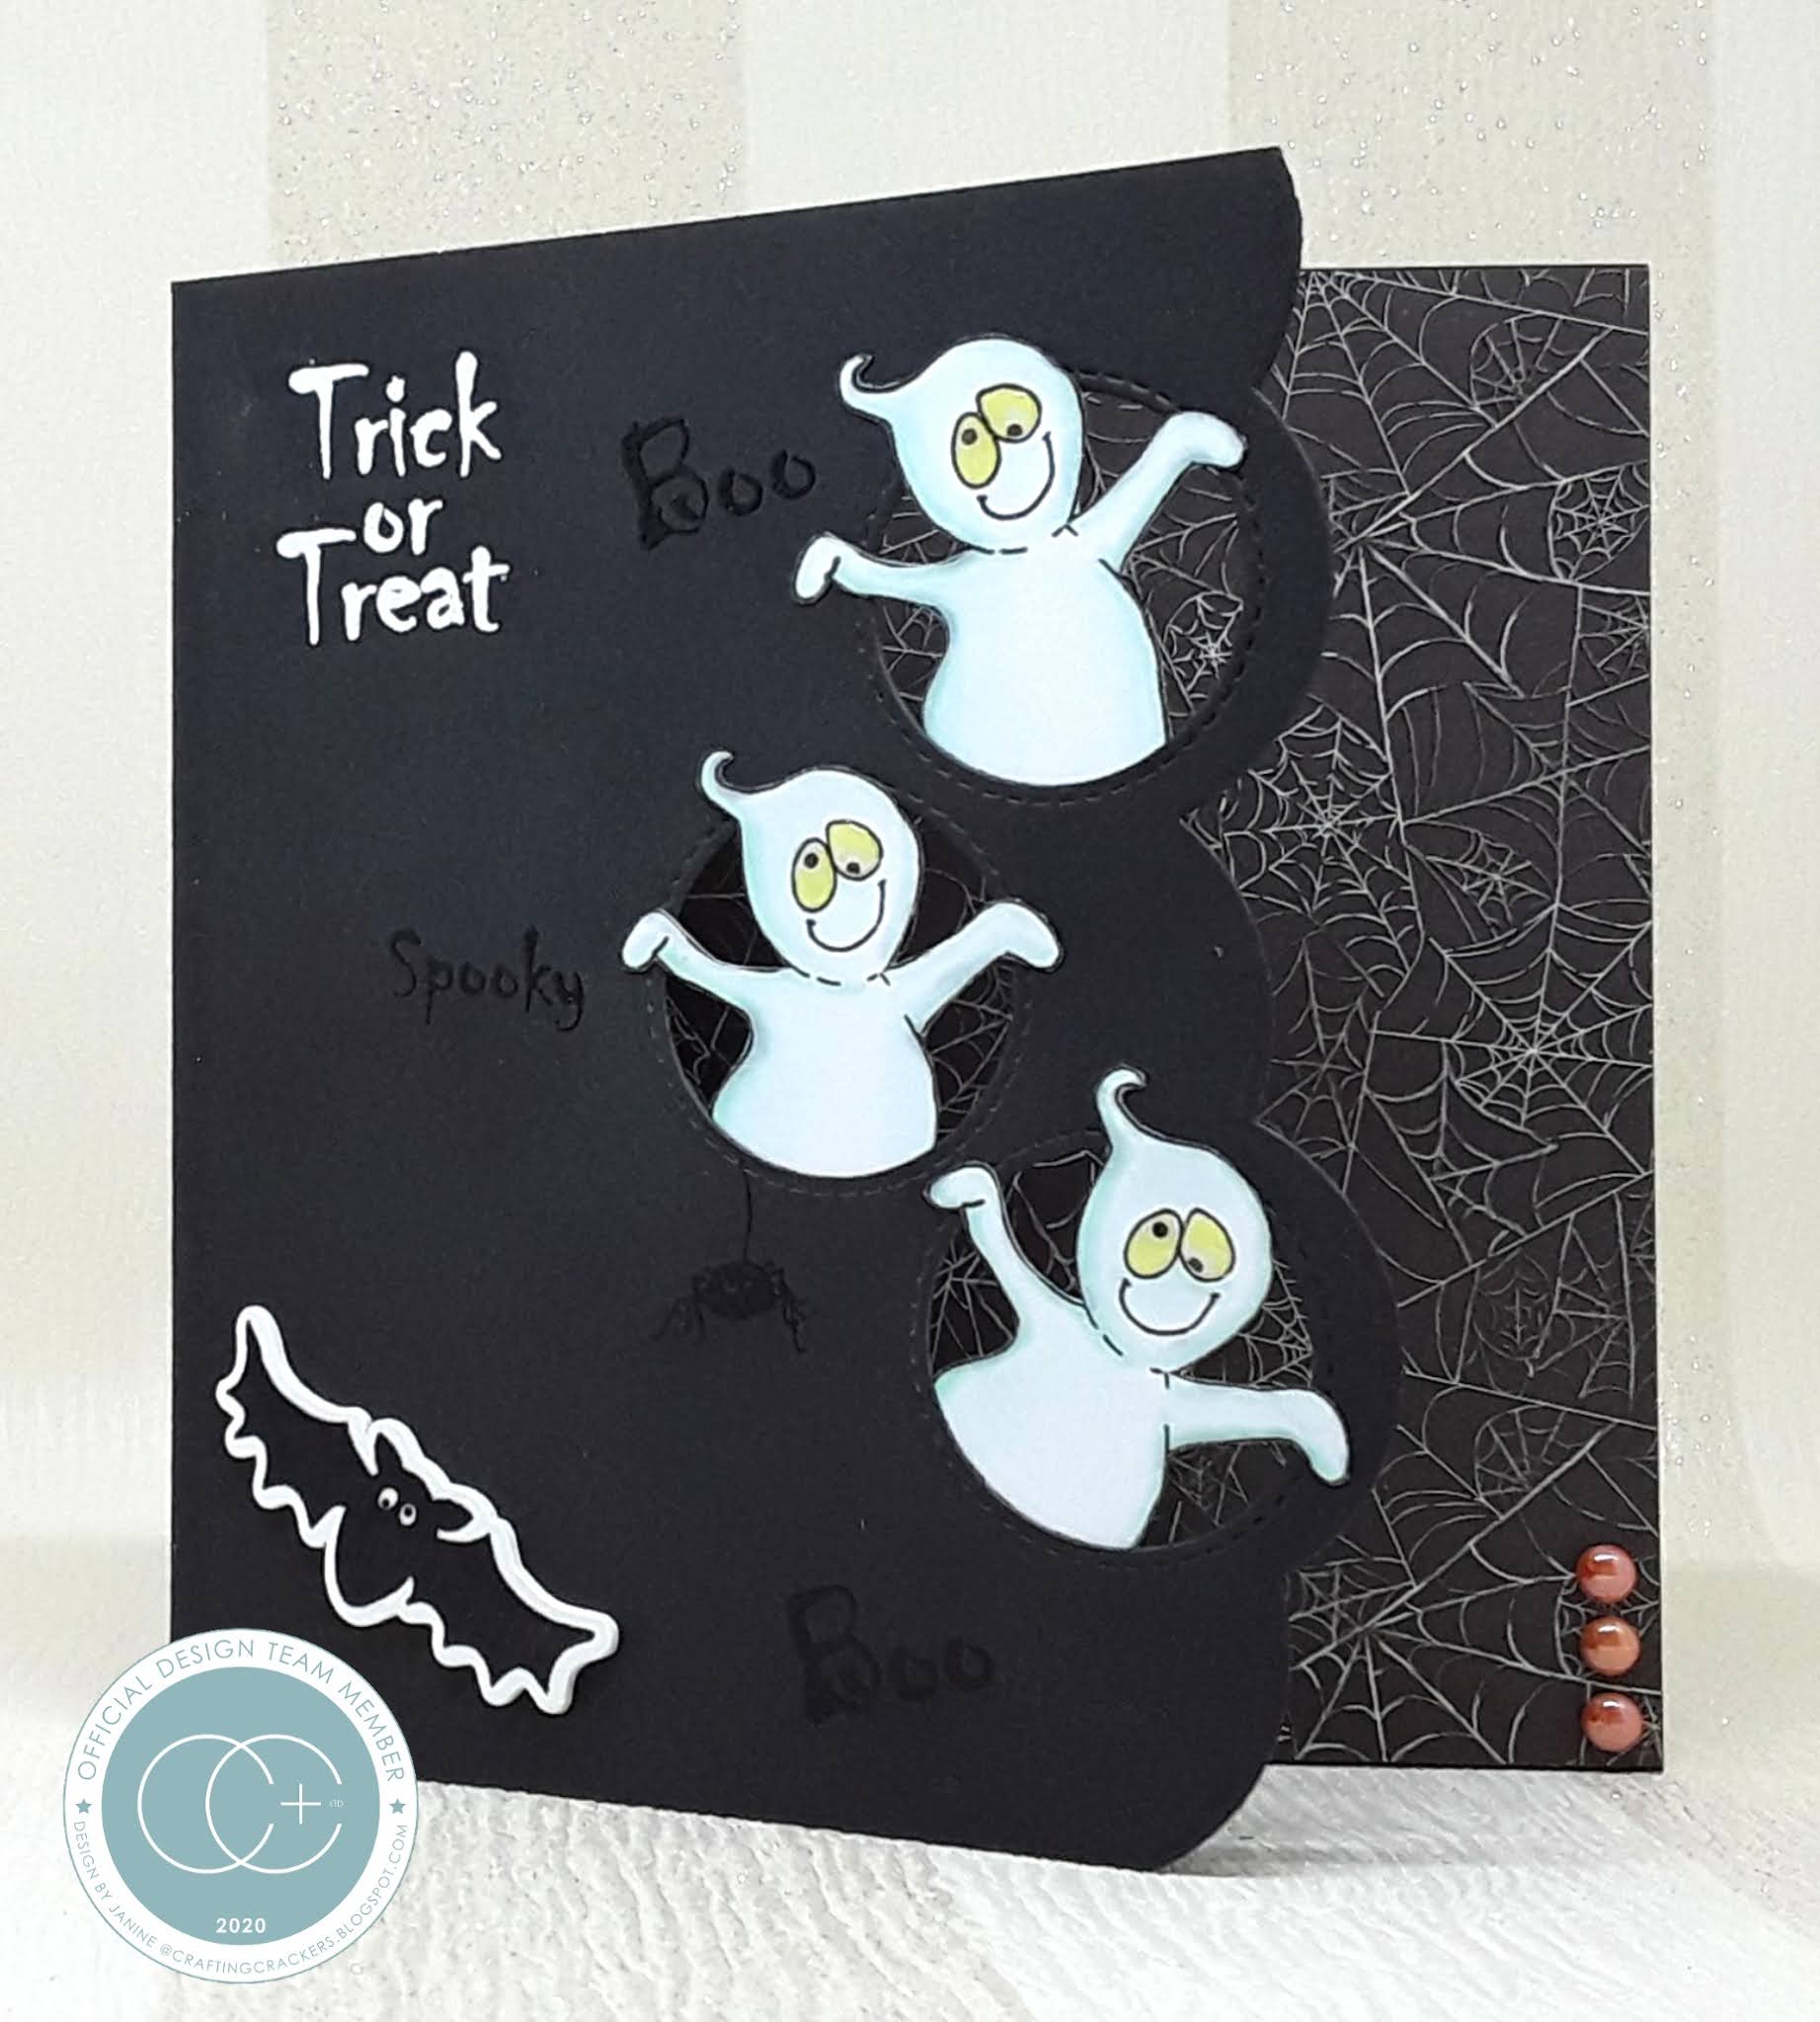
This one was made for my daughter and her partner who both love Halloween
Craft Consortium Product Used
Happy Haunting - Stamp Sets (as shown above)
Happy Haunting - 6" x 6" and 12" x 12" Paper Pad
Happy Haunting- Adhesive Pearls & Wooden Shape

Other Things I Used: 
Card/Paper - 6” x 6” & 7” x 7” White Card Blank, Copic Pens, Make It Colour Blending Card, Black Card, Orange Card, White Card, Grunge - Festive Tones Paper Pad (Craft Consortium), Silver Glitter Card

Dies - Stitched Scalloped Squares (Creative Expressions), Stitched Scalloped Circles (Creative Expressions) Peek-A-Boo Window & Edge (MFT), Circles (Tattered Lace), Wispy Grass Border (Taylored Expressions), Festive Collections - Winter Foilage (Crafters Companion), Bunting (The Works), Scalloped Circles (Tonic), Alphabet (Little B), Swirling Star Dies (Sizzix), Starry Skies Dies (Lawn Fawn), 

Misc - Mask It Paper,  Black Hybrid Ink, Oxide Ink (Tumbled Glass, Twisted Citron, Broken China, Faded Jeans, Chipped Sapphire, Wilted Violet, Faded Jeans, Fossilized amber, Black Soot), Glossy Accents, Clear Glaze Pen, Clear Glitter Pen, Clear & White Embossing Powder, Versamark Ink, Water, Electronic Cutting Machine & Haunted House SVG File, Bakers Twine, Buttons, Glue, Double Sided Tape, Funky Foam, White & Brown Pencil, White Pen, Black Fineliner, 

If you would like to know how I made a specific card or need more information please email me (my address is on the right), and I will send you the details. Do not leave a message requesting information  in the comments box unless you leave me your email address, as I'll be unable to contact you otherwise. x

If you purchase any Craft Consortium products could I politely ask that you give feedback on their facebook page or website and let them know what you think.  Please support our Craft suppliers. Thank you. xxx

Why not follow us on Facebook - Craft Consortium NetworkCraft Consortium Ltd or our our Instagram page. We'd loved to see you.  Thank you so much for dropping by, don't forget to say hi :) 

Please Note - I am part of the Craft Consortium's Design Team and I receive their lovely products to play with and share with you; I do not receive any kind of payment for my samples or my participation. Thank you. x

I'll be back tomorrow with another card made using this fabulous collection, so see you then. TTFN!

Challenges entered:

Hugs

x Janine x

Sunday 27 September 2020

Lili Of the Valley - Christmas Launch 2- Card #4

 Afternoon Everyone

I have another cute Lili Of The Valley Christmas digi stamp and paper to share with you today. As mentioned a few weeks ago the new LOTV images are different this time around as the digi stamps are in 4 different versions - a transparent sky in a solid white square (PNG), white image PNG with a fully transparent background, white image with snowy floor with a fully transparent background (PNG),  original JPG images with white background. (This has now been added to my Etsy store)

Today's card was made using the original JPG images of 'Wrapped Up Warm' and printed straight on my colouring card along with a sentiment. I coloured the scene in with Copic pens and added a sentiment from a previous launch. I used a digi paper from the 'Snow Princess' set. 
______ XXX _____
FYI, if you struggle using digi stamps or haven't got a suitable software package on your computer check out my 'Tutorials' page on this blog or in the 'Files' section on the 'We Love Lili Of The Valley' facebook group (if you are a member) as I've written 4 pictorial tutorials on how to download a free software program called WPS Office and then how to use it with digi stamps.

For your information, here is the link to the LOTV Etsy Store to check out all the digi stampsand the LOTV online store to check out the rest of their goodies.


Here's What I Did 
I imported the digital paper into my graphics program and resized it to fit my 5" x 7" card, then printed it onto good quality printer paper. The paper was then added to the front of the card blank, leaving a slim border around the edge. 

Using my graphics software again I imported the digi stamp along with the sentiment and resized them both to fit the die I was using. When I was happy with everything I printed the scene directly onto my colouring card, then cut it out with the tag die. The image was coloured in using Copic pens. I die cut the tag again from white card and glued it to the back of the coloured version to give it a little dimension. 

The tag was glued flat to the centre of the card front on a slight angle. Two large snowflakes were added to the top of the tag and several smaller ones were added around the coloured image. To finish the card I added a pearl and some gems to the card.

Here's What I Used 
Digital Stamp: Wrapped Up Warm
Digital Paper: Snow Princess

Copic Pens: Snowman & Clothing - B0000, B000, 0, C2, Y15, Y38, E31, E33, E35, V05, V06, V12, V15,B23, B24, B32, B97, C0, C01 / Bear & Clothing - E31, E33, E35, E37, V05, V06, V12, V15, B23, B24, B32, B97 / Robin -  E31, E33, E35,  R22, R27 / Mouse & Jumper - E31, E33, E35, B23, B32, B97 / Rabbit & Scarf - W0, W1, W3, W5, V05, V06, V15 / Bag - E31, E33, E35, V05, V06, V12, V15 /  Snow -  B0000, B000, 0, C1

Other: 5" x 7" White Card Blank, Make It Colour Card, White Card,  Purple Glitter Card (Hobbycraft), White Digital Printing Paper, Decorative Tags (Sweet Dixie), Mini Snowflake Die (Sizzix), Mini Snowflake Die (Lawn Fawn), Lilac Pearl, Gem, Heart Gem, Glue, Double Sided Tape, Funky Foam

Or why not join us on social media at  'We Love Lili Of the Valley' Facebook Group run by the Design Team, the official Lili Of The Valley Facebook page and on Instagram.  We'd loved to see you.

Please Note - I am part of the Lili Of The Valley's Design Team and I receive their lovely digi images to play with and share with you; I do not receive any monetary reimbursement for my samples, advertisements or my participation. I do, what I do for fun and relaxation. Thank you. x

Thank you so much for dropping by, and please don't forget to say hi :)  I'll be back soon with more sneaky peeks of the fabulous new LOTV Spring stamps. TTFN

Challenges entered:

Hugs

x Janine x

Wednesday 16 September 2020

Craft Consortium - Nativity Sneak Peak

Hello everyone

Well after having a lovely day out in the North Yorkshire moors here in the UK...which is only 10 minutes up the road for me, I'm now going to sharing a little big of tradition Christmas magic with you.
Today I'm sharing a sneak peak of the new 'Nativity' collection being launched by Craft Consortium (in partnership with Helz Cuppleditch). Helz's introduced us to the Snomes, Polar Pals and the Gift Of Giving...and more. If you have children, grandchildren, nieces or nephews...or maybe yourself who have played a part in a Christmas Nativity, then you will love this new collection. 

I'm sharing all 4 of the cards I made using the gorgeous stamps and papers. The collection will be launched on the Create & Craft TV on Saturday 19th September @ 19.30 (GMT) 15.30 (EST) time. You can also watch this in the USA as well as the UK. After the official launch it will be available to buy from the Craft Consortium website, and in all good craft shops. Once the launch has taken place I will add the links to the products.

This collection and other collections are available from the Craft Consortium's website and good craft retailer's websites. In the USA, it will be distributed by Notions Marketing. You can also go direct to the Craft Consortium's website here and sign up for an update on any future product launches. 
Craft Consortium Product Used
Nativity - Stamp Sets (as shown above)
Nativity - 6" x 6" and 12" x 12" Paper Pad
Nativity - Adhesive Pearls

Other Things I Used: 
Card/Paper - 6” x 6” & 5” x 7” White Card Blank, 6” x 6” White Scalloped Card Blank, Prismacolor Pencils, Copic Pens, Strathmore Toned Paper Pad, Make It Colour Blending Card, Gold Pearl Card, Torn Copier Paper, White Card, Kraft Card, Silver Glitter Card, Navy Card

Dies - Stitched Scalloped Square Die (Creative Expressions), Swirling Star Dies (Sizzix), Pierced Circle Die (Crealies), Snowflake Frame Dies (Sweet Dixie), Nobles – Double Pierced Background Rectangle Die (Creative Expressions), Stitched Hillside Border Dies & Starry Skies Dies (Lawn Fawn), Distressed Edge Dies (Creative Expressions), Rounded Corner Square Die, Stitched Indented Square Die (Elizabeth Craft Designs)

Misc - Black Hybrid Ink, Distress Ink (Vintage Photo, Tea Dye), Oxide Ink (Tumbled Glass, Broken China, Faded Jeans, Chipped Sapphire, Seedless Preserve, Black Soot), White Paint, Water, Gold Pen, Pearls, Glitter, Gold Glitter, Gold Embossing Powder, Versamark Ink, Glue, Double Sided Tape, Funky Foam, Clear Glitter Pen

If you would like to know how I made a specific card or need more information please email me (my address is on the right), and I will send you the details. Do not leave a message requesting information  in the comments box unless you leave me your email address, as I'll be unable to contact you otherwise. x

If you purchase any Craft Consortium products could I politely ask that you give feedback on their facebook page or website and let them know what you think.  Please support our Craft suppliers. Thank you. xxx

Why not follow us on Facebook - Craft Consortium NetworkCraft Consortium Ltd or our our Instagram page. We'd loved to see you.  Thank you so much for dropping by, don't forget to say hi :) 

Please Note - I am part of the Craft Consortium's Design Team and I receive their lovely products to play with and share with you; I do not receive any kind of payment for my samples or my participation. Thank you. x

I'll be back tomorrow with another card made using this fabulous collection, so see you then. TTFN!

Challenges entered:

Hugs

x Janine x

Tuesday 8 September 2020

Lili Of The Valley - Christmas Launch 2 - Sneak Peak #3

 Hi There Everyone

Again I have another wonderful sneaky peaks of the new Lili Of The Valley Christmas digi goodies which launch tomorrow - 9th September. You will love all the new characters and scenes, as well as fabulous new digital papers. As mentioned in my last post the new LOTV images are different this time around as the digi stamps are in 3 different versions - PNG (cutout without a box), PNG (cutout inside a box - which is contained on a large rectangle) and as a JPG. Please read my previous post for an explanation of how the new images work and for more information. (This has now been added to my Etsy store)

As you can see my card today is using the same 'Bears & Snowman' cutout boxed version I used yesterday, but this time I have used a pretty pink digital paper behind it from the 'Coral & Teal' set. I wanted to show how different an images can look by using a different paper behind it. I coloured the scene in with Copic pens and added a sentiment from a previous launch.
______ XXX _____
FYI, if you struggle using digi stamps or haven't got a suitable software package on your computer check out my 'Tutorials' page on this blog or in the 'Files' section on the 'We Love Lili Of The Valley' facebook group (if you are a member) as I've written 4 pictorial tutorials on how to download a free software program called WPS Office and then how to use it with digi stamps.

For your information, here is the link to the LOTV Etsy Store to check out all the digi stampsand the LOTV online store to check out the rest of their goodies.

Here's What I Did 
First I printed my sheet of coral pink digital paper onto good quality printer paper. The paper was then used it to cover the front of a 6" x 6" white card blank, leaving a slim border around the edge. 

Using my graphics software I imported the digi paper I used previously and then imported the snowman and bears digi stamp. I moved the image around until I was happy with the positioning of the dotty snowflake paper, then added my sentiment in the snowy area. When I was happy with everything I printed the scene directly onto my colouring card, then die cut it into a scalloped square. The image was coloured in using Copic pens, and when it was finished funky foam was glued to the back. Glitter was added to the hat trims and snow.

I die cut a large snowflake frame from white card and glued it flat to the centre of the card front. The finished topper was attached the centre of the snowflake frame. To finish the card I added white pearls around the card.

Here's What I Used 
Digital Stamp: Bears & Snowman 
Digital Paper: Coral & Teal Set (to be released)

Copic Pens: Snowman - 0, C0, C1, C2, Y15, Y38 / Bears - E31, E33, E53, C3, C5, 100 / Blue Clothing - B0000, B000, B00, B02, B04, B05, C0, C1, C2, YG00, YG01 / Snow - C0, C1

Other: 6" x 6" White Card Blank, Super Smooth Colouring Card (LOTV), White Card, White Digital Printing Paper, Stitched Scallop Square Die (Creative Expressions), Snowflake Frame Die (Sweet Dixie), White Pearls, Glitter, Glue, Double Sided Tape, Funky Foam

Or why not join us on social media at  'We Love Lili Of the Valley' Facebook Group run by the Design Team, the official Lili Of The Valley Facebook page and on Instagram.  We'd loved to see you.

Please Note - I am part of the Lili Of The Valley's Design Team and I receive their lovely digi images to play with and share with you; I do not receive any monetary reimbursement for my samples, advertisements or my participation. I do, what I do for fun and relaxation. Thank you. x

Thank you so much for dropping by, and please don't forget to say hi :)  I'll be back soon with more sneaky peeks of the fabulous new LOTV Spring stamps. TTFN

Challenges entered:

Hugs

x Janine x

Monday 7 September 2020

Lili Of the Valley - Christmas Launch 2 - Sneak Peak #2

 Hi Everyone

I'm continuing my sneaky peaks of the new Lili Of The Valley Christmas digi goodies. as mentioned in my previous post the 2nd collection of Christmas digi stamps launches on 9th September. The new images includes lot of bears, snowmen, characters, sentiment labels, alphas and digital papers. You will fall in love with the fabulous new images as well as the gorgeous papers. The new LOTV images are different this time around as the digi stamps are in 3 different versions - PNG (cutout without a box), PNG (cutout inside a box - which is contained on a large rectangle) and as a JPG. (This has now been added to my Etsy store)

New Digi Designs
For my card today I have used the cutout boxed version of the 'Bears & Snowman', plus one of the new digi sentiment labels and a digi paper from the 'Frozen Snowflakes' set behind it. To explain the PNG cutout images - on both version the characters are solid but the area around the characters has been cut away. this means the area around the image is missing which allows you to add one of the digital papers behind it to create the background sky etc. The whole scene can then be printed off as one piece onto your colouring card. Alternatively, you can print the scene directly onto your own patterned paper and colour it up as normal (but please bear in mind that your paper will need to be suitable to colour onto). What this means that in both cases you to add a background sky to your image without colouring it in. Clever eh!

LOTV are in the process of creating a tutorial and video to make it easier for everyone to understand. If you do buy any of the digi stamps and papers, and you need any help please do not hesitate to ask, and I will do my best to help. Please email me at: jsnine.quinn@gmail.com
______ XXX _____
FYI, if you struggle using digi stamps or haven't got a suitable software package on your computer check out my 'Tutorials' page on this blog or in the 'Files' section on the 'We Love Lili Of The Valley' facebook group (if you are a member) as I've written 4 pictorial tutorials on how to download a free software program called WPS Office and then how to use it with digi stamps.

For your information, here is the link to the LOTV Etsy Store to check out all the digi stampsand the LOTV online store to check out the rest of their goodies.


Here's What I Did 
First I printed my sheet of digital paper onto good quality printer paper. The paper was then used it to cover the front of a 6" x 6" white card blank, leaving a slim boarder around the edge. 

Using my graphics software I imported the digi paper I used previously and then imported the snowman and bear digi stamp.  I moved the image around until I was happy with the positioning of the snowflake paper, then added my sentiment. When I was happy with everything I printed the scene directly onto my colouring card, then die cut it into a square. The image was coloured in using Copic pens, and when it was finished funky foam was glued to the back. Glitter was added to the hat trims, snow and snowflakes as well as the sentiment label.

I die cut a pretty holly frame from white card and glued it flat to the centre of the card front. The square topper was attached the centre of the holly frame. To finish the card I added pink pearls around the sides of the frame.

Here's What I Used 
Digital Stamp: Bears & Snowman 
Digital Paper: Icy Snowflakes 

Copic Pens: Snowman - 0, C0, C1, C2, Y15, Y38 / Bears - E31, E33, E53, C3, C5, 100 / Pink Clothing - RV00, RV02, RV10, RV13, RV34, C0, C1, C2  / Blue Clothing - B0000, B000, B00, B02, B04, B05, C0, C1, C2 / Snow - C0, C1 / Label - RV13

Other: 6" x 6" White Card Blank, Colouring Card (Make It Colour), White Card, White Digital Printing Paper, Double Pierced Square Die (Crealies), Holly & Swirls 'Peace' Frame Die (Sweet Dixie), Pearls, Glitter, Glue, Double Sided Tape, Funky Foam

Or why not join us on social media at  'We Love Lili Of the Valley' Facebook Group run by the Design Team, the official Lili Of The Valley Facebook page and on Instagram.  We'd loved to see you.

Please Note - I am part of the Lili Of The Valley's Design Team and I receive their lovely digi images to play with and share with you; I do not receive any monetary reimbursement for my samples, advertisements or my participation. I do, what I do for fun and relaxation. Thank you. x

Thank you so much for dropping by, and please don't forget to say hi :)  I'll be back soon with more sneaky peeks of the fabulous new LOTV Spring stamps. TTFN

Challenges entered:

Hugs

x Janine x

Friday 4 September 2020

Lili Of The Valley - Christmas Launch 2 - Sneak Peak #1

Morning Everyone

I hope you're all well and keeping safe, and doing your best to ride out the pandemic. Myself and my family are doing our upmost to safe safe and healthy, while trying to get to grips with the new 'normal'.  Well after a few days of pretty rubbish weather here in the UK, I think we all need something to brighten our day, so I have some new Lili Of The Valley Christmas goodies to share with you. Yes, LOTV are launching the 2nd collection of Christmas digi stamps very soon. Wait until you check out the fabulous new images and sentiments, and guess what else....yep...digital papers. I know, it's amazing news isn't it. The whole collection is to die for, you will love them! The collection launches on 9th September, and once it has taken place I will add the links to the products. (This has now been added to my Etsy store)

The Collection
It includes lot of bears, snowmen, characters, sentiments and digital papers all in different designs. The difference with this launch is that for the first time LOTV have created 2 x PNG character images as well as JPG images. The 2 PNG images have a cut out section so that a digital paper can be placed behind it and to create a background. Alternatively you can print directly onto your own patterned paper. The main body of the characters are white you can simply print the whole image with the background paper onto your colouring cardstock and colour it the images as normal. The lovely ladies LOTV are in the process of creating a written tutorial and video to make it easier for everyone to understand. If you do buy any of the digi stamps and papers, and you need any help please do not hesitate to ask, and I will do my best to help. Please email me at: jsnine.quinn@gmail.com

Right onto my card, so today I'm sharing one of the digi stamps, some digital letters and one of the papers from the new collection. I used the 'Beary Merry Christmas' stamp, the 'Festive Message' letters and a paper from the 'Modern Christmas' set. I used Copic pens to colour with. 
______ XXX _____
FYI, if you struggle using digi stamps or haven't got a suitable software package on your computer check out my 'Tutorials' page on this blog or in the 'Files' section on the 'We Love Lili Of The Valley' facebook group (if you are a member) as I've written 4 pictorial tutorials on how to download a free software program called WPS Office and then how to use it with digi stamps.

For your information, here is the link to the LOTV Etsy Store to check out all the digi stampsand the LOTV online store to check out the rest of their goodies.


Here's What I Did 
First I printed my sheet of digital paper onto good printer paper, and covered the front of a 5" x 7" white card blank. Using my graphics software I imported the cute little bear carolers image along with the letters 'L' and 'A', then copied and pasted the letters a few times and arrange my scene.  I resized everything to fit my project and printed everything directly onto my colouring card. the scene was die cut into a rounded rectangle. The image was coloured in using Copic pens and when it was finished it was attached to a green scalloped mat. I added musical notes around the image using a black fineliner pen along with a few yellow glitter stars.

Funky foam was glued to the back of the topper and attached to the centre of the card front. To finish the card I added glitter to the snow, star and all the 'LA, LA, LA's'. 

Here's What I Used
Digital Stamp: Beary Merry Christmas  
Digital Paper: Modern Christmas 
Sentiment: Festive Message

Copic Pens: Bears - E31, E33, E53, C3, C5, 100 / Clothing & Lettering - G12, G29, G82, YG63, YG67, C1, C3, 0, R20, R22, R27, R59 / Star - Y15, Y17, Y38 / Branch & Holly - E31, E33, G12, G29, G82, YG64, R27 / Song Sheet - E50, E51, E53 / Snow - B0000, B000, C1

Other: 5" x 7" White Card Blank, White Colouring Card (Make It Colour), Green Card, White Digital Printing Paper, Yellow Glitter Card, Stitched Scallop Layered Rectangle Die (Creative Expression), Star Punch, Black Fineliner Pen, Glitter, Glue, Double Sided Tape, Funky Foam

Or why not join us on social media at  'We Love Lili Of the Valley' Facebook Group run by the Design Team, the official Lili Of The Valley Facebook page and on Instagram.  We'd loved to see you.

Please Note - I am part of the Lili Of The Valley's Design Team and I receive their lovely digi images to play with and share with you; I do not receive any monetary reimbursement for my samples, advertisements or my participation. I do, what I do for fun and relaxation. Thank you. x

Thank you so much for dropping by, and please don't forget to say hi :)  I'll be back soon with more sneaky peeks of the fabulous new LOTV Spring stamps. TTFN

Challenges entered:

Hugs

x Janine x