Monday 30 November 2020

Craft Consortium - Woodland Collection

 Hi everyone

I'm sharing a sneak peak of the new collection being launched by Craft Consortium (in partnership with Clare Therese Gray). If you loved the Noel, 'Circus' and 'Farm Meadow you will love this 'Woodland' collection. The collection is full of sweet animals and birds native to the Woodlands of the UK. The collection includes beautiful paper pads, stamp sets and embellishments. 

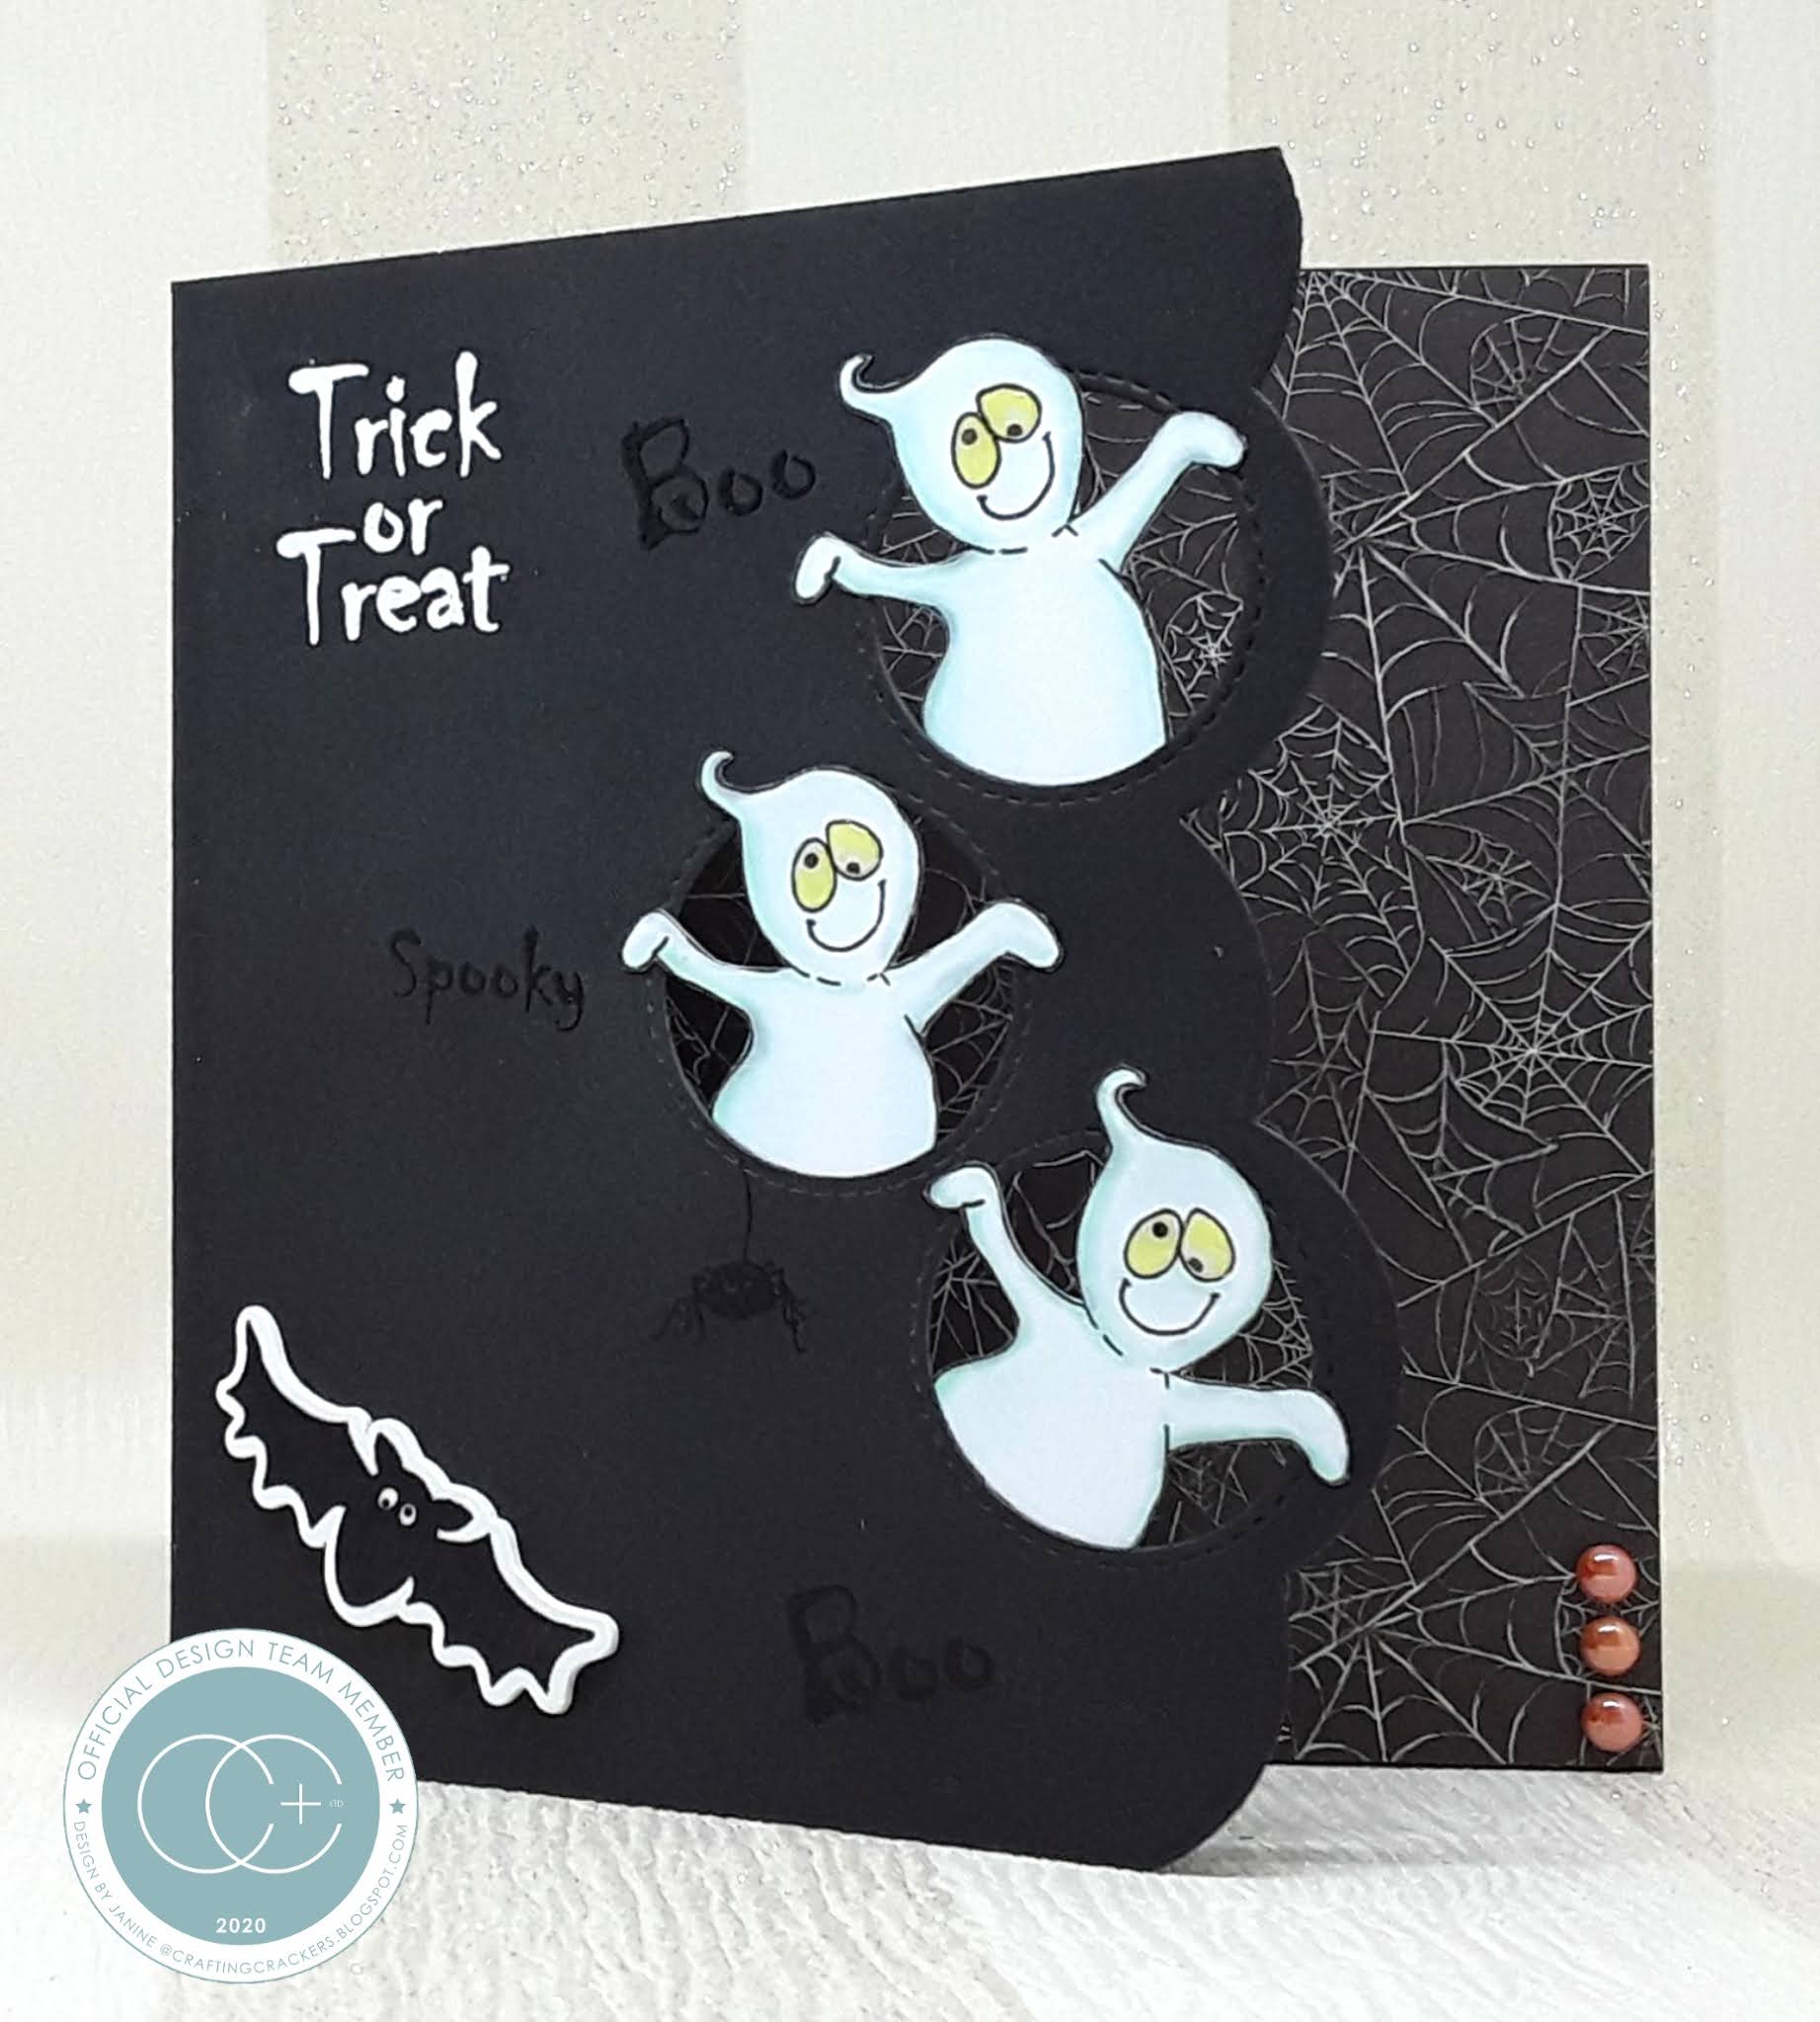
I'm sharing all 5 of the cards I made using the beautiful stamps and papers. The collection will be launched on Create & Craft TV tomorrow (1st December) at 12noon (GMT). The collection will also be available on the Craft Consortium website, and in good craft shops later in the week. You can watch Create & Craft on either a TV,  online via a device through or through their facebook page. I will add the product links after the launch.

This collection and other collections are available from the Craft Consortium's website and good craft retailer's websites. In the USA, it will be distributed by Notions Marketing. You can also go direct to the Craft Consortium's website here and sign up for an update on any future product launches. 
Woodland Animals
Woodland Animals

Woodland Birds
Woodland Birds
Woodland Birds
Craft Consortium Product Used
Noel - Stamp Sets (as shown above)
Noel  - 6" x 6" and 12" x 12" Paper Pad
Noel - Enamel Dots

Other Things I Used: 
5" x 5", 6” x 6”, 5" x 7" and DL Card Blank and Scalloped Blank (White & Black), Copic Pens, Make It Colour Card, Card (White, Black, Deep Red, Green, Brown), Glitter Card (Silver), Stitched Scalloped Circle Dies (Creative Expressions), Stitched Blooms Dies (MFT), Autumn Morning – Tumbling Leaves Dies (Crafters Companion), Brown Card, Square Die (Tattered Lace), Shadow Box Die (Creative Expressions), Stitched Scalloped Square Dies (Creative Expressions), Nested Scalloped Slim Dies (Lisa Horton Crafts), Circle Die (Tonic), Grand Decorative Oval Die (Spellbinders), Home Sweet Home Oval Frame Die (Tonic), Spring Foliage Dies (Creative Expressions), Nasturtium Cluster Dies (Creative Expressions), Winter Wonder Background Stencil (Honey Bee Stamps), Memento Black Ink, Distress Ink (Tea Dye), Distress Oxide Ink (Tumbled Glass, Salty Ocean, Chipped Sapphire, Peeled Paint, Black Soot Red Pearl, Glue, Double Sided Tape, Funky Foam, Computer Generated Sentiment

If you would like to know how I made a specific card or need more information please email me (my address is on the right), and I will send you the details. x

If you purchase any Craft Consortium products could I politely ask that you give feedback on their facebook page or website and let them know what you think.  Please support our Craft suppliers. Thank you. xxx

Why not follow us on Facebook - Craft Consortium NetworkCraft Consortium Ltd or our our Instagram page. We'd loved to see you.  Thank you so much for dropping by, don't forget to say hi :) 

Please Note - I am part of the Craft Consortium's Design Team and I receive their lovely products to play with and share with you; I do not receive any kind of payment for my samples or my participation. Thank you. x

I'll be back tomorrow with another card made using this fabulous collection, so see you then. TTFN!

Challenges entered:

Hugs

x Janine x

Friday 13 November 2020

Lili Of The Valley - James & Jenny Bear #2

Hello again

Hi I'm back again with another new digi stamp from Lili Of The Valley, this time I opted for one of the cute James Bear images. The new stamps were released yesterday (12th November), and are now available to buy in the LOTV Etsy store. 

For my card today I used 'James With Heart Bouquet' and colour him with Copic pens; I teamed him up with a sentiment from the 'Mix 32 Sentiments' that was released earlier in the year. I hope you like him. 

For your information, here is the link to the LOTV Etsy Store to check out all the digi stampsand the LOTV online store to check out the rest of their goodies.


Here's What I Did
To start with I added a piece of pretty floral paper to the front of a 6" x 6" card blank, leaving a slim border around the edge. 

Using my graphics software I imported the sweet James bear stamps and resized it to fit my project. The image was printed directly onto colouring cardstock and die cut into a square. The image was coloured in using Copic pens and mounted onto a lemon scalloped die cut square. Funky foam was glued to the back of the topper and attached to the centre of the card front.  To finish the card I added glitter and a few pearls. 

Here's What I Used
Digital Stamp: James With Heart Bouquet

Copic Pens: Bear - E321, E33, E34, R20, R30 / Flowers, Leaves & Stalks - Y02, Y15,Y35, E29, E33 /  Bouquet Wrapping Paper - B0000, B000, B00, B02 / Ground - W0, W1, W2, W5

Other: 6" x 6" White Scalloped Card Blank, Make It Colour Blending Card, Black Hybrid Ink, 'Bloom and Wild' Paper Pad (Craft Consortium), Stitched Scallop Square Dies (Creative Expressions), Lemon Card, Pearls, Glitter, Glue, Double Sided Tape, Funky Foam

Or why not join us on social media at  'We Love Lili Of the Valley' Facebook Group run by the Design Team, the official Lili Of The Valley Facebook page and on Instagram.  We'd loved to see you.

Please Note - I am part of the Lili Of The Valley's Design Team and I receive their lovely digi images to play with and share with you; I do not receive any monetary reimbursement for my samples, advertisements or my participation. I do, what I do for fun and relaxation. Thank you. x

Thank you so much for dropping by, and please don't forget to say hi :)  I'll be back soon with more sneaky peeks of the fabulous new LOTV Spring stamps. TTFN

Challenges entered:

Hugs

x Janine x

Thursday 12 November 2020

Lili Of The Valley - James & Jenny Bear #1

Hello everyone

I hope you're all doing ok and staying safe and well, and for those of you living in the UK I hope you're surviving the 2nd lockdown. As for myself, I'm keeping body and soul busy by crafting. :) To give you some light relief I'm back with some new Lili Of The Valley loveliness, in the form of James and Jenny Bears. The digi stamps are being released today (12th November) in the Etsy store. 

For my card today I chose ' Jenny Floral Border' and colour her with Copic pens. The link to the new stamp will be added after the launch. I hope you like her. (This card is available to buy in my Etsy store)

For your information, here is the link to the LOTV Etsy Store to check out all the digi stampsand the LOTV online store to check out the rest of their goodies.


Here's What I Did
To start with I added a piece of pretty pink paper to the front of a 6" x 6" card blank, leaving a slim border around the edge. A lacy die cut frame, cut from white card was glued flat in the centre of the card. 

Using my graphics software I imported the gorgeous little Jenny bear in her ring of flowers and resized it to fit my project. The image was printed directly onto colouring cardstock and die cut with doily circle die. The image was coloured in using Copic pens and mounted onto a pink scalloped die cut circle. Funky foam was glued to the back of the topper and attached to the centre of the card front on top of the white lacy frame. To finish the card I added glitter and a few pearls. 

Here's What I Used
Digital Stamp: Jenny Floral Border

Copic Pens: Bear - E321, E33, E34, R20, R30 / Flowers, Leaves & Stalks - RV00, RV02,RV10, RV25, RV52, RV55, V04, V12, B000, B00, B02, Y15, Y17

Other: 6" x 6" White Card Blank, Make It Colour Blending Card, Black Hybrid Ink, 'Bloom and Wild' Paper Pad (Craft Consortium), Grand Scalloped Circle Dies (Spellbinders), Doily Circle Die (Tattered Lace), Lace Frame Die (Sweet Dixie), White Card, Pink Card, Pearls, Glitter, Glue, Double Sided Tape, Funky Foam

Or why not join us on social media at  'We Love Lili Of the Valley' Facebook Group run by the Design Team, the official Lili Of The Valley Facebook page and on Instagram.  We'd loved to see you.

Please Note - I am part of the Lili Of The Valley's Design Team and I receive their lovely digi images to play with and share with you; I do not receive any monetary reimbursement for my samples, advertisements or my participation. I do, what I do for fun and relaxation. Thank you. x

Thank you so much for dropping by, and please don't forget to say hi :)  I'll be back soon with more sneaky peeks of the fabulous new LOTV Spring stamps. TTFN

Challenges entered:

Hugs

x Janine x

Friday 30 October 2020

Lili Of the Valley - Christmas Card #6

Hi Everyone

I'm back again with another winter or should I say Christmas delight. This is the 2nd of my Lili Of The Valley cards that I coloured up and made over the weekend. Today's card has been made using an adorable Santa image...isn't he sweet, I think you could easily use him for a male Christmas card or maybe an 'Across The Miles' card. The stamp is called 'Bumpy Ride' digi stamp (transparent sky in a solid white square - PNG style), and used one of the digi papers from the 'Krafty Red And White' set in both the background and in the picture. I coloured the scene in with Copic pens. Did you know you can buy the images already pre-coloured  from the LOTV Etsy store, which are brilliant for batch making at Christmas time.
______ XXX _____
FYI, if you struggle using digi stamps or haven't got a suitable software package on your computer check out my 'Tutorials' page on this blog or in the 'Files' section on the 'We Love Lili Of The Valley' facebook group (if you are a member) as I've written 4 pictorial tutorials on how to download a free software program called WPS Office and then how to use it with digi stamps.


For your information, here is the link to the LOTV Etsy Store to check out all the digi stampsand the LOTV online store to check out the rest of their goodies.
Here's What I Did 
I printed out one of the Kraft design papers onto good quality printer paper. The paper was trimmed down and added it to the front of a 6" x 6" Kraft card blank, leaving a slim border around the edge. 

Using my graphics software I imported the same digi paper I used earlier and resized it slightly. Next I added the digi stamp over the top and resized them both to fit the die I intended to use. When I was happy with everything I printed the scene directly onto my colouring card and cut it out with a rounded square die. The image was coloured in using Copic pens. Making sure I protected the white border around the coloured in scene I added a little brown distress ink around the edge to make the paper pop. The finished scene was glued flat onto a red scalloped die cut  square, and funky foam was added to the back. The complete topper was then adhered to the centre of the card. 

To finish the card I added glossy accents to the headlights and 3 red enamel dots to the bottom of the card.

Here's What I Used 
Digital Stamp:  Bumpy Ride
Digital Paper: Krafty Red And White

Copic Pens: Santa - E000, E00, E01, E02, R27, E07, E08, E09, C2, C3, W2 / Tree - YG01, YG03, YG17, YG67, B99 / Car - R27, E07, E08, E09, C2, C3, C5, C7, Y15, Y17 / Candy Canes - R27, E09, C1, C3 / Presents - R27, E07, E08, E09, B12, B14, B16, Y17, E31, E33, E35, YG01, YG03, YG17 / Stars - Y15, Y17 / Snow -  B0000, B000 / Shadow - C0, C1

Other: 6" x 6" Kraft Card Blank, Make It Colour Card, Red Card, White Digital Printing Paper, Stitched Scalloped Square Die (Creative Expressions), Tea Dye Distress Ink, Enamel Dots, Glossy Accents, Glue, Double Sided Tape, Funky Foam

Or why not join us on social media at  'We Love Lili Of the Valley' Facebook Group run by the Design Team, the official Lili Of The Valley Facebook page and on Instagram.  We'd loved to see you.

Please Note - I am part of the Lili Of The Valley's Design Team and I receive their lovely digi images to play with and share with you; I do not receive any monetary reimbursement for my samples, advertisements or my participation. I do, what I do for fun and relaxation. Thank you. x

Thank you so much for dropping by, and please don't forget to say hi :)  I'll be back soon with more sneaky peeks of the fabulous new LOTV Spring stamps. TTFN

Challenges entered:

Hugs

x Janine x

Wednesday 28 October 2020

Lili Of The Valley - Christmas Card #5

 Morning Everyone

Where are the weeks and months going! Is it just me??  I feel like I haven't posted any cards in ages. I've been busy though setting up my Etsy shop and adding stock, plus I've decided to sell my Cricut stuff on eBay, both of which have taken up a huge part of my time. Anyhow, I spend the weekend colouring up 2 really cute Lili Of The Valley Christmas digi stamps and teamed them up with some of the new digi papers.

For today's card I have used the 'Cosy Christmas Bear' digi stamp (transparent sky in a solid white square - PNG style) and one of the digi papers from the 'Snow Princess' set in both the scene and in the background. I coloured the scene in with Copic pens. Did you know you can buy the images already pre-coloured  from the LOTV Etsy store, which are brilliant for batch making at Christmas time.
______ XXX _____
FYI, if you struggle using digi stamps or haven't got a suitable software package on your computer check out my 'Tutorials' page on this blog or in the 'Files' section on the 'We Love Lili Of The Valley' facebook group (if you are a member) as I've written 4 pictorial tutorials on how to download a free software program called WPS Office and then how to use it with digi stamps.

For your information, here is the link to the LOTV Etsy Store to check out all the digi stampsand the LOTV online store to check out the rest of their goodies.


Here's What I Did 
I printed out the Snow Princess papers onto good quality printer paper. The paper was trimmed down and added it to the front of a 6" x 6" white card blank, leaving a slim border around the edge. A white die cut frame was glued flat into the centre of the card front. 

Using my graphics software I imported the the same digi paper I used earlier and reduced it slightly; I then rotated it so the colours would appear be the opposite to the background paper. Next I added the digi stamp over the top and resized them both to fit the die I intended to use. When I was happy with everything I printed the scene directly onto my colouring card and die cut into a scalloped square. The image was coloured in using Copic pens. The finished scene was glued flat onto a pink fancy edge die cut square, and funky foam was added to the back. The complete topper was then adhered to the centre of the card. 

To finish the card I added a die cut poinsettia and a few branches, plus a little glitter to the snow. 

Here's What I Used 
Digital Stamp: Cosy Christmas Bear
Digital Paper: Snow Princess

Copic Pens: Bear & Cat Fur - E31, E33, E35, E37, R32 / Hat, Coat & Scarf -  B0000, B000, B00, B02, B12, B14, B16, B18, RV00, RV02, R34, RV52, RV55 / Snow -  B0000, B000

Other: 6" x 6" White Card Blank, Make It Colour Card, White Card, Pink Card, White Glitter Card (Hobbycraft), White Digital Printing Paper, Scalloped Square Die (Sizzix), Pearl Square Die (Tattered Lace Die), Decorative Background (Sweet Dixie), Poinsettia & Winter Leaves Die (Lady E Designs), Fabulous Flowers Die (Hunkydory), Red Ink, Pearl, Glitter, Glue, Double Sided Tape, Funky Foam

Or why not join us on social media at  'We Love Lili Of the Valley' Facebook Group run by the Design Team, the official Lili Of The Valley Facebook page and on Instagram.  We'd loved to see you.

Please Note - I am part of the Lili Of The Valley's Design Team and I receive their lovely digi images to play with and share with you; I do not receive any monetary reimbursement for my samples, advertisements or my participation. I do, what I do for fun and relaxation. Thank you. x

Thank you so much for dropping by, and please don't forget to say hi :)  I'll be back soon with more sneaky peeks of the fabulous new LOTV Spring stamps. TTFN

Challenges entered:

Hugs

x Janine x

Thursday 22 October 2020

Big News!!!

Hi everyone

Well over the past few weeks I have finally managed to set up an Etsy store and started filling it with my cards. YAY!! I am hoping to sell all the Design Team cards I make and display here on my blog. I also planning to offer a personalised option to some cards eg the recipients name, age and maybe a sentiments. There will also be flat printed cards and die cut cards on offer. I have included the postage with the cards price, and can only post within  the UK atm.

I know that there is huge competition on Etsy, so I'm not going to stress if I don't manage to sell anything straight off. Fingers crossed I do finally sell something though. Lol I do have a few admirers already which is fabulous. :)

The Etsy link to the store is shown on the right of my page but here it is again. If you have any card requests don't hesitate to email me at jsnine.quinn@gmail.com or contact me through my shop.

My shop is called Janine's Creative cards (no gaps) or click below:

Hugs 
x Janine x

Sunday 11 October 2020

Lili Of The Valley - Halloween #3

Morning Everyone

Well its the weekend and here again, and wow where are the weeks and months going. It's definitely been a year of craziness! So to calm things down and share some loveliness or should I say spookniness with you, I have a Lili Of The Valley Halloween card for you. I used one of the fabulous new digi stamps and sentiments which is available individually or as part of a big bundle. 

The Collection
The collection includes cute witches, wizards, spooky accessories, sentiments and digital papers all in different designs. The images are in 3 different format --- a transparent sky in a solid white square (PNG) - perfect to overlaying over paper, a white PNG image with a fully transparent background - perfect for overlaying over digi papers with no edges or borders, and a JPG image with a solid white background. If you do buy any of the digi stamps and papers, and you need any help please do not hesitate to ask, and I will do my best to assist you. Please email me at: jsnine.quinn@gmail.com
______ XXX _____
FYI, if you struggle using digi stamps or haven't got a suitable software package on your computer check out my 'Tutorials' page on this blog or in the 'Files' section on the 'We Love Lili Of The Valley' facebook group (if you are a member) as I've written 4 pictorial tutorials on how to download a free software program called WPS Office and then how to use it with digi stamps.

For your information, here is the link to the LOTV Etsy Store to check out all the digi stampsand the LOTV online store to check out the rest of their goodies.


Here's What I Did 
First I trimmed down 2 pieces of 6" x 6" patterned paper (it's all I had) and added them to the front of a 5" x 7" black card blank leaving a slim border edge around the edge. I die cut a scalloped border and added it across the card to hide the join. 

I imported the cute little witch, her cauldron and the sentiment plus a few of my own stars into my graphics program, then resized them to fit my project. The complete scene was printed directly onto colouring cardstock. As the paper is really thin I glued it onto a piece of thin card and then die cut it into a rectangle. The little scene was coloured up using pencils, and white dots were add,. When it was finished funky foam was glued to the back to raise it up. The topper was attached to the centre of the card front.

To finish the card off I added a few gems to the bottom of the card and 2 die cut stars at the top. 

Here's What I Used
Digital Stamp: The Cauldron Girl (I used the white PNG with a fully transparent background with floor)
Whole Collection: Magical Bundle

Prismacolor Pencils: Skin - Lilac, Light Peach, Chartreuse / Hair - Canary Yellow, Burnt Ochre, Dark Brown / Hats & Cloak - Cool Grey 20%, 50%, 70%, Black, White / Witch's Outfit - Blush Pink, Pink, Crimson Red, Crimson Lake, Canary Yellow, Chartreuse, Cloud Blue, Light Cerulean Blue, True Blue, Ultramarine  / Cauldron & Fumes - Warm Grey 20%, 50%, 70%, Black, White, Chartreuse, Apple Green, Parrot Green, Yellow Chartreuse, Crimson Red / Boots - Burnt Ochre, Dark Brown, Sienna Brown / Bottles - Canary Yellow, Chartreuse, Yellow Orange, Apple Green, Burnt Ochre, Sienna Brown / Stars -  Cloud Blue, Light Cerulean Blue, Crimson Red, Canary Yellow, White, Pale Vermilion 

Other: 5" x 7" Black Card Blank, Toned Tan Paper (Strathmore), White Card, Black Card, Believe Magic 6" x 6" Paper Pad (First Edition), Stitched Scallop Layered Rectangles Die (Creative Expression), Elegant Border Die (Sweet Dixie), Star Dies (Sizzix), White Pen, Gems, Glue, Double Sided Tape, Funky Foam

Or why not join us on social media at  'We Love Lili Of the Valley' Facebook Group run by the Design Team, the official Lili Of The Valley Facebook page and on Instagram.  We'd loved to see you.

Please Note - I am part of the Lili Of The Valley's Design Team and I receive their lovely digi images to play with and share with you; I do not receive any monetary reimbursement for my samples, advertisements or my participation. I do, what I do for fun and relaxation. Thank you. x

Thank you so much for dropping by, and please don't forget to say hi :)  I'll be back soon with more sneaky peeks of the fabulous new LOTV Spring stamps. TTFN

Challenges entered:

Hugs

x Janine x

Tuesday 6 October 2020

Lili Of The Valley - Halloween #2

  Hi Everyone

I'm back with another new spooky Lili Of The Valley card, this time I've not made it too Halloweeny and but concentrated on cuteness instead. As mentioned yesterday the new launch includes digi stamps, sentiments and papers in 3 different formats and is available in the store today. You can buy the images, sentiments and paper packs separately or in a big bundle...the choice is yours. Below the photos you can find the names and links to the images and paper I used  in today's card. I used the white PNG with fully transparent background images and overlaid it over digi paper. I used Copic pens to colour with. I hope you like. x (This has now been added to my Etsy store)

The Collection
As mentioned yesterday, the collection includes cute witches, wizards, spooky accessories, sentiments and digital papers all in different designs. The images are in 3 different format --- a transparent sky in a solid white square (PNG) - perfect to overlaying over paper, a white PNG image with a fully transparent background - perfect for overlaying over digi papers with no edges or borders, and a JPG image with a solid white background. If you do buy any of the digi stamps and papers, and you need any help please do not hesitate to ask, and I will do my best to assist you. Please email me at: jsnine.quinn@gmail.com
______ XXX _____
FYI, if you struggle using digi stamps or haven't got a suitable software package on your computer check out my 'Tutorials' page on this blog or in the 'Files' section on the 'We Love Lili Of The Valley' facebook group (if you are a member) as I've written 4 pictorial tutorials on how to download a free software program called WPS Office and then how to use it with digi stamps.

For your information, here is the link to the LOTV Etsy Store to check out all the digi stampsand the LOTV online store to check out the rest of their goodies.


Here's What I Did 
First I added a piece of dark blue paper to the front of a 6" x 6" white card blank leaving a slim border edge around the edge. Next I imported the digital paper into my graphic program and resized it to 4½" x 4½" and printed it straight onto white card, then die cut it with a 5¼" x 5¼" square die to give a white border around the edge. The panel was then added to the card front flat. 

I imported the sweet witch and spooky sentiment into my graphics program and resized them to fit my project, then printed them directly onto colouring cardstock. The image was then die cut into a circle and coloured in using Copic pens. The finished scene was added to a white scalloped circle mat, then funky foam was glued to the back to raise it up. The topper was attached to the centre of the card front.

To finish the card off I added 3 blue pearls to the card bottom and glitter to the wand and around the background. Note -- I changed the sentiment colour from black to white in my graphics program. 

Here's What I Used
Digital Stamp: Mystical Moon
Digital Paper: Cloudy Evening Skies
Whole Collection: Magical Bundle

Copic Pens: Skin - E000, E00, E01, E02, E11/ Hair - E13 / Hats - C2, C3, C5, C7 / Wand - E13, E99, Y15, Y17 / Moon - W0, W1, W2, W3, 0 / Witch's Outfit - V12, V15, V17, Y17, B12, B14, B16

Other: 6" x 6" White Card Blank, White Colouring Card (Make It Colour), White Card, White Smooth Card, Distressing Ink (Hickory Smoke), Stitched Scallop Layered Circle Die (Creative Expression), Stitched Square Die (Crealies), Blue Pearl, Glue, Double Sided Tape, Funky Foam

Or why not join us on social media at  'We Love Lili Of the Valley' Facebook Group run by the Design Team, the official Lili Of The Valley Facebook page and on Instagram.  We'd loved to see you.

Please Note - I am part of the Lili Of The Valley's Design Team and I receive their lovely digi images to play with and share with you; I do not receive any monetary reimbursement for my samples, advertisements or my participation. I do, what I do for fun and relaxation. Thank you. x

Thank you so much for dropping by, and please don't forget to say hi :)  I'll be back soon with more sneaky peeks of the fabulous new LOTV Spring stamps. TTFN

Challenges entered:

Hugs

x Janine x

Monday 5 October 2020

Lili Of The Valley - Halloween #1

 Hi Everyone

I hope you're all keeping safe and virus free. The virus cases in my area are starting to rise and are high in the local authority 1/2 mile up the road, so I'm keeping safe and staying inside as much as possible and crafting. Thankfully I have lots of spooky new Lili Of The Valley Halloween digi goodies to keep me occupied. The new launch includes digi stamps, sentiments and papers all in 3 different formats and is available in the store today. You can buy the images, sentiments and paper packs separately or in a big bundle...the choice is yours. Check out the names and links to the images and paper I used for today's card. I used the white PNG image with the fully transparent background, and Copic pens to colour with. I hope you like. x  (This has now been added to my Etsy store)

The Collection
It includes lot of cute witches and wizards along with spooky accessories, there are also sentiments and digital papers all in different designs. The images are in 3 different format --- a transparent sky in a solid white square (PNG) - perfect to overlaying over paper, a white PNG image with a fully transparent background - perfect for overlaying over digi papers with no edges or borders, and a JPG image with a solid white background. The lovely ladies at LOTV have included a written tutorial with your purchase and are in the process of creating a video to help you. If you do buy any of the digi stamps and papers, and you need any help please do not hesitate to ask, and I will do my best to assist you. Please email me at: jsnine.quinn@gmail.com
______ XXX _____
FYI, if you struggle using digi stamps or haven't got a suitable software package on your computer check out my 'Tutorials' page on this blog or in the 'Files' section on the 'We Love Lili Of The Valley' facebook group (if you are a member) as I've written 4 pictorial tutorials on how to download a free software program called WPS Office and then how to use it with digi stamps.

For your information, here is the link to the LOTV Etsy Store to check out all the digi stampsand the LOTV online store to check out the rest of their goodies.


Here's What I Did 
First I printed my sheet of digital paper onto good printer paper, and covered the front of a 6" x 7" black card blank leaving a slim edge all the way around. Using my graphics software I imported the sweet witch, pumpkin, bats, cobweb, spider and spooky sentiment into the program and added a dotty border around them. The scene was resized to fit my project and printed directly onto colouring cardstock. The scene was die cut into a rounded square. Grey distress ink was carefully added around the inside of the frame, the image was then coloured in using Copic pens. The finished scene was added to a black scalloped mat and funky foam was glued to the back and attached to the centre of the card front. To finish the card I added 3 black pearls to the bottom section.

Here's What I Used
Digital Stamp: Broomstick
Digital Paper: Simply Halloween

Copic Pens: Skin - E000, E00, E01, E02, E11/ Hair - E13, E99 / Hats - C2, C3, C5, C7 / Pumpkin - Y17, YR15, YR16, E07 / Broom - E31, E33, E35, E51, E51, E53, E57, Y21 / Witch's Outfit - YG00, YG01, YG03, YG17, V01, V12, V15, V17, YR15

Other: 6" x 6" Black Card Blank, White Colouring Card (Make It Colour), Black Card, White Digital Printing Paper, Distress Ink (Hickory Smoke), Stitched Scallop Layered Square Die (Creative Expression), Black Pearl, Glue, Double Sided Tape, Funky Foam

Or why not join us on social media at  'We Love Lili Of the Valley' Facebook Group run by the Design Team, the official Lili Of The Valley Facebook page and on Instagram.  We'd loved to see you.

Please Note - I am part of the Lili Of The Valley's Design Team and I receive their lovely digi images to play with and share with you; I do not receive any monetary reimbursement for my samples, advertisements or my participation. I do, what I do for fun and relaxation. Thank you. x

Thank you so much for dropping by, and please don't forget to say hi :)  I'll be back soon with more sneaky peeks of the fabulous new LOTV Spring stamps. TTFN

Challenges entered:

Hugs

x Janine x

Monday 28 September 2020

Craft Consortium - Happy Haunting Sneaky Peak

 Morning everyone

Well I think that autumn has officially hit the UK, the fleece and heating are on. I do love autumn, the freshness of the season, the gorgeous colours and most of all, Halloween. Soooo, on  that note I have a wonderful new launch to share with you from Craft Consortium (in partnership with Helz Cuppleditch) called 'Happy Haunting'. This new collection really ticked all my boxes, and I know you will love them too. x

So today I'm sharing all 4 of the cards I made using the gorgeous stamps and papers, I did make some bunting using the papers but unfortunately I couldn't take a photo of it (once Craft Consortium have shared it, I will add it on my blog post. The collection is now available to pre-order on the Craft Consortium website - see the links below the photos. It will be available in all good retailers and in the US from the 5th October.

This collection and other collections are available from the Craft Consortium's website and good craft retailer's websites. In the USA, it will be distributed by Notions Marketing. You can also go direct to the Craft Consortium's website here and sign up for an update on any future product launches. 
This one was made for my daughter and her partner who both love Halloween
Craft Consortium Product Used
Happy Haunting - Stamp Sets (as shown above)
Happy Haunting - 6" x 6" and 12" x 12" Paper Pad
Happy Haunting- Adhesive Pearls & Wooden Shape

Other Things I Used: 
Card/Paper - 6” x 6” & 7” x 7” White Card Blank, Copic Pens, Make It Colour Blending Card, Black Card, Orange Card, White Card, Grunge - Festive Tones Paper Pad (Craft Consortium), Silver Glitter Card

Dies - Stitched Scalloped Squares (Creative Expressions), Stitched Scalloped Circles (Creative Expressions) Peek-A-Boo Window & Edge (MFT), Circles (Tattered Lace), Wispy Grass Border (Taylored Expressions), Festive Collections - Winter Foilage (Crafters Companion), Bunting (The Works), Scalloped Circles (Tonic), Alphabet (Little B), Swirling Star Dies (Sizzix), Starry Skies Dies (Lawn Fawn), 

Misc - Mask It Paper,  Black Hybrid Ink, Oxide Ink (Tumbled Glass, Twisted Citron, Broken China, Faded Jeans, Chipped Sapphire, Wilted Violet, Faded Jeans, Fossilized amber, Black Soot), Glossy Accents, Clear Glaze Pen, Clear Glitter Pen, Clear & White Embossing Powder, Versamark Ink, Water, Electronic Cutting Machine & Haunted House SVG File, Bakers Twine, Buttons, Glue, Double Sided Tape, Funky Foam, White & Brown Pencil, White Pen, Black Fineliner, 

If you would like to know how I made a specific card or need more information please email me (my address is on the right), and I will send you the details. Do not leave a message requesting information  in the comments box unless you leave me your email address, as I'll be unable to contact you otherwise. x

If you purchase any Craft Consortium products could I politely ask that you give feedback on their facebook page or website and let them know what you think.  Please support our Craft suppliers. Thank you. xxx

Why not follow us on Facebook - Craft Consortium NetworkCraft Consortium Ltd or our our Instagram page. We'd loved to see you.  Thank you so much for dropping by, don't forget to say hi :) 

Please Note - I am part of the Craft Consortium's Design Team and I receive their lovely products to play with and share with you; I do not receive any kind of payment for my samples or my participation. Thank you. x

I'll be back tomorrow with another card made using this fabulous collection, so see you then. TTFN!

Challenges entered:

Hugs

x Janine x

Sunday 27 September 2020

Lili Of the Valley - Christmas Launch 2- Card #4

 Afternoon Everyone

I have another cute Lili Of The Valley Christmas digi stamp and paper to share with you today. As mentioned a few weeks ago the new LOTV images are different this time around as the digi stamps are in 4 different versions - a transparent sky in a solid white square (PNG), white image PNG with a fully transparent background, white image with snowy floor with a fully transparent background (PNG),  original JPG images with white background. (This has now been added to my Etsy store)

Today's card was made using the original JPG images of 'Wrapped Up Warm' and printed straight on my colouring card along with a sentiment. I coloured the scene in with Copic pens and added a sentiment from a previous launch. I used a digi paper from the 'Snow Princess' set. 
______ XXX _____
FYI, if you struggle using digi stamps or haven't got a suitable software package on your computer check out my 'Tutorials' page on this blog or in the 'Files' section on the 'We Love Lili Of The Valley' facebook group (if you are a member) as I've written 4 pictorial tutorials on how to download a free software program called WPS Office and then how to use it with digi stamps.

For your information, here is the link to the LOTV Etsy Store to check out all the digi stampsand the LOTV online store to check out the rest of their goodies.


Here's What I Did 
I imported the digital paper into my graphics program and resized it to fit my 5" x 7" card, then printed it onto good quality printer paper. The paper was then added to the front of the card blank, leaving a slim border around the edge. 

Using my graphics software again I imported the digi stamp along with the sentiment and resized them both to fit the die I was using. When I was happy with everything I printed the scene directly onto my colouring card, then cut it out with the tag die. The image was coloured in using Copic pens. I die cut the tag again from white card and glued it to the back of the coloured version to give it a little dimension. 

The tag was glued flat to the centre of the card front on a slight angle. Two large snowflakes were added to the top of the tag and several smaller ones were added around the coloured image. To finish the card I added a pearl and some gems to the card.

Here's What I Used 
Digital Stamp: Wrapped Up Warm
Digital Paper: Snow Princess

Copic Pens: Snowman & Clothing - B0000, B000, 0, C2, Y15, Y38, E31, E33, E35, V05, V06, V12, V15,B23, B24, B32, B97, C0, C01 / Bear & Clothing - E31, E33, E35, E37, V05, V06, V12, V15, B23, B24, B32, B97 / Robin -  E31, E33, E35,  R22, R27 / Mouse & Jumper - E31, E33, E35, B23, B32, B97 / Rabbit & Scarf - W0, W1, W3, W5, V05, V06, V15 / Bag - E31, E33, E35, V05, V06, V12, V15 /  Snow -  B0000, B000, 0, C1

Other: 5" x 7" White Card Blank, Make It Colour Card, White Card,  Purple Glitter Card (Hobbycraft), White Digital Printing Paper, Decorative Tags (Sweet Dixie), Mini Snowflake Die (Sizzix), Mini Snowflake Die (Lawn Fawn), Lilac Pearl, Gem, Heart Gem, Glue, Double Sided Tape, Funky Foam

Or why not join us on social media at  'We Love Lili Of the Valley' Facebook Group run by the Design Team, the official Lili Of The Valley Facebook page and on Instagram.  We'd loved to see you.

Please Note - I am part of the Lili Of The Valley's Design Team and I receive their lovely digi images to play with and share with you; I do not receive any monetary reimbursement for my samples, advertisements or my participation. I do, what I do for fun and relaxation. Thank you. x

Thank you so much for dropping by, and please don't forget to say hi :)  I'll be back soon with more sneaky peeks of the fabulous new LOTV Spring stamps. TTFN

Challenges entered:

Hugs

x Janine x

Wednesday 16 September 2020

Craft Consortium - Nativity Sneak Peak

Hello everyone

Well after having a lovely day out in the North Yorkshire moors here in the UK...which is only 10 minutes up the road for me, I'm now going to sharing a little big of tradition Christmas magic with you.
Today I'm sharing a sneak peak of the new 'Nativity' collection being launched by Craft Consortium (in partnership with Helz Cuppleditch). Helz's introduced us to the Snomes, Polar Pals and the Gift Of Giving...and more. If you have children, grandchildren, nieces or nephews...or maybe yourself who have played a part in a Christmas Nativity, then you will love this new collection. 

I'm sharing all 4 of the cards I made using the gorgeous stamps and papers. The collection will be launched on the Create & Craft TV on Saturday 19th September @ 19.30 (GMT) 15.30 (EST) time. You can also watch this in the USA as well as the UK. After the official launch it will be available to buy from the Craft Consortium website, and in all good craft shops. Once the launch has taken place I will add the links to the products.

This collection and other collections are available from the Craft Consortium's website and good craft retailer's websites. In the USA, it will be distributed by Notions Marketing. You can also go direct to the Craft Consortium's website here and sign up for an update on any future product launches. 
Craft Consortium Product Used
Nativity - Stamp Sets (as shown above)
Nativity - 6" x 6" and 12" x 12" Paper Pad
Nativity - Adhesive Pearls

Other Things I Used: 
Card/Paper - 6” x 6” & 5” x 7” White Card Blank, 6” x 6” White Scalloped Card Blank, Prismacolor Pencils, Copic Pens, Strathmore Toned Paper Pad, Make It Colour Blending Card, Gold Pearl Card, Torn Copier Paper, White Card, Kraft Card, Silver Glitter Card, Navy Card

Dies - Stitched Scalloped Square Die (Creative Expressions), Swirling Star Dies (Sizzix), Pierced Circle Die (Crealies), Snowflake Frame Dies (Sweet Dixie), Nobles – Double Pierced Background Rectangle Die (Creative Expressions), Stitched Hillside Border Dies & Starry Skies Dies (Lawn Fawn), Distressed Edge Dies (Creative Expressions), Rounded Corner Square Die, Stitched Indented Square Die (Elizabeth Craft Designs)

Misc - Black Hybrid Ink, Distress Ink (Vintage Photo, Tea Dye), Oxide Ink (Tumbled Glass, Broken China, Faded Jeans, Chipped Sapphire, Seedless Preserve, Black Soot), White Paint, Water, Gold Pen, Pearls, Glitter, Gold Glitter, Gold Embossing Powder, Versamark Ink, Glue, Double Sided Tape, Funky Foam, Clear Glitter Pen

If you would like to know how I made a specific card or need more information please email me (my address is on the right), and I will send you the details. Do not leave a message requesting information  in the comments box unless you leave me your email address, as I'll be unable to contact you otherwise. x

If you purchase any Craft Consortium products could I politely ask that you give feedback on their facebook page or website and let them know what you think.  Please support our Craft suppliers. Thank you. xxx

Why not follow us on Facebook - Craft Consortium NetworkCraft Consortium Ltd or our our Instagram page. We'd loved to see you.  Thank you so much for dropping by, don't forget to say hi :) 

Please Note - I am part of the Craft Consortium's Design Team and I receive their lovely products to play with and share with you; I do not receive any kind of payment for my samples or my participation. Thank you. x

I'll be back tomorrow with another card made using this fabulous collection, so see you then. TTFN!

Challenges entered:

Hugs

x Janine x

Tuesday 8 September 2020

Lili Of The Valley - Christmas Launch 2 - Sneak Peak #3

 Hi There Everyone

Again I have another wonderful sneaky peaks of the new Lili Of The Valley Christmas digi goodies which launch tomorrow - 9th September. You will love all the new characters and scenes, as well as fabulous new digital papers. As mentioned in my last post the new LOTV images are different this time around as the digi stamps are in 3 different versions - PNG (cutout without a box), PNG (cutout inside a box - which is contained on a large rectangle) and as a JPG. Please read my previous post for an explanation of how the new images work and for more information. (This has now been added to my Etsy store)

As you can see my card today is using the same 'Bears & Snowman' cutout boxed version I used yesterday, but this time I have used a pretty pink digital paper behind it from the 'Coral & Teal' set. I wanted to show how different an images can look by using a different paper behind it. I coloured the scene in with Copic pens and added a sentiment from a previous launch.
______ XXX _____
FYI, if you struggle using digi stamps or haven't got a suitable software package on your computer check out my 'Tutorials' page on this blog or in the 'Files' section on the 'We Love Lili Of The Valley' facebook group (if you are a member) as I've written 4 pictorial tutorials on how to download a free software program called WPS Office and then how to use it with digi stamps.

For your information, here is the link to the LOTV Etsy Store to check out all the digi stampsand the LOTV online store to check out the rest of their goodies.

Here's What I Did 
First I printed my sheet of coral pink digital paper onto good quality printer paper. The paper was then used it to cover the front of a 6" x 6" white card blank, leaving a slim border around the edge. 

Using my graphics software I imported the digi paper I used previously and then imported the snowman and bears digi stamp. I moved the image around until I was happy with the positioning of the dotty snowflake paper, then added my sentiment in the snowy area. When I was happy with everything I printed the scene directly onto my colouring card, then die cut it into a scalloped square. The image was coloured in using Copic pens, and when it was finished funky foam was glued to the back. Glitter was added to the hat trims and snow.

I die cut a large snowflake frame from white card and glued it flat to the centre of the card front. The finished topper was attached the centre of the snowflake frame. To finish the card I added white pearls around the card.

Here's What I Used 
Digital Stamp: Bears & Snowman 
Digital Paper: Coral & Teal Set (to be released)

Copic Pens: Snowman - 0, C0, C1, C2, Y15, Y38 / Bears - E31, E33, E53, C3, C5, 100 / Blue Clothing - B0000, B000, B00, B02, B04, B05, C0, C1, C2, YG00, YG01 / Snow - C0, C1

Other: 6" x 6" White Card Blank, Super Smooth Colouring Card (LOTV), White Card, White Digital Printing Paper, Stitched Scallop Square Die (Creative Expressions), Snowflake Frame Die (Sweet Dixie), White Pearls, Glitter, Glue, Double Sided Tape, Funky Foam

Or why not join us on social media at  'We Love Lili Of the Valley' Facebook Group run by the Design Team, the official Lili Of The Valley Facebook page and on Instagram.  We'd loved to see you.

Please Note - I am part of the Lili Of The Valley's Design Team and I receive their lovely digi images to play with and share with you; I do not receive any monetary reimbursement for my samples, advertisements or my participation. I do, what I do for fun and relaxation. Thank you. x

Thank you so much for dropping by, and please don't forget to say hi :)  I'll be back soon with more sneaky peeks of the fabulous new LOTV Spring stamps. TTFN

Challenges entered:

Hugs

x Janine x