Showing posts with label Polkadoodles. Show all posts

Saturday, 26 February 2022

My Cards Not Previously Shared

 Afternoon everyone, I thought I would share some of the personal cards and projects I've made recently. This is simply a random selection, please that on some cards I've removed the recipient's name. 

I haven't detailed a list of the products used or how I made them, so if you wish to know anything about these cards please email me at - jsnine.quinn@gmail.com


I will add more tomorrow. I hope you like them. :) 

Hugs
x Janine x

Thursday, 28 February 2019

Craftsulove February Card and Tutorial

Morning everyone 💜 

I'm back today sharing the second of my February Craftulove Design Team cards with you and a tutorial. This month's cards is again highlighting the beautiful new range of stamps and papers by Polkadoodles. I hope you like it. x

All the links to the specific Craftuslove products can be found below, and the link to the general store is here.


 What I Used
Stamp Set: Heart Sing by Polkadoodles
Paper Pad: Gentle Song by Polkadoodles

Should you purchase any of the above products, please select  'Design Team'  in the 'where have you seen us' drop down so we know we have inspired you! Thank you x

Other
5¼” x 5¼” White Card Blank, Pink Card, Neenah Colouring Card, Double Sided Tape, Foam Pads, Gold Stickles Glitter Glue, Wow ‘Gold Twinkling Lights’ Embossing Powder, Gold Glitter Enamel Dots, Copic Pens, Black Memento Ink, Versamark Ink, Wet Glue, Circle Die
To Make Card
1. Trim down a piece of the patterned paper to 5” x 5” and attach it to the front of a 5¼” x 5¼” card blank.


2. Stamp the flowers and leaves onto colouring card using black memento black ink pad. Stamp - 1 x large flowers, 2 x medium flowers, 2 x small flowers, 3 large leaves and 2 small leaves.. Colour everything Copic markers (or any other alcohol pens). Note - In the photo shown, I stamped out extra flowers and leaves just in case.

3. Fussy cut out all the flowers and leaves and curl the ends with your fingers to give them a movement.

4. From pink card die cut a 3½” x 3½” circle, and then stamp and heat emboss the 2 sentiments and the heart using gold glitter embossing powder.  Add the circle to the card front.

5. Glue the flowers and leaves around the left hand side of the circle framing the sentiment. Only glue down the centre of the flowers so that curled edges can be lifted up.

6. Add gold sparkly glitter glue to the centre of the flowers and leave to dry.  To finish the card add 2 gold enamel dots in the bottom right corner.
Why not, follow us on Facebook, Pinterest, Instagram or on our YouTube Channel we'd loved to see you.

Thank you so much for dropping by, don't forget to say hi :)  I'll be back very soon with more delicious goodies to show you.....so see you then. TTFN!

Challenges entered:

Hugs

x Janine x

Friday, 15 February 2019

Craftsulove Design Team - February Card #1

Morning everyone 💜

I'm back today sharing the first of my February Craftulove Design Team cards with you. This month's cards is highlighting the beautiful new range of stamps and papers by Polkadoodles. I hope you like it. x

All the links to the specific Craftuslove products can be found below, and the link to the general store is here.


Here's What I Did
I trimmed down a piece of patterned paper to cover the front of a 6" x 6" card blank leaving a slim border around the edge. 

I stamped the image onto colouring card and die cut it into a 4" x 4" square which cut off the leaves at each side. The image was coloured in using Copic pens and added to a die cut square cut from black card. The leaves that were cut off earlier by the die cut were stamped again, coloured using Copic pens and fussy cut out. Two hearts were stamped above the birds using distress ink.

The topper was added to the card front using foam pads and the cut out leaves were attached to the picture so they laid onto the black mat. To completed the card, gold glitter pen was added along with a pearls along the bottom.

Available from Craftsulove
Stamp Set: Heart Sing by Polkadoodles
Paper Pad: Gentle Song by Polkadoodles

Should you purchase any of the above products, please select  'Design Team'  in the 'where have you seen us' drop down so we know we have inspired you! Thank you x

My Own Stash:
6" x 6" Black Card Blank, Black Card, Joanna Sheen Smooth Colouring Card, Copic Pens, Pearls, Gold glitter Pen, Foam Pad, Square Dies (Tattered Lace), Shabby Shutters Distress Ink, Double Sided Tape, Memento Black Ink

Why not, follow us on Facebook, Pinterest, Instagram or on our YouTube Channel we'd loved to see you.

Thank you so much for dropping by, don't forget to say hi :)  I'll be back in a few days with another card using the Polkadoodles stamp set and paper pad.....so see you then. TTFN!

Challenges entered:

Hugs

x Janine x

Tuesday, 28 October 2014

Polkadoodles Digi Queen DT Wk 9 - Winston

Good morning everyone!

I just love the Winston CD from Polkadoodles, and I couldn't resist this fabby digi stamp of Winston chillin' out in his boat; I think he's so cool.  To colour this gorgeous image in I thought I would take inspiration from Nikky and use my Pan Pastels - it was a bit of a learning curve but I'm happy with the results.


You can get the digi here

Here's What I Did
I thought I would create a CAS card so the main focus would be on Winston. I matted and layered plain Cardstock onto my base and added faux stitching around the edges. The digi stamp was printed directly onto some artist quality paper designed for pastels, but these could easily be any cardstock. I used a fine paint brush to apply my Pan Pastels and when everything was completed I used a few pencils to add a little extra shade and dimension.  I punched out the corners of my completed topper and matted it onto some co-coordinating card. To finish off I wrapped some jute around the edge of the card and added some hand drawn fish and a few buttons. 
 
Here's What I Used
Digi Stamps: Winston
Paper/Cardstock (CS): Cream Card Base, Artist Pastel CS, Basal CS
Pan Pastels: Turquoise, Bright Yellow Green, Phthalo Green, Burnt Sienna Shade, Permanent Red, Permanent Red Tint, Violet Tint, Titanium White, Diarylide Yellow, Black
Other: Buttons, Jute, Corner Punch, Bronze & Black Sharpie Pen, White Pen, Pencils
 
To see more fabulous designs to inspire you why not check out the fab makes from the Digi Queen girls our at our challenge blog over at  Polkadoodles towers.

Thank you for dropping by - why not leave me a message I'd love to hear from you.

Thank you everyone!

Hugs
 x Janine x


Tuesday, 14 October 2014

Polkadoodles - Digi Queens Week 7

Hello and good morning Polkadoodlers -

Wow, I can't believe another fortnight as flown by!

Anyhoo, it's my delight to share my Digi Queen themed card with you this week - and the theme is Halloween.  It's one of those themes that you either love or hate --- it's a bit like marmite. :)

For my card I used Polkadoodles Witchie Witchie 2013 Digi Download Bundle for the tree/owl and bats (there's loads of fab Halloween stuff in the bundle), and the gorgeous girl is a digi stamp called Witchie Skeleton 2013.  The links can be found below.

Here's What I Did
To start with I made an A5 black card base. I matted orange and black card onto the base along with the orange swirly coloured paper which was made using Pan Pastels. The tree/owl, girl, bats and pumpkin are all Polkadoodles images which I coloured my Copic pens.  All the coloured elements were fussy cut out and glued onto the card base along with my die cut fence. To finish off I punched out a few dots from black glitter card.

To colour her hair I selected 3 purple shades - dark, mid and light and 2 shades of green - light and mid. Purple - I started at the crown with the deepest shade and flicked a little way out, then using my mid shade and starting where the deep shade finished I flicked further towards the area where I thought the light would hit, ensuring I left a white area.  Green - Then from the edge of her hair I started with my mid shade and flicked towards the purple, again not too far. Using my lightest shade of green I flicked towards the purple, again leaving a small area of white.

Using my lightest purple shade I coloured in the white area that was left, and blended up towards the mid purple shade and down to the light green until they blended together. This effect is simple to do but it might take a few goes to get it right - it also looks fab on fairy wings too.

Here's What I Used
Digi Stamps: 'Witchie Witchie' 2013 Download Bundle and 'Witchie Skeleton' 2013
Paper/Cardstock (CS): , Papermainia Coloured CS, Craftwork Cards Super Smooth Colouring CS, Black CS, Black Glitter CS
Copics: Skin - E0000, E000, E00, E02 / Hair - YG03, YG11, V000, V01, V04 / Bows - Y00, Y38, YR07, YR68, / Tree - C2, C3, C5, C7, 100 / Costume - C2, C3, C5, C7, 100 Y02, Y38 / Pumpkin - Y00, YR04, YR07, YR68, W2, W3, YG03, YG06, YG663, YG67, 100 / Bats - C3, C5, V01 / Mask - V000, V01, V04
Pan Pastels: Permanent Red, Phthalo Green Orange, Dairylide Yellow
To see more fabulous designs to inspire you why not check out the fab makes from the Digi Queen girls our at our challenge blog over at  Polkadoodles towers.

Thank you for dropping by - why not leave me a message I'd love to hear from you.

Thank you everyone!

Hugs
 x Janine x

Tuesday, 30 September 2014

Polkdoodles Digi Queens - Week 5

 Hello and welcome
 
 
Hi there and good morning, well it's my turn to share my Digi Queen DT card with you today using one of the fabby digis from the Nikky Hall and Polkadoodles. I didn't get chance to see the new Winston CD collection before I went on holiday but once I did, I fell immediately in love with it. When I was looking through the CD I spotted this gorgeous image of Etty bear, and I knew instantly that I wanted to watercolour her.

My card is made using a 6" x 6" white card base matted with some Polkadoodles digital paper.  The completed stamped image was matted and layered onto complimentary card stock together with die cut flowers and some ribbon.


Here's What I Did
I firstly printed it onto thin watercolour card and I used distressing ink pads and pens, but if you would like to create something similar you could easily used watercolour pencils or similar. I also have a scrap of the same watercolour card at hand so I can test my colours on it first before going to my stamped image.

When I'm using distressing ink pads I always put my directly colour onto a non porous surface eg mat (splodge away), a white plate or tile, and take my wet paint brush to it.  I never take ink straight from an ink pads as you could dilute the ink in it. I always dilute my paint down with some water, give add a very light wash first.  I then slowly build up my colour (the brush should be wet but not dripping), adding more while the paint is still wet. 

To add more definition and shading I'll wait it the area is dry and add a the same colour but with slightly less water. and for deep shadows I add a darker shade.  If you make a mistake or your colour leaks to an area you don't want it to be  - wet the area, agitate the are (don't scrub or over work it) and dap with a paper towel to remove the paint. 

In case you're wondering about the sky, I  created it using a cloud template (which I cut out my hand) and Tumbled Glass Distressing Ink and a piece of cut and dry foam.

TIPS
If you decide to use watercolour pencils you could try a few technique I've learnt about along the way-
1) Go direct to your image on your watercolour card - draw around the edge of the image where you want the colour to be, but don't go to heavy to start with because you can built up the colour as you go.
2) You could scribble onto a scrap piece of watercolour card and lift the colour from there using your wet brush and then take the paint to your image.
3)  Another way is to shave some of the pencil lead and dip your paint brush into the shaving and then paint your image.

I'm no expert and don't confess to be, but the key is definitely practice.  If you want to know more and learn more, I'd definitely check out You Tube, there are lots of talented people who have created some fantastic tutorials.  So go on and download one of Nikky's fab digi stamps onto watercolour card and give it a go - what are you waiting for!!!

If you would like more information or help with anything I mentioned - just leave your question in the comment box, along with your email address. Alternatively send me a private email using the contact box at the top of the page.

Here's What I Used
Digi Stamp: Winston CD Collection available from the Polkadoodles shop
Paper/Cardstock (CS): Digital Paper 'Pretty Papers' from Polkadoodles, Papermainia CS, Craftwork Cards Super Smooth Digital CS
Distressing Inks: Fur & Postbox - Tea Dye, Vintage Photo, Walnut Stain / Bird & Nose - Antique Linen / Cheeks & Paw Pads - Worn Lipstick / Dress & Bow & Postbox Plate - Squeezed Lemonade, Mustard Seeds, Wild Honey / Sky - Tumbled Glass / Roses - Worn Lipstick, Barn Door, Fired Brick / Leaves &amp Grass - Shabby Shutter, Peeled Paint / Bird - Antique Linen / Flag - Squeezed Lemonade, Wild Honey, Worn Lipstick, Barn Door / Ladybird - Barn Door, Fired Brick, Walnut Stain / Envelope - Antique Linen, Worn Lipstick
Dies: MFT Die-namic Blueprint 8, Britannia Multi Rose Small, Medium and Large, Tattered lace 'Embellishments
Other: CraftArtist2, Ribbon, Maratha Stewart Leaf Punch, Candi, Gems, Pens, Pearls
To see more fabulous designs to inspire you why not check out the fab makes from the Digi Queen girls over at the Polkadoodles blog.

Thank you for dropping by - why not leave me a message I'd love to hear from you.
 
Thank you everyone!
 
Hugs
 x Janine x 

Tuesday, 16 September 2014

Polkadoodles - Digi Queens (Wk 3)

 Hello and welcome Polkadoodlers -

 
Hi there, well I'm back from my cruising holiday to Alaska - photos will follow in a few days (hopefully). Thankfully the jetlag has finally eased and my heads not so foggy now.  Anyhoo it's back to crafty business, and it's my turn to share my card with you today - the theme for the Digi Queen's this week is Christmas, my most favourite time of the year.  


Here's What I Did
I was spoilt for choice with Nikky's fabulous designs, but I finally picked 'Postbox' together with one of her gorgeous Christmas digi papers, both of which are from the 'Work & Play Festive Hollybobs' Collection 5.  To make my card I firstly matted and layered my printed off paper onto some co-coordinating cardstock on which I added the frame I made using a MFT square and arch die - to add a little bit of sparkle I placed a piece of white glitter card behind the aperture.  I coloured both the postbox image and the envelope with alcohol markers; both were then fussy cut out and glued onto the frame. Using foam tape I placed everything on top of the matted and layered card base to give extra dimension. To finish off I added a touch of glitter (of course!) and a few gems.
Here's What I Used
Digi Stamp: 'Postbox' available from the 'Work & Play Festive Hollybobs' Collection 5. 
Paper/Cardstock (CS): 'Work & Play Festive Hollybobs' Collection 5 Christmas Digital Paper, Papermainia CS, Craftwork Cards Super Smooth Colouring CS, White Glitter CS
Dies: MFT Die-namic Blueprint 3 & 8, Memory Box 'Mini Holly Leaves'
Other: Alcohol Pens, Glitter, Gems, CraftArtist2, Papermania Embossing Folder 'Snowflakes'
To see more fabulous designs to inspire you why not check out the fab makes from the Digi Queen girls our at our challenge blog over at  Polkadoodles towers.

Thank you for dropping by - why not leave me a message I'd love to hear from you.
 
Thank you everyone!
 
Hugs
 x Janine x 

Tuesday, 2 September 2014

Polkadoodles - Digi Queens Design Team

Hello and welcome Polkadoodlers -
 
Wow, when I applied to join Polkadoodle's new Digi Colouring Design Team I never thought for one moment I would be asked to join. But I did, I received an email from the lovely Nikky Hall (the lady behind Polkadoodles) asking me to join her new team. As you can imagine I was overwhelmed and of course my reply was YES! I'm joined by a team of fantastic ladies who are so wonderful and talented. We are to be fondly known as the 'Polkadoodles Digi Queens' - it's such a fab name!  Wow, I've never been a Queen before - not even for a day. Lol x 
http://www.polkadoodles.co.uk/index.php?cPath=689
I hope you will like today's my card and all my future projects - I will endeavour to learn and grow as part of Nikky's DT, and hopefully I'll pick up some fab tips and hints along the way :)
I've scheduled this post because I'm away on holiday at the moment, on a cruise to Alaska. Yep, I've gone lumberjack and whale watching - lol!  So before further ado, he's my 1st make for the Polkadoodles Digi Queens DT. 


Here's What I Did

I used a 7" x 7" card base which I matted and layered with lots of card and paper. The paper and stamp are all available as digital downloads from the Polkadoodles website (see the links below). I coloured the gorgeous 'Amelia Braids', with alcohol pens; she was a dream to colour as she's got lots of open spaces. Although she would look fabulous as a one layer image, on my card I decided to give her more dimension.  So I printed out 3 copies of the stamp, colour sections of her in and fussy cut out them out, and layered her up.  I glued my sentiment banner onto the die circle and placed Amelia onto top so she appeared to be sitting on the banner.  To finish off I added glitter, gems and die cut flowers.

Here's What I Used
Digi Stamp: 'Amelia Braids' available from Polkadoodles Digi Store
Paper/Cardstock (CS): Polkadoodles 'Pretty Sweet' Digital Paper, Topsy Turvy CS, Craftwork Cards Super Smooth Colouring CS,  
Dies: Tonic Layering Dies, Britannia Multi Rose Flower
Other: Alcohol Pens, Glitter, Gems, CraftArtist2
 
To see more fabulous from the Digi Queens make sure you visit our blog over at  Polkadoodles tower.

Thank you for dropping by - why not leave me a message I'd love to hear from you.
 
Thank you everyone!
 
Hugs
 
x Janine x 

Saturday, 9 August 2014

Sweet Stampin' - Photo Inspired

Good morning my dear friends.

Sorry for the lateness of my post - blogger and I had a bit of a falling out. For some reason my post appeared 2 days before I wrote it. It could be 'user' error but it's easier to blame Blogger. LOL Hopefully we're all sorted now. (Quick Update) Thanks to Christine who spotted my error in the 'Here's What I did' section, thanks hunnie I owe you one! Hopefully I've written everything up properly now. -- phew I've had a nightmare!!!

 Anyhoo ------- it's that time of the month ---- it's Sweet Stampin' time. Yay!!!

This week's theme is Photo Inspired - so it's all about using the gorgeous colours in this wonderful photo. 

In my little card I used lilacs, blues and greens from the photo to create a 'New home' card. To be honest I made the card for my new neighbours --- but I didn't actually give them it (oops how bad am I!!). The stamp I used is one I've had for ages, it was part of a mag and stamp kit from Polkadoodle's Pen & Paper Circle. It's the first time I've used it but it won't be the last - it stamped brilliantly and it's so sweet and wonderful to colour.

Photo to be inspired by


Here's What I did
I used a 5" x 5" white scalloped card base and matted it with pretty LOTV patterned paper. I stamped the cute little cottage onto Neenah CS and die cut it into a circle. I coloured it flat with my Copic Pens and used a little pan pastel for the sky. I punched out a border strip and die cut a scalloped circle from the same coloured cardstock and layered everything up. To finish off I die cut a few little clouds and added a touch of glitter.

Here's everything I used:
Digi Stamp: 'Cottage' by Polkadoodles
Paper/Cardstock (CS): LOTV 'Promises', Papermania CS, Neenah CS
Copics: Various (Sorry I still can't find my notebook with all my colour lists)
Dies: Spellbinders 'Circle and Scallop Circle', Joy! 'Clouds'
Other: Tonic Border Punch, Glitter, Pan Pastel

So why not drop by the Sweet Stampin' Challenge blog and check out what my fab Design Team girlies have made to inspire you. So come on why not join in with the fun and enter your card/project into our 'Photo Inspired' challenge we'd love to see you. REMEMBER you must include a stamped element on your card!

This week's sponsor and prize is from Hobby House.

I look forward to seeing what you create.

Challenges entered: 

Hugs

Janine x

Saturday, 30 November 2013

Totally Gorjuss Challenge - 212 - Snows The Way To Go

The challenge this week over at Totally Gorjuss is ANYTHING GOES - Snows The Way To Go.  So come on and join in with us, I'd love to see your creations.  There's a fab prize from Lili Of The Valley.

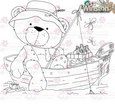
So to give you a little inspiration here's my DT card. I used a Humphrey's Corner freebie stamp from one of my Craft mag - isn't he adorable.  I've been dying to use him for ages and this theme was perfect.  The kraft card background was given a snowy feel using white pan pastel, white and blue pencils and a touch of glitter.  I added snow drops by drawing irregular circles with a fineliner and filling in with a white gel pen.  Humphrey and friend was stamped and coloured using my copics on white Neenah card to make the colours pop, and cut out them out. Finally I stamped a sentiment and die cut a flag.


Here's what I used.
Stamp: Humphrey's Corner 'Elephant and Reindeer', Polkadoodles 'Snow Sentiment' (both stamps were magazine freebies)
Paper/Card: Neenah, Red CS and Kraft Card
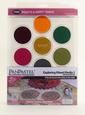
Copics: Y00, Y02, Y06, Y07, Y17, R32, R35, R37, R59, R000, R00,C-1, C-2, C-3, B0000, B000, B02, BO5, E33, E35, E50, E51, E53, 0
Dies: Sizzix 'Banner 2'
Other: Gems, Glitter, White Pan Pastel, White Gel Pen, Black Fineliner, White and Blue Pencil

So why not come along and visit our blog at Totally Gorjuss and check out what my fab team buddies have made to inspire you. While you're there don't forget to enter your card/project into our weekly challenge - remember it's ANYTHING GOES SNOWS THE WAY TO GO. There's a prize up for grabs and this week's sponsors is Lili Of The Valley.

As always I'm looking forward to seeing what you make.

Janine x