Saturday 26 November 2016

Sweet Stampin' Design Team Card - Got The Blues?

Hello and good morning everyone ---

Well it's Saturday and Sweet Stampintime...yay!!

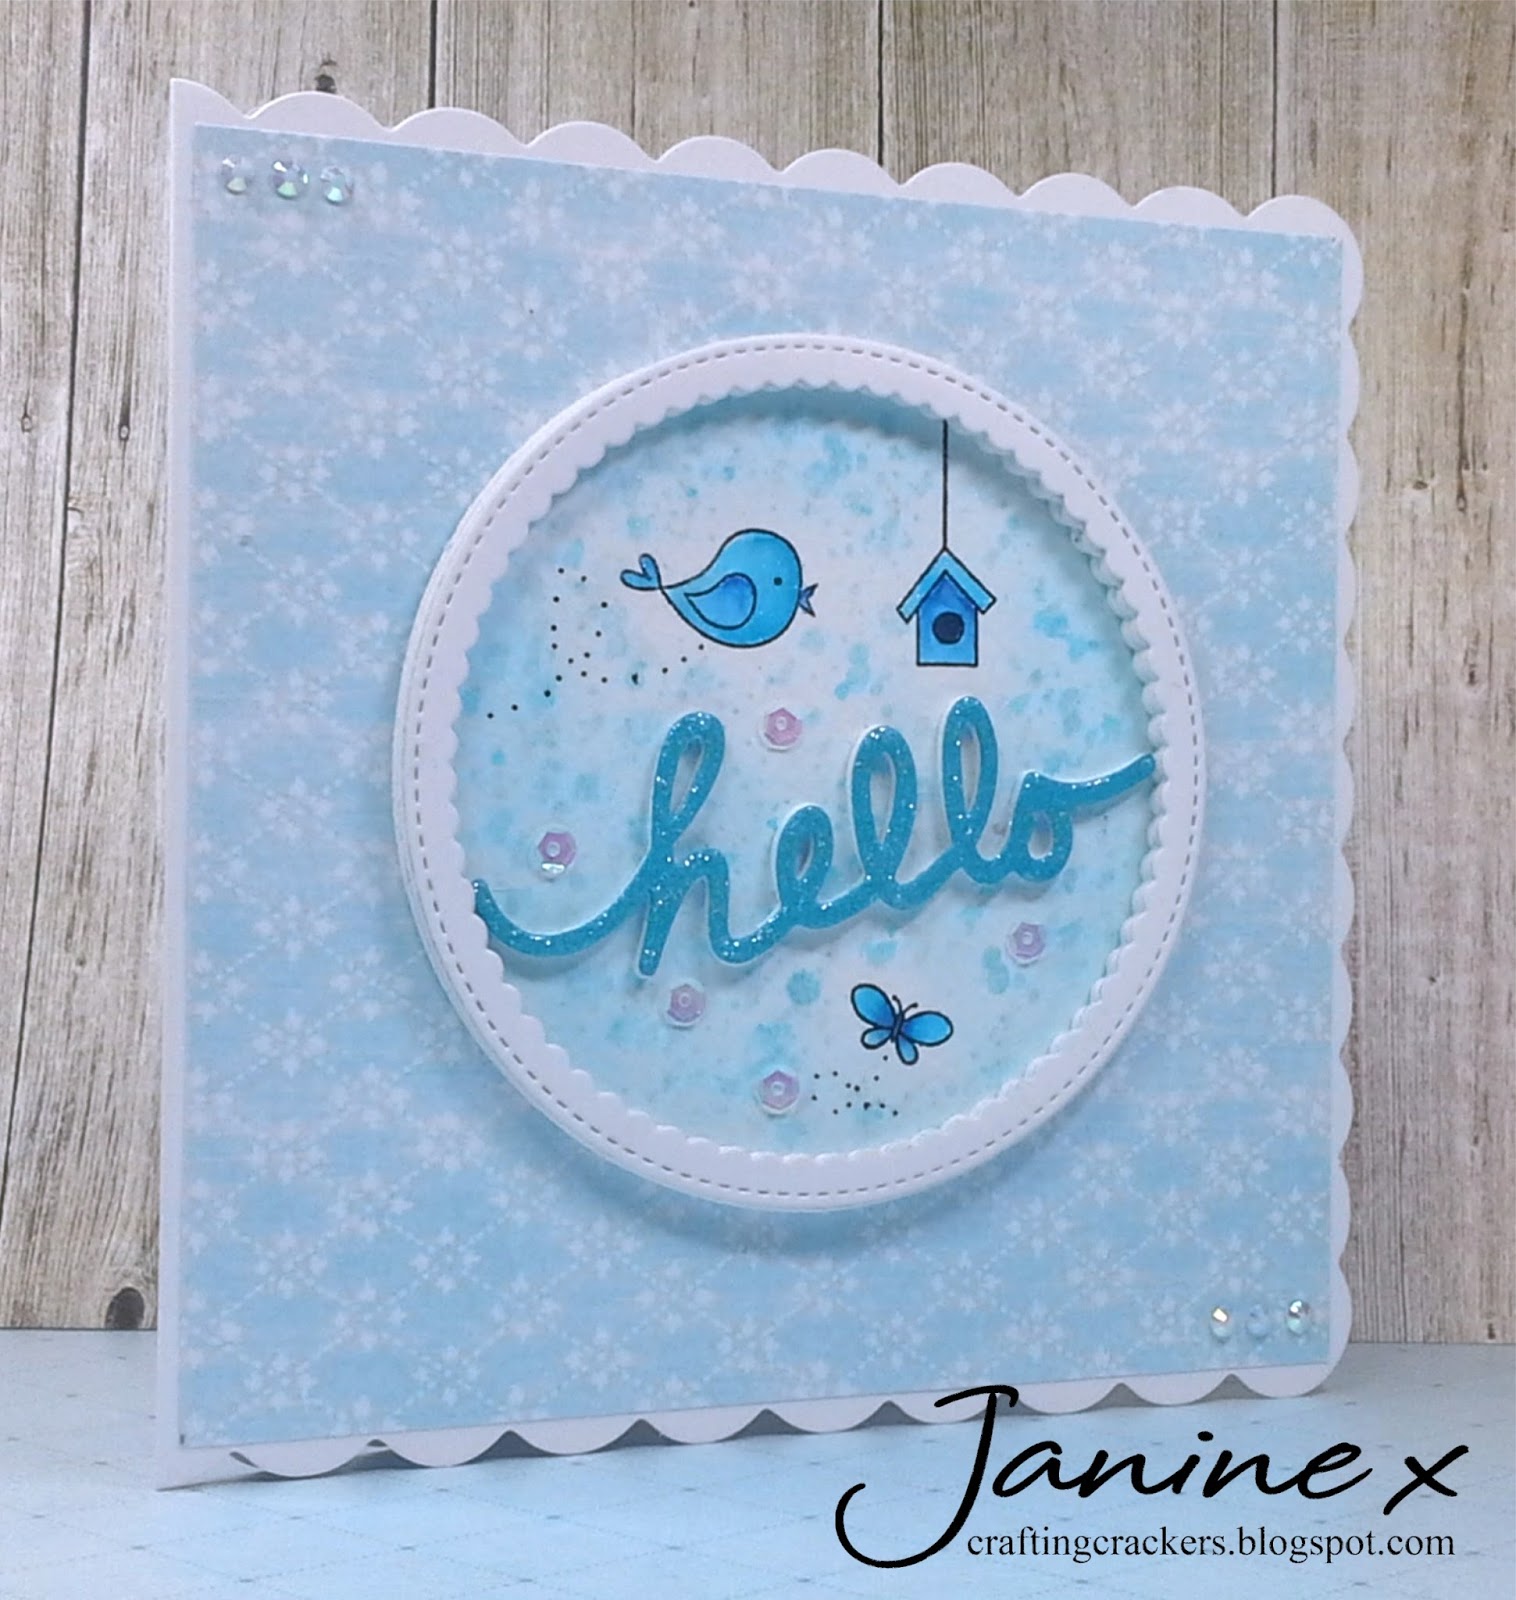
So I'm here to share my latest Design Team Challenge card with you. Our fab theme this week is 'Got The Blues?' I had to think about this one though, so after a little umming and arring (I think I've spelt those right) I decided to create a picture in shades of blue inside a frame. The fab little bird and house are from an MFT stamp set that I've had for months but never got around to using. The glittery 'hello' sentiment was made using some beautiful blue glitter card and a fab die from Diamond Press (available from Crafter's Companion). IRL this is super sparkly but hard to capture on camera. Thanks for looking 💖


Don't forgot to enter our challenge you must include a stamped element on your card/project, follow our theme and link back to the Sweet Stampin' blog for a chance to win a prize! 

Here's What I Did
I covered a 6" x 6" card blank front with pretty patterned paper. Next I die cut a fancy circle from white card and 2 pieces of funky foam, these were all glued together to create a frame. I did the same thing for the 'hello' sentiment - one layer cut from blue glitter card and one from funky foam, and glued together.

From watercolour card I die cut a circle and added distressing ink around the edge and into the centre, leaving some areas white. I over stamped the background with splodges and splashes to give a tone-on-tone effect, and then added splashes of glitter pen.

I stamped the bird, butterfly and house onto the watercolour card circle making sure I left sufficient room fore the 'hello' sentiment. The images were then water coloured and glittered up using pens. The frame was glued onto the background circle and the sentiment was then glued on the inside.

To complete the card, the topper was added to the card front and sequins and gems were added.

Here's What I Used
Stamp: MFT 'I'm Tweet On You', MFT 'Distressed Pattern'
Dies: Diamond Press (from Crafter's Companion) 'Hello & Butterflies', MFT Die-namics 'Stitched Circle Scallop Frame'
Paper & Cardstock (CS): 6" x 6" Scallop Card Blank, Sheena Douglass White Stamping CS, White Funky Foam, Blue Glitter CS, Crafter's Companion Watercolour CS, LOTV 'Shabby Shack'
Zig Clean Color Pens: Persian Blue, Cobalt Blue
Leonie Pujol Sparkle Pens: Ice Drop, Aquamarine
Other: Gems, Sequins, Black Fineliner Pen

So why not drop by the Sweet Stampin' Challenge blog and check out what my fab Design Team girlies have made to inspire you. So come on why not join in with the fun and enter your card/project into our 'Got The Blues' challenge we'd love to see your entries. 

This week's prize is Live And Love Crafts

Thank you so much for dropping by and why not leave me a message to say hi :)

Challenges entered: 

Hugs
x Janine x

Friday 25 November 2016

Crafter's Companion 'Inspirers' Design Team - November #4 (Thanksgiving card)

Good morning

HAPPY THANKSGIVING TO YOU ALL

Well I'm here today to share one of my November Crafter's Companion Design Team projects with you.


Today's card is a CAS one and in celebration of Thanksgiving. I've used autumnal coloured card stock and copper coloured glitter card which seemed fitting, and a simple sentiment.

I hope you like my take on it :)


Here's What I Did
To start with I created a 5¼" x 7¼" top fold card blank from a sheet of white card. From copper coloured glitter card I cut 2 strips and added them down each sides.

I cut down a piece of strong white card and die cut a circle into the top portion of it, then I dry embossed it using a wood grain effect embossing folder. A computer generated sentiment was glued behind the aperture and added to the card front using foam pads.

Using different coloured card, I die cut lots of leaves and glued then around the window.  To finish off I attached amber coloured gems around the front of the card.

Here's What I Used
Crafter's Companion Products Core'dinations 'Brights' Pad, Sheena Douglass White Stamping CardCrafter's Inspiration Magazine Issue #11, Die'sire Mixerd Media Autumn Leaves Dies, Textures 'Wood Grain' Embossing Folder, Die'sire 'Four Seasons' Die, Crafter's Companion Matt Black Card, Collall Glue

Other: Manual Die Cutting Machine, Glitter Card, Gems, CA2, Coloured Card, Foam Pads

Don't forget....if you want to see more Crafter's Companion creations made my lovely teamies why not join our Facebook page - just search for Crafter's Companion UK or USA, and for more magazine inspiration definitely checked out the Crafters' Companion Inspiration Magazine group.

Just a little heads up...we are also on Twitter, Instagram and have a Pinterest Board, so why not follow us.I look forward to seeing you soon. Why not leave me a message so I know who's out there or if you have any questions about the products - I'd love to hear from you :)

I look forward to seeing you soon. Why not leave me a message so I know who's out there - I'd love to hear from you!!

Challenge Entered:

Hugs & kisses

x Janine x

Friday 18 November 2016

Crafter's Inspiration Magazine Kit - Issue #12 (2)

Morning everyone

Hi there, well I'm here with another Crafter's Companion project using the freebies from Crafter's Inspiration Magazine Kit - Issue #12 (November). Erm, did I mention I love all the Christmas freebies in the kit, especially the CD which contains lots of images, papers and toppers in JPG, PNG and PDF format.

After seeing some of the fab digital content I just couldn't resist creating a Christmas scrapbook page of my family. So for my project I used the digital content from the 'Deck The Halls' collection on the CD (it's my favourite.....can you tell). Because of the graphics program I use I can either print, share or email my scrapbook page to family and friends, which saves time, money and resources.

A description of how I made it and all the products used are shown just below the photos. :)

FOR YOUR INFORMATION - the PNG images have a transparent background which can be layered, resized and flipped to create your own toppers and backgrounds etc using a graphics program. The PDF documents have multiple images stored on them, the documents can be printed off and the elements fussy cut out. JPG images have a white background and cannot be layered on top of each other - the papers, some digi stamps and element sheets have been saved in this format, and are ready to be printed off and used.

Here's What I Did
I opened my graphics program (CraftArtist 2), then I put my Crafter's Inspiration CD into the computer drawer and waited for it to load. From the pop up screen I clicked onto Papers, then from the fabulous options I selected 'Deck The Halls' collection and opened the folder called 'Individual Elements' which is a digi kit  and created my scrapbook page using one of my favourite pictures from last year.

My scrapbook page is now ready to printed, shared or emailed to my family and friends...I could even create a Christmas card topper from it. It's such a shame we're not wearing our Christmas jumpers. Lol

Tip: To give the illusion of depth added a shadow (if possible) to each of the digital elements and layered them on top of each other, as you would with real embellishments.

Here's What I Used
Crafter's Companion: Crafter's Inspiration Magazine Kit - Issue #12
 (Used 'Deck the Halls' Collection Digital Elements)

Other: Serif CraftArtist 2, Computer


Don't forget....if you want to see more Crafter's Companion creations made my lovely teamies why not join our Facebook page - just search for Crafter's Companion UK or USA, and for more magazine inspiration definitely checked out the Crafters' Companion Inspiration Magazine group. Just a little heads up...we are also on Twitter, Instagram and have a Pinterest Board, so why not follow us.
I look forward to seeing you soon. Why not leave me a message so I know who's out there or if you have any questions about the products, or even how to use them digitally I'd love to hear from you :)

Challenge Entered:

Hugs & kisses

x Janine x


Tuesday 15 November 2016

Crafter's Inspiration Magazine Kit - November Issue #12 (1)

Good morning everyone :)

Hi there, welcome to my 1st Crafter's Companion project using the freebies from Crafter's Inspiration Magazine Kit - Issue #12 (November). I absolutely love all the Christmas freebies in the kit especially the CD.  The CD contain images, papers and toppers available in different formats eg  JPG, PDF sheets (which can be printed and fussy cut out) and in a digital format (PNG) which can be used in a graphics program eg Serif CraftArtist, Photoshop etc. These images can be layered up to create your own toppers and backgrounds.

So for my project I used the digital content from the 'Deck The Halls' collection to create my own Christmas card topper, which I matted and layered onto a card base and then added glitter. Hope you like it. :) Digitally created cards are brilliant to batch make at Christmas time plus they'll save on your postage.

A description of how I made it and all the products used are shown just below the photos. :)


Here's What I Did
First I matted my  7" x 7" card blank with teal coloured card. Next I opened my graphics program (CraftArtist 2), then I put my Crafter's Inspiration CD into the computer drawer and waited for it to load. From the pop up screen I clicked onto Papers, then from the fabulous options I selected 'Deck The Halls' collection and opened (double clicked) the folder called 'Individual Elements' which essentially is a digi kit to create my card. All the elements in the folder are in a PNG format which means they have a transparent background which allows you to lay the images onto top of each other to create scenes. In my case I created a 6" x 6" Christmas card topper. To give the illusion of depth I added a shadow to each of the elements.

When I completed my card design I printed it onto super smooth paper, then matted and layered it onto mirror card and it added to the 7" x7" card blank using foam pads. To finish off I added glitter and a few gems.

Tip: You could create a similar looking card by using the PDF sheets from any of the collections, and fussy cutting the elements out then layering them using foam pads or 3D glue gel.

Here's What I Used
Crafter's Companion: Crafter's Inspiration Magazine Kit - Issue #12
 (Used 'Deck the Halls ' Collection Digital Elements)

Other: 7" x 7" Card Blank, Teal Card, Super Smooth Printer Paper, Gold Mirror Card, Gems, Clear & Gold Glitter, Serif CraftArtist 2, Computer

Don't forget....if you want to see more Crafter's Companion creations made my lovely teamies why not join our Facebook page - just search for Crafter's Companion UK or USA, and for more magazine inspiration definitely checked out the Crafters' Companion Inspiration Magazine group. Just a little heads up...we are also on Twitter, Instagram and have a Pinterest Board, so why not follow us.
I look forward to seeing you soon. Why not leave me a message so I know who's out there or if you have any questions about the products, or even how to use them digitally I'd love to hear from you :)

Challenge Entered:

Hugs & kisses

x Janine x

Saturday 12 November 2016

Sweet Stampin' Design Team Card - Photo Inspiration

Hello and good morning everyone ---

Well it's Saturday and Sweet Stampintime - so I'm here to share my Design Team Challenge card with you. Our theme this week is 'Photo Inspiration' (see below). So for my card I used the rain, umbrella and yellow to inspire me. As soon as I spotted this Elizabeth Bell image I knew it would be perfect. I coloured her with the new Spectrum Noir Illustrator pens (which I love) in aqua and yellows to tie in with the photo.


Don't forgot to enter our challenge you must include a stamped element on your card/project, follow our theme and link back to the Sweet Stampin' blog for a chance to win a prize! 


Here's What I Did
I die cut a square from lemon card and die cut again to add the pin hole details and matted it onto the 5" x 5" card base. I die cut the image and coloured it with Spectrum Noir Illustrator pens, then added glitter to the rain drops and puddle. The completed topper was added the die cut aqua mat and attached to the card front using foam tape.

Next I die cut the word 'memories' and the tiny badge twice from 2 shades of aqua card (one is slighly darker than the other). I slightly offset the 2 words and glued them together and attached them to the card front.

To complete the card I added a touch of glitter to the spots on her umbrella.

Here's What I Used
Stamp: 'July Showers' from Elizabeth Bell (Hobby House 'Summer Sweetness' Colouring Paper Pad)
Spectrum Noir Illustrator Pens & Spectrum Noir Pens (SN): Skin - FS3, FS6, FS7, FS9, TN3 / Hair - GB4, GB7, TN7  / Aqua Top, Trousers, Shoes & Bows - BT1, AB1, GT2, (SN) BT1  / Umbrella - CT1, CT2, CT4, GY1, GY2, VB1, LY1 / Clothing Stripes - CT1, CT2, GY3  / Puddle & Raindrops - BT1, Blender, IB1 (SN) 
Dies: Tonic Verso 'Cherish the Moment' Rectangle Frame, Tonic 'Pin Hole Square Layering', Xcut Mini Sentiments 'Memories'
Paper & Cardstock (CS): 5" x 5" Scallop Card Blank, Lemon Linen CS, Aqua CS (Light & Dark)
Other: Blue & Clear Glitter, Silver Pen, Foam Pads

So why not drop by the Sweet Stampin' Challenge blog and check out what my fab Design Team girlies have made to inspire you. So come on why not join in with the fun and enter your card/project into our 'Photo Inspiration' challenge we'd love to see your entries. 

This week's prize is Dies To Die For

Thank you so much for dropping by and why not leave me a message to say hi :)

Challenges entered: 

Hugs
x Janine x

Wednesday 2 November 2016

Crafter's Companion 'Inspirers' Design Team - October Project #2

Good morning everyone

Now I know it's the beginning of November, but I'm here today to share one of my October Crafter's Companion Design Team project with you using a few of Leonie Pujol's products. I used one of her new Christmas embossing folder, stamps and a few of her glittery pens.


Well you know me and how I love to create little scene - so here I decided to create a little wintery backdrop for this gorgeous reindeer using distressing inks. To add sparkle I added purple glitter pens to the reindeer and filled the pretty swirly de-bossed border with glitter.

I hope it gets you into the  Christmas mood :)


Here's What I Did
I cut a piece of strong white card to size and embossed it with the Christmas embossing folder. Using the de-bossed side of the card I stamped the reindeer and sentiment into the centre. The reindeer was stamped again onto a post-it note (tacky end) and fussy cut out; this was placed over the stamped reindeer on the card to protect it while doing the next step.

Next I added Shaded Lilac distressing ink around the edges slowly increasing the depth of colour. To create the snow hills template I roughly tore off a strip from a piece of copier paper. the template was laid this across the white card at an angle, then using a piece of cut & dry foam I gently sponged Worn lipstick distressing ink above the tear line to create sky. This was followed by 2 more drifts using the Shaded Lilac distressing ink. I added a little extra ink just under the reindeer's feet so he looked liked he was prancing.  When the ink was dry I coloured the reindeer in with alcohol pens and finished it off with glitter pens.

I achieved the glittery look around the edge, by using a narrow tipped glue pen and carefully drawing inside the swirly de-bossed lines - I did one side at a time and added glitter. I repeated the process for each of the side until it was finished.

I matted the reindeer topper onto lilac card, and then mounted it onto the 5" x 7" card blank using foam tape. and to finish off I attached 2 gems on the 'i' dots.

Here's What I Used
Crafter's Companion Products - Leonie Pujol 'Entwined Frame' Embossing Folder, Leonie Pujol 'Tree Fairy' Stamp Set, Sara's Signature Collection Contemporary Christmas 'Festive Sentiments', Sheena Douglass White Stamping CardLeonie Pujol Glitter Pen 'Wrapped Up'Spectrum Noir Pens - NB1, HB2, HB3, LV3, Spectrum Noir 'Clear Overlay' Glitter Pen,

Other: Distressing Inks (Worn Lipstick & Shaded Lilac), Memento Ink (Grape Jelly & Tuxedo Black), Manual Die Cutting Machine, Glitter, Gems, White & Lilac Cardstock, Copier Paper, Misti

Don't forget....if you want to see more Crafter's Companion creations made my lovely teamies why not join our Facebook page - just search for Crafter's Companion UK or USA, and for more magazine inspiration definitely checked out the Crafters' Companion Inspiration Magazine group.

Just a little heads up...we are also on Twitter, Instagram and have a Pinterest Board, so why not follow us.I look forward to seeing you soon. Why not leave me a message so I know who's out there or if you have any questions about the products - I'd love to hear from you :)

I look forward to seeing you soon. Why not leave me a message so I know who's out there - I'd love to hear from you!!

Challenge Entered:

Hugs & kisses

x Janine x