Friday, 17 January 2025

Lili Of The Valley - Sending Love #1

Hi There

This is my last post sharing glimpse of the newly launched Spring polymer stamps from Lili Of The Valley (LOTV). My card today is using several of the stamps from the 'Sending Love' set. This set and the other 3 are all now live in the LOTV Etsy shop on pre-order. I hope you like it. 

For your information, here is the link to the LOTV website which hosts freebies and tutorials, and the LOTV Etsy Store so you can check out all the stampsFYI you can use both sites to access all the stamps. 


Here's What I Did & Used
First I trimmed down a piece of blue floral paper and added it to the front of a 5" x 7" card blank, leaving a slim border around the edge. 

All the images together with the sentiment were stamped onto colouring cardstock, and die cut into a rectangle. Everything was coloured with Copic pens, and glitter was added to a few of the hearts. When finished, the panel was added to a die cut blue postage stamp frame, and mounted onto white card. Funky foam was glued to the back. The topper was glued onto the front f the card. To finish the card I add a few pearls at the bottom. 

Here's What I Used
Polymer Stamp: Sending Love
Bundle: 4 x Stamps

Copic Pens: Mouse & Heart - E31, E33, E34, E35, R02, R10, RV13, RV14, RV21 / Bird & Heart  - B000, B00, B02, Y17, R10, RV13, RV14, RV21 / Postage Stamp - B00, B02, R10, RV13, RV21 / Ground - E33, E53

Other: 5" x 7" White Card Blank, Make It Colouring Card, White & Blue Card, 'Bonnets & Bowties' Paper Pad (LOTV), Rectangle Postage Stamp Frame Die (Creative Expression), Glitter, Pearls, White & Black Pen, Funky Foam, Glue, Double Sides Tape, Black Ink

If you wish to ask a question about any of my cards please leave me a message in the comment with your email address, otherwise I cannot contact you. Alternatively email me at jsnine.quinn@gmail.com

Or why not join us on social media at  'We Love Lili Of the Valley' Facebook Group run by the Design Team, the official Lili Of The Valley Facebook page and on Instagram.  We'd loved to see you.

Please Note - I am part of the Lili Of The Valley's Design Team and I receive their lovely images to play with and share with you; I do not receive any monetary reimbursement for my samples, however on occasion I receive a free stamp set as a thank you gesture for my advertisements or participation. I do, what I do for fun and relaxation. Thank you. x

Thank you so much for dropping by, and please don't forget to say hi :)  I'll be back soon with more sneaky peeks of the fabulous new LOTV Love stamps. TTFN

Hugs

x Janine x

Craft Consortium - Exciting News

Hi everyone

Today I'm delighted to share some exciting news!

I have re-joined Craft Consortium as a new Design Team. I will be joining an incredibly talented bunch who have been with Craft Consortium for many some years, as well as a few more new ladies. I look forward to working with them all - both new and old. We are quite an international DT now. Here are their faces and Instagram address if you would like to follow them. :)

Why not follow us on Facebook - Craft Consortium NetworkCraft Consortium Ltd or our our Instagram page. We'd loved to see you. Thank you so much for dropping by, don't forget to say hi :) 

Hugs

x Janine x


Thursday, 16 January 2025

Lili Of The Valley - Unicorns & Dragons #1

 Hi There

My post today is highlighting one of the stamps on the new 'Unicorns & Dragon's polymer stamp sets from Lili Of The Valley. The set launched yesterday, and is on pre-order.  So for today's card I used one of the very cute dragons which I coloured with Copic pens. I hope you like it. 

For your information, here is the link to the LOTV website which hosts freebies and tutorials, and the LOTV Etsy Store so you can check out all the stampsFYI you can use both sites to access all the stamps. 


Here's What I Did & Used
First I trimmed down a piece of green patterned paper and added it to the front of a 6" x 6" card blank, leaving a slim border around the edge. 

The dragon and sentiment were stamped onto colouring cardstock, and die cut into a circle. The image was then coloured with Copic pens along with white pen highlights. The circle was mounted onto a patterned paper scalloped circle, then onto a white fancy die cut frame. The topper was glued flat onto the card of the front. To finish the card I add glitter to the bubbles and a few pearls at the bottom of the card. 

Here's What I Used
Polymer Stamp: Unicorns & Dragons
Bundle: 4 x Stamps

Copic Pens: Dragon - YGO1, YG03, YG17, YG67 / Bubbles & Stars - Y15, Y17, Y38, V04, V05, V06 / Ground - N0, N2, N4

Other: 6" x 6" White Card Blank, Make It Colouring Card, White Card, 'Humming Bird & Their Beautiful Colours' Paper Pad (The Works), Scalloped Circle Die (Tonic), Decorative Nested Circle Die Set (Craft Buddy), Glitter, Pearls, White Pen, Glue, Double Sides Tape, Black Ink

If you wish to ask a question about any of my cards please leave me a message in the comment with your email address, otherwise I cannot contact you. Alternatively email me at jsnine.quinn@gmail.com

Or why not join us on social media at  'We Love Lili Of the Valley' Facebook Group run by the Design Team, the official Lili Of The Valley Facebook page and on Instagram.  We'd loved to see you.

Please Note - I am part of the Lili Of The Valley's Design Team and I receive their lovely images to play with and share with you; I do not receive any monetary reimbursement for my samples, however on occasion I receive a free stamp set as a thank you gesture for my advertisements or participation. I do, what I do for fun and relaxation. Thank you. x

Thank you so much for dropping by, and please don't forget to say hi :)  I'll be back soon with more sneaky peeks of the fabulous new LOTV Love stamps. TTFN

Hugs

x Janine x


Tuesday, 14 January 2025

Lili Of The Valley - Sweet Wishes #1

 Hi There

My post today expands on my sneaky peak highlighting the new polymer stamp sets from Lili Of The Valley, which launch tomorrow (Wednesday 15/1/25). So here is my next card made using another of the sets; this cute cat is from the 'Sweet Wishes' set. I used Copic pens to colour with, and die cut a pretty floral pattern at the top of the oval. I hope you like it. 

For your information, here is the link to the LOTV website which hosts freebies and tutorials, and the LOTV Etsy Store so you can check out all the stampsFYI you can use both sites to access all the stamps. 


Here's What I Did & Used
First I trimmed down a piece of lilac patterned paper and added it to the front of a 5" x 7" scalloped card blank, leaving a slim border around the edge. 

The cat and sentiment were stamped onto colouring cardstock, and die cut into an oval. The top of the oval was die cut with a patterned die from my stash. The oval was mounted onto lilac card and onto white card. I then set about paper piecing the flowers and leaves using the same patterned paper, glitter and gold mirror card. The image was then coloured with Copic pens. Funky foam was added to the back of the oval topper to give it dimension and glued to the centre of the card front. To finish the card I add glitter to the heart and a few pearls at the bottom of the card. 

Here's What I Used
Polymer Stamp: Sweet Wishes
Bundle: 4 x Stamps

Copic Pens: Cat - N0, N2, N4, R02 / Bow & Heart - V06, V12, V15 / Ground - E31, E33

Other: 5" x 7" White Scalloped Card Blank, Make It Colour Blending Card, 'Triple step Blooming Heart' Die (Concord & 9th), 'Flowers Forever' Paper Pad (The Works), Essential Stylish Ovals Die Set (Spellbinders), White & Lilac Card, Purple & Blue Glitter Card, Gold Mirror Card, Pearls, Glitter, White Pen, Glue, Double Sided Tape, Funky Foam, Black Ink

If you wish to ask a question about any of my cards please leave me a message in the comment with your email address, otherwise I cannot contact you. Alternatively email me at jsnine.quinn@gmail.com

Or why not join us on social media at  'We Love Lili Of the Valley' Facebook Group run by the Design Team, the official Lili Of The Valley Facebook page and on Instagram.  We'd loved to see you.

Please Note - I am part of the Lili Of The Valley's Design Team and I receive their lovely images to play with and share with you; I do not receive any monetary reimbursement for my samples, however on occasion I receive a free stamp set as a thank you gesture for my advertisements or participation. I do, what I do for fun and relaxation. Thank you. x

Thank you so much for dropping by, and please don't forget to say hi :)  I'll be back soon with more sneaky peeks of the fabulous new LOTV Love stamps. TTFN

Hugs

x Janine x

Lili Of The Valley - Have A Mice Day #1

Happy Belated New Year

I hope 2025 is a good year for you all - full of love, peace and happiness. Hugs to you all. xxx

To start the year off I'm going to be share a sneak peak of new polymer stamps from Lili Of The Valley (LOTV). The 4 sets all launch tomorrow Wednesday 15/1/25, and I've made one card from each of the sets. My first card is using a stamp from the cute 'Have A Mice Day' set. I used Copic pens to colour with. I hope you like it. 

For your information, here is the link to the LOTV website which hosts freebies and tutorials, and the LOTV Etsy Store so you can check out all the stampsFYI you can use both sites to access all the stamps. 


Here's What I Did & Used
First I trimmed down a piece of yellow patterned paper and added it to the front of a 5" x 5" card blank, leaving a slim border around the edge. 

The mouse and sentiment were stamped onto colouring cardstock, and die cut into a circle. The image was then coloured with Copic pens, and mounted onto a yellow scalloped die cut circle. I added white pen to the eyes and bow. Funky foam was added to the back of the circle topper to give dimension. A doily frame die cut from white card was glued in the centre of the card front, and the circle topper was added on top. To finish the card I add a few yellow gems to the bottom of the card. 

Here's What I Used
Polymer Stamp: Have A Mice Day
Bundle: 4 x Stamps

Copic Pens: Mouse - N0, N2, N4, R02 / Bow - Y15, Y17 / Ground - E31, E53

Other: 5" x 5" White Card Blank, Make It Colour Blending Card, Doily Circle Die (Joy! Crafts), White Card & Yellow Card, Gems, White Pen, Glue, Double Sided Tape, Funky Foam, Black ink

If you wish to ask a question about any of my cards please leave me a message in the comment with your email address, otherwise I cannot contact you. Alternatively email me at jsnine.quinn@gmail.com

Or why not join us on social media at  'We Love Lili Of the Valley' Facebook Group run by the Design Team, the official Lili Of The Valley Facebook page and on Instagram.  We'd loved to see you.

Please Note - I am part of the Lili Of The Valley's Design Team and I receive their lovely images to play with and share with you; I do not receive any monetary reimbursement for my samples, however on occasion I receive a free stamp set as a thank you gesture for my advertisements or participation. I do, what I do for fun and relaxation. Thank you. x

Thank you so much for dropping by, and please don't forget to say hi :)  I'll be back soon with more sneaky peeks of the fabulous new LOTV Love stamps. TTFN

Hugs

x Janine x

Sunday, 22 December 2024

Lili Of The Valley - Penguin Party

 Merry Christmas🎅

Hi everyone, I'm back with my last 2024 card for Lili Of The Valley (LOTV), and again I'm highlighting 1 of the 9 new Christmas digi stamps. As I mentioned yesterday LOTV are offering a crazy deal if you buy the set of 9 for £25, as you will receive the complete LOTV digi stamp shop, how amazing is that. The gift is worth approx £2,000 and contains 683 stamps. However, if you prefer the pre-coloured Simple Prints images (Pdfs), there is an offer for those as well, just buy the new Christmas Simply Print images (9) and you will receive the complete 'Simply Print' catalogue in the store worth approx £1400 (465 Pdf images). Please note: the offer finishes on Christmas Day - see the links below. 

So my last card I'm using  'Penguin Party' and coloured it with my Copic pens. I hope you like it. x

For your information, here is the link to the LOTV website which hosts freebies and tutorials, and the LOTV Etsy Store so you can check out all the stampsFYI you can use both sites to access all the stamps. 


Here's What I Did & Used
I trimmed down a piece of pretty Christmas paper to fit the front of a 6" x 6" card blank, leaving a slim border around the edge. The paper was then glued flat onto the front of the card. 

Next I imported the penguins and sentiment into my software (FYI I use MS Publisher) and resized them to fit my project. Everything was printed onto colouring cardstock and coloured with Copic pens. The scene was die cut into a square and mounted onto a red scalloped frame. The topper was glued flat onto the card front. To finish the card, I added a little handmade embellishment at the top of the card along with a little glitter to the hats and snow. 

Digi Stamp Set: Christmas 24 Offer (free big bundle gift will be downloaded up to 48 hrs later)
Simply Print Set: Christmas 24 offer (free big bundle gift will be downloaded up to 48 hrs later)

Copics: Penguins - N2, N4, N6, N8, E000, E00, E02, Y15, Y38 / Hats - B00, B02, R27, R29 / Star - Y15, Y17, Y38 / Holly - R27, R29, YG03, YG67 / Snow - B00, B02

Other: White 6" x 6" Card Blank, Make It Colour Card, 'I'll Be Gnome for Christmas' Paper Pad (The Works), Red Glitter Card, Red & White Card, 'Stitched Scalloped Square' Die Set (Creative Expressions), 'Mini Snowflakes' Die Set (Lawn Fawn), Banner Dies (MFT), Glitter, Double Sided Tape, White Pen, Gem, Double Sided Tape, Glue

If you wish to ask a question about any of my cards please leave me a message in the comment with your email address, otherwise I cannot contact you. Alternatively email me at jsnine.quinn@gmail.com

Or why not join us on social media at  'We Love Lili Of the Valley' Facebook Group run by the Design Team, the official Lili Of The Valley Facebook page and on Instagram.  We'd loved to see you.

Please Note - I am part of the Lili Of The Valley's Design Team and I receive their lovely images to play with and share with you; I do not receive any monetary reimbursement for my samples, however on occasion I receive a free stamp set as a thank you gesture for my advertisements or participation. I do, what I do for fun and relaxation. Thank you. x

Thank you so much for dropping by, and please don't forget to say hi :)  I'll be back soon with more sneaky peeks of the fabulous new LOTV Love stamps. TTFN

Hugs

x Janine x

Saturday, 21 December 2024

Amanda Jayne Designs - Penguin Couple

 Merry Christmas Everyone

For this post I'm sharing the last of my cards for Amanda Jayne Designs as my term as a Design Team member has sadly comes to an end. I have one more item to share tomorrow, then I'm off to pastures new for 2025. So watch this space! 

So for today's card I have created a pretty blue Christmas card using the 'Penguin Couple' digi set. The set contains a generous black outline stamp to colour yourself and a pre-coloured version, which is great if you need a quick card before the big day. I used Copic pens to colour with. I hope you like it. x

FYI - Amanda has lots of  lovely digi stamp, papers and sentiments in her Etsy shop, along with some pre-coloured images and papers. Here is the link to the Amanda Jayne Designs Etsy Store to check out all the digi stamps and papers.


Here's What I Did 
I covered the front of a 5" x 7" card front with some pretty blue snow effect paper. Next I imported the cute penguin couple into my software (FYI I used MS Publisher) and added my own Christmas sentiment, everything was then resized to fit my project. 

The image and sentiment were printed onto colouring cardstock and cut with a label die. The image was coloured with Copic pens. The penguins were printed out again onto masking paper, and fussy cut out. The mask was placed over the image and blue distress ink was applied around it. The mask was removed once everything was dry; then mounted onto blue card cut using a slightly larger label die. Funky foam was added to the back to raise it up a little. The finished topper was added to the front of the card. 

To complete the card, I added glitter to the hats and snow, and a few pearls to the bottom of the card.  

Here's What I Used 
Digi Stamp Set: Penguin Couple

Copic Pens: Penguins - N2, N4, N6, N8, E0000, E000, E00, E01, Y15, Y38 / Hats & Scarves - B000, B00, BO2, B23, B45, B97 / Snow - B000, B00, BO2

Other: 5" x 7" White Card Blank, Make It Colour Card, Blue Card, 'Snowy Christmas' Paper Pad (The Works), 'Ornate Label' Die Set (Hunkydory), Tumbled Glass Distress Ink, Masking Paper, White Pen, Pearls, Glitter, Glue, Double Sided Tape

We have a lovely facebook group called Amanda Jayne Design Inspiration Group, or why not follow Amanda Jayne Designs on Instagram @amandajaynedesigns

If you wish to ask a question about any of my cards please leave me a message in the comment with your email address, otherwise I cannot contact you. Alternatively email me at jsnine.quinn@gmail.com

Please Note - I am designing for Amanda Jayne Designs and I receive her lovely digi images to play and share with you; I do not receive any monetary reimbursement for my samples, advertisements or my participation. I do, what I do for fun and relaxation. Thank you. x

Thank you so much for dropping by, and please don't forget to say hi :)  I'll be back soon with more cards using Amanda Jayne Designs stamps. TTFN

Hugs

x Janine x
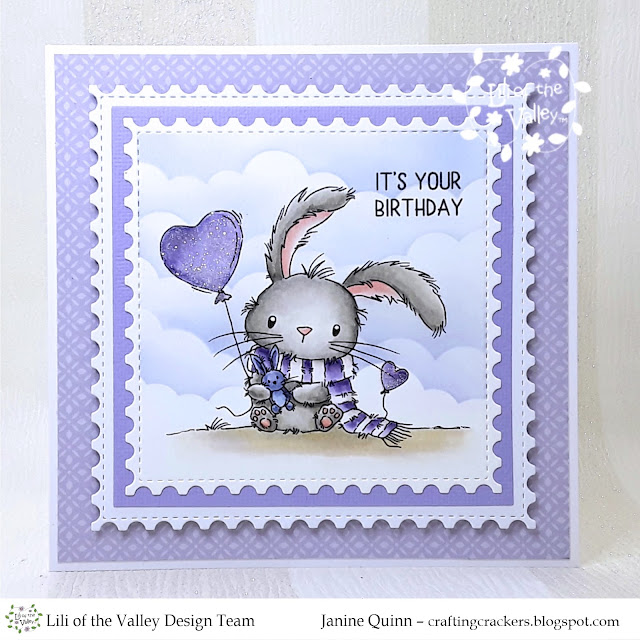
Lili Of The Valley - Christmas Digi Stamps #1

Merry Christmas🎅

Hi everyone, I hope all your Christmas prep is finished or almost finished, and you can now relax. I'm definitely all finished, well except for sharing my last few cards for Lili Of The Valley for 2024. Today I'm highlighting 2 of the 9 new Christmas digi stamps which has a fabulous special gift attached to it. So basically if you buy the set of 9 for £25 you will receive the complete LOTV digi stamp shop, how wonderful is that. The gift is worth approx £2,000 and contains 683 stamps. However, if you prefer the pre-coloured Simple Prints images (Pdfs), there is an offer for those as well, just buy the new Christmas Simply Print images (9) and you will receive the complete 'Simply Print' catalogue in the store worth approx £1400 (465 Pdf images). Please note: the offer finishes on Christmas Day - see the links below. 

For my card today I have used the digi stamp 'Photobooth Bear' and coloured it with my Copic pens. I hope you like it. x

For your information, here is the link to the LOTV website which hosts freebies and tutorials, and the LOTV Etsy Store so you can check out all the stampsFYI you can use both sites to access all the stamps. 


Here's What I Did & Used
I die cut piece of lovely blue Christmas paper and glued it flat onto my DL card. Next I imported the bear photo strip into my software (FYI - I use MS Publisher), and tilted the image so it was straight and resized it to fit my project. The bears were all coloured using Copic pens, and  I created a snowy background on each. 

When the colouring was finished I die cut it with a slim rectangle die and attached it to a scalloped mat cut from blue Christmas paper. The topper was then mounted onto the front of a DL card blank flat. 

To finish the card, I added white dots in the background for snow, and a little glitter to the fur trim on the hats.

Digi Stamp Set: Christmas 24 Offer (free big bundle gift will be downloaded up to 48 hrs later)
Simply Print Set: Christmas 24 offer (free big bundle gift will be downloaded up to 48 hrs later)

Copics: Bear - E31, E33, E34, E35, E37 / Hats - B45. B97, B99 / Background - BV00, B00, B32

Other: White DL Card Blank, Make It Colour Card, 'Snowy Christmas' Paper Pad (The Works),  'Nested Scalloped Slims' Die Set (Lisa Horton), Glitter, Double Sided Tape, White Pen, Double Sided Tape, Glue

If you wish to ask a question about any of my cards please leave me a message in the comment with your email address, otherwise I cannot contact you. Alternatively email me at jsnine.quinn@gmail.com

Or why not join us on social media at  'We Love Lili Of the Valley' Facebook Group run by the Design Team, the official Lili Of The Valley Facebook page and on Instagram.  We'd loved to see you.

Please Note - I am part of the Lili Of The Valley's Design Team and I receive their lovely images to play with and share with you; I do not receive any monetary reimbursement for my samples, however on occasion I receive a free stamp set as a thank you gesture for my advertisements or participation. I do, what I do for fun and relaxation. Thank you. x

Thank you so much for dropping by, and please don't forget to say hi :)  I'll be back soon with more sneaky peeks of the fabulous new LOTV Love stamps. TTFN

Hugs

x Janine x

Thursday, 28 November 2024

Amanda Jayne Designs - Christmas Cookie Cow #2

 Hi Everyone

I'm back today to share another of my cards promoting a Christmas digi stamp set from Amanda Jayne Designs. As I mentioned in my previous post, the set is called 'Christmas Cookie Cow' and it includes: 4 digi stamps - 2 uncoloured and 2 pre-coloured. I also used one of the sentiments from the 'Christmas Sentiments' set. I used Copic pens to colour with. I hope you like it. x

FYI - Amanda has lots of  lovely digi stamp, papers and sentiments in her Etsy shop, along with some pre-coloured images and papers. Here is the link to the Amanda Jayne Designs Etsy Store to check out all the digi stamps and papers.


Here's What I Did 
For this card I trimmed down a piece of pink textured card and glued it flat to the front of a 6" x 6" card blank, then added a pretty star background frame over the top which was gifted to me by a friend.

I imported the cookie cow into my software and added a Christmas sentiment, everything was then resized to fit my project. The scene was printed onto colouring card, and then coloured with Copic pens. The finished image was die cut into a circle. 

The cow was printed out again onto masking paper, and fussy cut out. The mask was placed over the image and blue distress ink was applied around it. Gold paint was watered down slightly and flicked all over the image. The mask was removed once everything was dry; then mounted onto a pink scalloped circle. The finished topper was added to the front of the card. To complete the card, I added glitter to the cookie and a few pink snowflakes. 

Here's What I Used 
Digi Stamp Set: Christmas Cookie Cow
Digi Sentiment: Christmas Sentiments

Copic Pens: Cow - E00, E01, E02, NO, N2, N4, N6 / Bow - R20, R22, R32 / Cookie - E31, E33, E35, R20, R22 / Ground - N0, N2

Other: 6" x 6" White Card Blank, Make It Colour Card, Pink Card, 'Stitched Scalloped Circle' Die Set (Creative Expressions), 'Mini Snowflake' Die Set (Lawn Fawn), Tumbled Glass Distress Ink, 'Star Background' Die (?), Masking Paper, White Pen, Gold Acrylic Paint, Glitter, Glue, Double Sided Tape

We have a lovely facebook group called Amanda Jayne Design Inspiration Group, or why not follow Amanda Jayne Designs on Instagram @amandajaynedesigns

If you wish to ask a question about any of my cards please leave me a message in the comment with your email address, otherwise I cannot contact you. Alternatively email me at jsnine.quinn@gmail.com

Please Note - I am designing for Amanda Jayne Designs and I receive her lovely digi images to play and share with you; I do not receive any monetary reimbursement for my samples, advertisements or my participation. I do, what I do for fun and relaxation. Thank you. x

Thank you so much for dropping by, and please don't forget to say hi :)  I'll be back soon with more cards using Amanda Jayne Designs stamps. TTFN

Hugs

x Janine x
Wednesday, 27 November 2024

Amanda Jayne Designs - Christmas Cookie Cow #1

Evening Everyone

Today I'm sharing one of my recent cards promoting on of the Christmas digi stamp bundles from Amanda Jayne Designs. I will be back again later in the week with another card using the same stamp set. 

So for today's card I have created a sweet Christmas card using one of the stamps from the 'Christmas Cookie Cow' set. The set includes: 4 digi stamps - 2 uncoloured and 2 pre-coloured, I also added a sentiment from the 'Christmas Sentiments'. I used Copic pens to colour with. I hope you like it. x

FYI - Amanda has lots of  lovely digi stamp, papers and sentiments in her Etsy shop, along with some pre-coloured images and papers. Here is the link to the Amanda Jayne Designs Etsy Store to check out all the digi stamps and papers.


Here's What I Did 
I trimmed down a piece of lovely red Christmas paper from my stash and glued it to the front of a 6" x 6" card front, leaving a slim border around the edge. I imported the sweet cookie cow into my software and added a Christmas sentiment, everything was then resized to fit my project. I made the cow a little larger and tilted her so she looked like she was popping up from the corner. 

The image and sentiment were printed onto colouring cardstock and cut with a square die. The image was coloured with Copic pens. The cow was printed out again onto masking paper, and fussy cut out. The mask was placed over the image and blue distress ink was applied around it. Gold paint was watered down slightly and flicked all over the image. The mask was removed once everything was dry; then mounted onto red and white card cut using a postage stamp die set. The finished topper was added to the front of the card. To complete the card, I added glitter to the cookie and a few red snowflakes. 

Here's What I Used 
Digi Stamp Set: Christmas Cookie Cow
Digi Sentiment: Christmas Sentiments

Copic Pens: Cow - E00, E01, E02, NO, N2, N4, N6 / Bow - R14, R27, R35, R37 / Cookie - E31, E33, E35, R14, R35

Other: 6" x 6" White Card Blank, Make It Colour Card, Red and White Card, 'I'll Be Gnome For Christmas' Paper Pad (The Works), Square 'Postage Stamp Frame' Die Set (Creative Expressions), 'Mini Snowflake' Die Set (Lawn Fawn), Tumbled Glass Distress Ink, Masking Paper, White Pen, Gold Acrylic Paint, Glitter, Glue, Double Sided Tape

We have a lovely facebook group called Amanda Jayne Design Inspiration Group, or why not follow Amanda Jayne Designs on Instagram @amandajaynedesigns

If you wish to ask a question about any of my cards please leave me a message in the comment with your email address, otherwise I cannot contact you. Alternatively email me at jsnine.quinn@gmail.com

Please Note - I am designing for Amanda Jayne Designs and I receive her lovely digi images to play and share with you; I do not receive any monetary reimbursement for my samples, advertisements or my participation. I do, what I do for fun and relaxation. Thank you. x

Thank you so much for dropping by, and please don't forget to say hi :)  I'll be back soon with more cards using Amanda Jayne Designs stamps. TTFN

Hugs

x Janine x