Monday 29 April 2019

Lili Of the Valley (LOTV) - April Card #3

Morning everyone💜

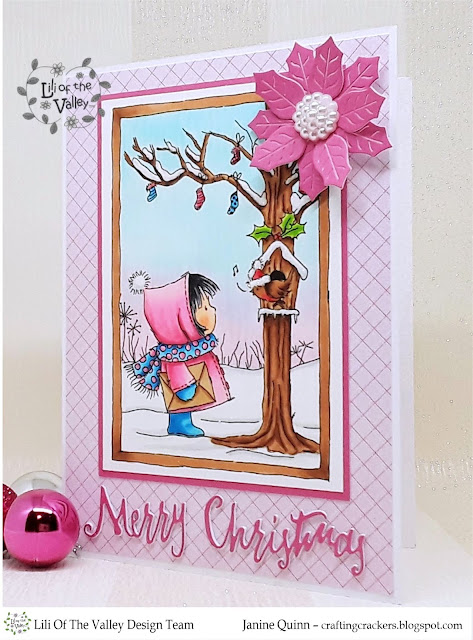
Well guys, I'm away atm relaxing on a week's cruise around Scandinavia with my wonderful daughter. I'll share some lovely photos with you when I get back. But for the time being I have a lovely Christmas card for you using a really sweet Lili Of The Valley (LOTV) digi stamp called 'Robin Singing'. The digi stamp is available from the Etsy store as an instant download. I know I said the dreaded 'C' word, but I just love this stamp and really wanted to share it with you. I'm sure you can see why! I used Copics to colour with.

For your information, here is the link to the LOTV online store and the LOTV Etsy Store to check out the rest of their goodies.


Here's What I Did 
I trimmed down a piece of patterned paper from my LOTV stash and added it to the card front leaving a slim border around the edge.

The gorgeous digi stamp was printed directly onto some colouring card stock and coloured with Copic pens. The image was then added to a bright pink mat and glued flat onto the card front. Glitter was added to the snow.

The 'Merry Christmas' sentiment was die cut 3 times, twice from white card and once from the bright pink card and glued together to give dimension. When dry the sentiment was added to the card front below the topper.

To complete the card I die cut and layered up a poinsettia cut from the same pink card, this was then added to the front using a foam pad.

Here's What I Used
Digital Stamp:  'Robin Singing'.

Other: 5½" x 7¼" Card Blank, Neenah Card, LOTV 'Pastel Dreams' Pad Pad, Hunkydory Matt-tastic Card, Sizzix 'Home for the Holidays Die Set, Sizziz 'Box, Pillow & Poinsettia' Die Set, Graphics Program, Printer, Foam Pads, Glitter

Copics: Tree & Bird House - E29, E31, E33, E35, E37, C0, C1 /Robin - E33, E35,E37, R22, R27, C0, C1 /  Socking - B01, B04, R22, RV02 / Holly - YG03, YG17, R22, R27 / Skin - E000, E00, E02 / Hair - C1, C3, C5, C7, 00 / Coat - RV00, RV02, RV10, RV34 / Scarf - RV00, RV02, B000, B00 B04, B06 / Gloves & Boots - B00, B04, B06 / Snow - C0, C01

Or why not join us on social media at  'We Love Lili Of the Valley' Facebook Group run by the Design Team, the official Lili Of The Valley Facebook page and on Instagram.  We'd loved to see you. #lotvdt

Thank you so much for dropping by, and please don't forget to say hi :)  I'll be back in a few days with another fabulous LOTV image for you....so I'll see you very soon. TTFN

Challenges entered:

Hugs


x Janine x

Monday 22 April 2019

Lili Of The Valley (LOTV) - April Card #2

Morning everyone💜

This the 2nd of my April cards for Lili Of The Valley (LOTV) cards and I wanted to share the last of my cards with an Easter theme. So today's card is using a digi stamp called 'Spring Rabbit With Egg 2' with my own sentiment and papers. The digi stamp is available on it's from the Etsy store as an instant download, but if you prefer the rubber stamp version it is available as A5 stamp sheets and include other stamps, please see below for the links.

For your information, here is the link to the LOTV online store and the LOTV Etsy Store to check out the rest of their goodies.


Here's What I Did
I trimmed down a piece of patterned paper from my stash and attached it to my card front. Using another piece of paper from the same pad I cut a strip approx 2" wide and punch out each side to create a border, this was glued in place across the card.

The rabbit digi stamp was printed directly onto some colouring card stock and coloured with Copic pens. The completed image was then added to an oval die cut, cut from the same pad as the background paper so that all the colours tied in. The completed topper was added to the card front using foam pads to raise it up; glitter was added to the Easter egg. To complete the card punched out butterflies and pearls were added.

Here's What I Used
Digital Stamp: 'Spring Rabbit With Egg 2' (the images are available singularly)
Rubber Stamp Sheet: 'Easter Cuties'

Other: 4½" x 5¾" Card Blank (my own size), Tonic 'Home Sweet Home' Oval Dies, Neenah Card, Graphics Program, Printer, Foam Pads, Pearls, Glitter, First Edition 'Spring Drop' Paper Pad, Tonic Border Punch

Or why not join us on social media at  'We Love Lili Of the Valley' Facebook Group run by the Design Team, the official Lili Of The Valley Facebook page and on Instagram.  We'd loved to see you.

Thank you so much for dropping by, and please don't forget to say hi :)  I'll be back in a few days with another fabulous LOTV image for you....so I'll see you very soon. TTFN

Challenges entered:

Hugs

x Janine x

Friday 19 April 2019

Hunkydory Product Review - Moonstone Dies #2

Good Morning Everyone

Today I'm back with another review using the last of my die cutting sets from the UK company Hunkydory Crafts (HC).  If you didn't read my last review, here is a little background --- I was approached approx a month ago by Hunkydory Crafts asking if I would consider reviewing some of their products. So of course I said yes as long as I could give my honest opinion about the quality and usage of the products. HC happily agreed. I was given carte blanche on my choice, so I opted to use some of their Moonstone dies as I'd never them before in either my personal crafting or as a member of the 'For the Love Of Stamps' Design Team. 

As I mentioned in my previous review I selected the 3 sets shown below. I received these dies as a gift, and I will be giving you my personal, honest and sincere opinion from a crafter's point of view. I previously stated I will review the dies packaging, how they cut and how I feel the finished product looks. I used the first 2 sets in my previous review and you can see it here. (warning -- this is a long post)


Here are the links to the products, the prices and sizes (taken from the Hunkydory website) should you wish to purchase them (the information was correct on 11/04/19) --

Deck The Hall - Fabulous Frames - £19.99 (or any 2 for £34.98)
Largest die size is: 12.5cm x 12.5cm and the smallest die size is: 2.6cm x 2.6cm

Blooming Lovely Sentiments & Frame Die Set - £14.99 (or any 2 for £24.98)
Largest die size is: 12.5cm x 12.5cm and the smallest die size is: 4.5cm x 3.1cm

Fabulous Flowers - £14.99 (or any 2 for £24.98)
Largest die size is approx: 5cm x 5cm and the smallest die is approx: 2.2cm x 2.2cm

For this review and my card I used 'Deck The Halls' which I know is technically a Christmas set, but to be honest the only thing that looks remotely Christmassy is the centre circle as it has a cut out holly decoration. This makes this set really useful as it can be used all year around. I also used the 'Forget-Me-Not' stamp set by 'For The Love Of Stamps and 'Garden Treasures' Matt-tastic card and Copic pens.

MY PERSONAL REVIEW ---

(1) PACKAGING
As mentioned in my previous review the overall appearance of the packaging is really attractive in shades of blue and lilac with the white text and die description printed over the top, making everything easy to read and see. This is typical of all the Moonstone die products. The clear plastic packaging makes the products inside very visible and is easy to cut open with a strong pair of scissors. I did find that that if I cut along the top of the packet I could easily slide the die storage sheet in and out, which was brilliant to keep the dies intact and safe.

The die storage sheet was white indexed with the die shape so it made it easy to return the dies to their correct spot.

(2) CUTTING
Firstly I cut out the large frame from matt-tastic card (350gsm) using my trusty manual Grand Calibur die cutting machine and A4 plates. I found it better rotated the frame 45° (to a diamond shape) so it would cut from a single point; this cut through with one pass. Much of the waste from the cut out design just fell away as in the other dies I used; a few areas did need poking out with a tool though. The design of the frame is very pretty and intricate making it perfect to place different colour card behind it, as in my card. This frame die removes the centre so make a lovely frame.

It’s also useful to recut the frame and just use the centre portion for a stamped images etc, as in my card.

(3) MATERIALS
I cut the frame using Hunkydory matt-tastic 350gsm card and super smooth colouring card (200gsm) and it cut through both beautifully with one pass.

To test the dies further I cut out some corner embellishments using different types of materials. I used – vellum, glitter card (coated backing), black card (300gsm), glitter card, mirror card, matt mirror card, kraft card. I only needed one pass through my cutting machine when using the above material, apart from the glitter card (coated backing) which needed two passes. You can see the cut samples below.

4) APPEARANCE
The set includes 2 square dies (5" x 5" & 3¼" x 3¼"), 2 circle dies (2¼" x 2¼" & 1" x 1"), 2 corner dies (1" x 1¼" & 1" x 1½") and 2 border dies (3¼" x ¾" & 3½" x ¾") all are in a pretty intricate patterns, apart from the centre circle which has a cut holly design.

The inside area of the large square frame is approx 3½" square which ideal to add a sentiment, stamped image or flowers on and the small square has a 2½" x 2½" circle cut out.

MY VERDICT

In my sincere opinion I think that the set of dies I tested and used are attractively designed, cut brilliantly on all the materials I tried, and the finished result is very pretty. As with the other sets I tested out I really enjoyed working with them, and will definitely be using these on more of my projects, and would recommend them to my crafting friends. The cost point of the die set is equivalent to similar dies on the market.

As in the other sets I used I would prefer to see them packaged in a cardboard envelop or strong pouch system instead of the usual plastic case. I just feel that this would make storing the dies better, and help to reduce the need for plastic which is such a big issue at the moment.

If you have any questions about the products I used or would like me to test a particular l material just let me know. #ad #gift #craftproductreview

Thank you for taking the time to read my review.

Regards

X Janine X

Wednesday 17 April 2019

Lili Of The Valley (LOTV) - April #1

Morning everyone💜

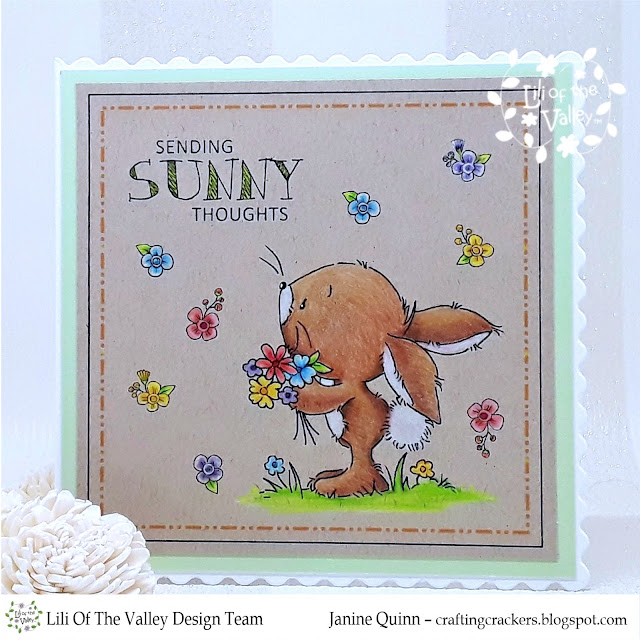
Today I want to share my 1st Lili Of The Valley (LOTV) cards, for April. To continue the Spring theme I've used digi stamps from the Spring/Easter release - the rabbit is called 'Spring Rabbit Posy', all the flowers are from 'Flower Alphabet' and finally the sentiment is from Everyday Greetings. All the digi stamps are available from the Etsy store as an instant download. However, if you prefer rubber stamps they are available as A5 stamp sheets and include other stamps, please see below for the links.

I used Caran D'ache pencils to colour my spring scene and kept my card really simple. I hope you like it. x

For your information, here is the link to the LOTV online store and the LOTV Etsy Store to check out the rest of their goodies.


Here's What I Did
I covered the front of a 5½" x 5½" white scalloped card blank with a soft green card, leaving an exposed edge. Using my graphics software I created a double border edged square, and imported the cute rabbit, sentiment and flowers inside it. The digi images were then resized and arranged to create a scene and printed directly onto Neenah card and coloured with pencils. When finished the topper was trimmed down and mounted onto the card front.

Tip --  I lightly used a white pencil in the areas where I wanted the highlights to be, then used a coloured pencil over the top
Here's What I Used
Digital Stamps (the images are available singularly)
Rabbit: Spring Rabbit Posy
Flowers: Flower Alphabet
Sentiment: Everyday Greetings

Rubber Stamp (the stamps I used are contain in these sets)
Rabbit: Spring Set Collection
Flowers: Flower Alphabet
Sentiment: Sunny Days

Other: 5½" x 5½" White Scalloped Card Blank, Neenah Desert Storm Card, Matt Green Card (Hunkydory)

Caran D'ache Pencil: Rabbit - White, Brown Ochre, Burnt Ochre, Burnt Sienna / Flowers, Grass, Leaves - White, Turquoise Blue, Phthalocyanine Blue, Spring Green, Grass Green, Moss Green, Lemon Yellow, Orange, Lavender Violet, Violet, Purplish Red, Anthraquinoid Pink, Permanent Red / Sentiment - Spring green

Or why not join us on social media at  'We Love Lili Of the Valley' Facebook Group run by the Design Team, the official Lili Of The Valley Facebook page and on Instagram.  We'd loved to see you.

Thank you so much for dropping by, and please don't forget to say hi :)  I'll be back in a few days with another fabulous LOTV image for you....so I'll see you very soon. TTFN

Challenges entered:

Hugs

x Janine x
Tuesday 16 April 2019

Craftsulove Design Team - April Card #1

Hi everyone 💜

Today I'm sharing the first of my April Craftulove Design Team cards with you. This month I received a lovely word edger die by Creative Expressions and Metallic paper pad (technically it's mirror/kraft card) by Tim Holtz, which I teamed it up with Julie Hickey's sentiment stamp set and a few distress oxide inks. Anyhow I hope you like my card. x

All the links to the specific Craftuslove products can be found below, and the link to the general store is here.


Here's What I Did
Firstly I trimmed down a piece white card on to 4½" x 7" then applied and blended 3 distress oxide ink - Worn Lipstick, Picked Raspberry and Candied Apple. I repeatedly apply and blended the ink until I was happy with the result, then I sprayed and splattered water over the top top activate the ink. I used a paper towel to take off the excess water. When it was dry, I attached it to the card front.

Next I trimmed down some of the beautifully rose coloured mirror card to 4" x 7". I placed the die at the height where there would be plenty of card at the bottom as well as at the top where the cut out would be. and ran it thought my manual die cutting machine. Tip - I found it better to cut the die and card vertically. Once it was cut out I snipped away the 2 side sections so it would release the cut out portion at the top of  the edger.  This was attached to the bottom section of the card front.

Using the same ink blend as before I made a small banner and stamped the word 'mother' onto it in black ink; this was attached to the card front using foam pads. To complete the card I added 3 small gems to the banner.

Available from Craftsulove
Die: Creative Expression - Paper Cuts 'For You' Edger
Paper Pad: Tim Holtz Idea-ology 8"x8" Kraft Stock Cardstock - Metallic Confections
Stamp Set: I Need It - Family Sentiments by Julie Hickey
Distress Oxides: Worn Lipstick, Picked Raspberry and Candied Apple

Should you purchase any of the above products, please select  'Design Team'  in the 'where have you seen us' drop down so we know we have inspired you! Thank you x

My Own Stash:
5" x 7" White Scalloped Card Blank, Crafter's Companion Sheena Douglas Stamping Card, Memento Ink - Tuxedo Black, Gems, Foam Pad, Double Sided Tape

Why not, follow us on FacebookPinterestInstagram or on our YouTube Channel we'd loved to see you.

Thank you so much for dropping by, don't forget to say hi :)  I'll be back towards the end of the month with my usual Craftsulove tutorial and card.....so see you then. TTFN!

Challenges entered:

Hugs

x Janine x

Saturday 13 April 2019

Hunkdory Product review - Moonstone Dies


Hi there dear friends

Today I'm doing something a little different; I'm actually reviewing some die cutting products. I was asked by Hunkdory Crafts here in the UK if I would review some of their products, I was given carte blanche on my choice. Now, I know I was on the Hunkdory 'For the Love Of Stamps' Design Team for a few years but I never got to use any of their dies, so I thought this was a great opportunity to try them out.  

So I selected 3 different sets from their Moonstone dies range (see below). I received these dies as a gift, and I will be giving you my personal, honest and sincere opinion from a crafter's point of view. I will review the dies packaging, how they cut and how I feel the finished product looks. (warning -- this is a long post)


Here are the links to the products, the prices and sizes (taken from the Hunkydory website) should you wish to purchase them (the information was correct on 11/04/19) --

Blooming Lovely Sentiments & Frame Die Set - £14.99 (or any 2 for £24.98)
Largest die size is: 12.5cm x 12.5cm and the smallest die size is: 4.5cm x 3.1cm

Fabulous Flowers - £14.99 (or any 2 for £24.98)
Largest die size is approx: 5cm x 5cm and the smallest die is approx: 2.2cm x 2.2cm

Deck The Hall - Fabulous Frames - £19.99 (or any 2 for £34.98)
Largest die size is: 12.5cm x 12.5cm and the smallest die size is: 2.6cm x 2.6cm

For this review and card I used the 'Fabulous Flowers' and 'Blooming Lovely Sentiments and Frames' die sets. I will be using the remaining die set on another review in a few days.  On my card I also used Matt-tastic pink card, 'Garden Treasures' Matt-tastic card, thick white stamping card, funky foam, gems and pearls.

MY PERSONAL REVIEW ---

(1) PACKAGING
The overall look of the compact packaging is attractive, with the white text and die description printed over two shades of blue, making it easy to read. The clear plastic packaging makes the products inside very easy to see. The packaging was very easy to cut open as the plastic wasn't as tough as other companies packaging, but you will still need a strong pair of scissors. I found that if I cut along the top of the package I could slide the die storage sheet in and out, making it better to store and keep the dies intact and safe.

The die storage sheet was white indexed with the die shape so it made it easy to return the dies to their correct spot.

(2) CUTTING
I started by cutting out the large square frame from the ‘Blooming Lovely’ set by using my trusty manual Grand Calibur die cutting machine and A4 plates. I cut the frame using white 300gsm card and rotated the frame 45° (to a diamond shape) so it would cut from a single point; this cut through with one pass. Much of the waste from the cut out design just fell away, but a few areas did need poking out with a tool. The design of the frame is intricate and beautiful; it cuts tiny detail into the shape which looks like lace work. This frame die leaves the centre intact, but the set also includes a slightly smaller square die which allows you to cut out the centre, if you wish. I love the fact that you have the choice of 2 design options.

When the inside piece of the frame is cut away it is large enough for one of the sentiments to be cut from it, which is fabulous when you’re trying to save on your card. The sentiments also cut out very easily, but did need the use of a pokey tool to take out the tiny areas.

The flower dies from the ‘Fabulous Flowers’ set are really easy to use and cut out brilliantly with one pass, and I did not experience any problems with these at all. In the set, each flower has 2 versions - one is an open intricate design and the other is a closed design, this is brilliant because it allows you to cut them out and use separately or overlay them. The finished products are very pretty. You can see in my card that I have overlaid white card over pink card to give a nice effect.

(3) MATERIALS
To add dimension to the card I made (see below) I cut the frame and sentiment again from funky foam and this cut out without any problems with one pass through my machine. This frame and sentiment were glued to the ones I had cut earlier from white card.

To test the dies further I cut out more flowers using different types of materials. I used – vellum, glitter card (coated backing), glitter card, mirror card, matt mirror card, chalkboard adhesive backed card, kraft card, cork adhesive backed card, Matt-tastic card (350gsm) and Sheena Douglas Stamping Card (300gsm). I only needed one pass through my cutting machine when using the above material, apart from the glitter card (coated backing), which needed two passes. You can see the cut samples below.

(4) APPEARANCE
The die cut ‘Blooming Lovely’ frame is a really delicate and pretty, and the inside area is approx 3½"square which ideal to add a sentiment, stamped image or flowers on, or for the centre to be cut out. The set includes 3 sentiments, these dies aren't too big and can fit inside the frame, the font is easy to read and cuts out well. The Fabulous Flowers’ die set includes 5 different flowers in 2 different styles, in varying sizes (1" - 2" in diameter), as mentioned previously they cut our very easily and look lovely and intricate.

MY VERDICT
In my honest opinion I think that the sets of dies I used are beautifully designed, cut brilliantly on the materials I tried, and the finished look is very pretty. I loved working with the dies, and will certainly be using these on more of my projects and would recommend them to my crafty friends. On a cost point of view, I think they’re mostly on par with other companies. I definitely would like to see Hunkydory Crafts produce more designs, especially frames and flowers.

I really enjoyed working with the die sets, if any I would prefer to see them delivered in a cardboard envelop or strong pouch system instead of the usual plastic case though. I feel that this would make storing the dies better and help to reduce the need for plastic.

If you have any questions about the products I used or would like me to test a particular l material just let me know. #ad #gift #craftproductreview

I will be back in a few days to review the last of my Hunkydory Crafts Die sets --- so watch this space.

Regards

X Janine X

Friday 5 April 2019

Lili Of The Valley (LOTV) - March #4 Card

Morning everyone💜

I'm back with the last of my March Lili Of The Valley (LOTV) cards, a little late I know (oops!). Sometimes life has a cheek to get in the way of my crafting. :)  So today, I've used one of the gorgeous new Spring/Easter digi stamps, this one is called 'Easter Tree' and it's available from the Etsy store as an instant download. I used Copic pens to colour everything with and tried to keep the colours lovely and fresh. I hope you like it. x

For your information, here is the link to the LOTV online store and the LOTV Etsy Store to check out the rest of their goodies.


Here's What I Did
I trimmed down a piece of patterned paper to cover the front of a 4½" x 6" top fold card. I imported the pretty Easter tree digi stamp into my graphics software, then resized it to fit
the rectangle die I decided to use. The image was printed directly onto white colouring cardstock, then using my cloud stencil and blue distressing ink I carefully added my cloud background. When the ink was dry I coloured the image using Copic pens. The completed image was die cut into a rectangle, and mounted onto a fancy die cut rectangle cut from green textured card.

The topper was attached to the card front using foam pads to raise it up. I created a computer generated sentiment and die cut it into a banner, then added it to the base of the topper.

To finished the card, fine yellow glitter was applied to the Easter eggs and a few pink gems added to the bottom.

Here's What I Used
Digital Stamp (Bunny): Easter Tree

Other:  4½" x 6" White Card Blank (created from an A4 card), Neenah Card, LOTV 'Bonnets & Bowties), Rectangle Die (Tattered Lace), Rectangle Pearl Die (Tattered Lace), Banner Die (MFT)Yellow Glitter, Gems, Tumbled Glass Distressing Ink, Cloud Stencil (MFT), Foam Pads

Copics:  Bunny - E31, E33, E35, C0 / Chick - Y08, Y11, Y15 /Leaves &Grass - YG01, YG03, YG17 / Eggs & Plant Pot - RV02, RV13, RV14 / Soil - E31, E33, E35

Or why not join us on social media at  'We Love Lili Of the Valley' Facebook Group run by the Design Team, the official Lili Of The Valley Facebook page and on Instagram.  We'd loved to see you.

Thank you so much for dropping by, and please don't forget to say hi :)  I'll be back in a few days with another fabulous image for you....so I'll see you very soon. TTFN

Challenges entered:

Hugs

x Janine x

Tuesday 2 April 2019

Whimsy Stamps - Ray & Make A Wish Campaign

Hi everyone💜

My card today is for a special guy called Ray and for a very special cause. Ray is the brother of Crissy Armstrong one of the artist over at Whimsy Stamps. Ray (see below) sadly has cancer and is currently undergoing treatment and courageously fighting it. So in his honour Crissy designed a digi stamp depicting a penguin having Chemo. The stamp is available in the Whimsy store all the proceeds will go to the 'Make A Wish' campaign in Canada. Please support this wonderful cause and Ray. Come on, KICK CANCER'S BUTT!  I'm send Ray lots of healing hugs and lots of love.  You can find the Ray digi stamp here.


So here is my card to show support for Ray and the 'Maker a Wish' campaign - I used kraft coloured Neenah card and Caran D'ache pencils.


Here's What I Did

I covered the front of a 6" x 6" card front with some pretty green patterned paper.

Using my graphics software I imported the poorly penguin image, sized him and created a border and a sentiment around him. The image and sentiment was printed directly onto Neenah card and coloured with pencils. Tip --  I lightly used a white pencil in the areas where I wanted the highlights to be, then used a coloured pencil over the top. When finished the topper was trimmed down and mounted onto green car, then onto the card front.

Here's What I Used
Digital Stamp: Penguin Ray

Other: 6" x 6" White Card Blank, Desert Storm Neenah Card, Kraft Card, 'Wallflower' The Works/Trimcraft Paper Pad, Green Card

Caran D'ache Pencils - Penguin & Feather - White, Slate Grey, Black, Olive Yellow, Lemon Yellow, Burnt ochre, Scarlet, Gold Bismuth Yellow, Orange, Cornelian / Plaster - White, Light Cobalt Blue, Genuine Cobalt, Phthalocyanine Blue / Drip & Stand - White, Slate Grey, Black, Olive Yellow, Lemon Yellow / Ground - White, Slate Grey

You can follow Whimsy Stamps on their Facebook group, PinterestInstagram and on their Blog

Thank you so much for dropping by, don't forget to say hi :)  I'll be back later in the week with another LOTV card....so see you then. TTFN!

Challenges entered:

Hugs

x Janine x