Tuesday, 27 August 2019

Lili Of The Valley Christmas Launch - Snowman #3

Morning everyone

It's so hot here in the UK, that I thought I would share one of the brand new snow people from Lili of the Valley (LOTV) to cool you down. I decided to colour this gorgeous digi stamp all pink and pretty to make a more feminine card, but you could quite easily transform it into a vintage card or even a masculine card by changing the colours and colour scheme.

So for my card today, I've used Snowman #2, which I coloured with Copic pens. I used pink background paper and a heart stencil. I hope you like it. If you would like to check out the rest of the new snow people and gnome images click here. x


For your information, here is the link to the LOTV Etsy Store to check out all the digi stampsand the LOTV online store to check out the rest of their goodies.

Here's What I Did
I trimmed down a piece of pretty patterned paper, and added it to the front of my card blank leaving a border around the edge. I die cut a scalloped edge circle from the same pink paper used in the background to be used later. From strong white card I die cut a fancy edged square which I added to the card front using funky foam to give it more support.

I imported the gorgeous little snow peep digi stamp into my graphics program, then resized it to fit my project. The image was then printed directly onto colouring card stock and die cut into a circle, and then coloured in using Copic Pens. The image was printed again onto masking paper, fussy cut out and then stuck onto the coloured in snow girl. Using a heart stencil (from my own stash) I apply pink distress ink through it to give the impression of falling snow. When the ink was dry, the mask was removed from the image and added to the centre of the pink scalloped circle. The completed topper was added to the card front using foam pads. To finish my card I added a little glitter, a stamped sentiment (from my own stash) and a few pink gems.

Here's What I Used
Digital Stamp: Snowman #2

Copic Pens: Snow Person & Snow - B0000, B000, C0 / Hat, Scarf & Gloves - RV000, RV00, RV02, RV10, RV13 / Arms & Coals - C1, C5, C7, E31, E33, E35, YG03, YG17 / Star & Nose -  Y08, Y17

Other: 6" x 6" White Card Blank, Make It Color Blending Card (thank you Jayne & Mary), 'Light Tones' Grunge Pad (Craft Consortium), Square Pearl Die (Tattered Lace), Falling Hearts Stencil (Simon Says Stamp), 'Worn Lipstick' Distress Ink, Stitched Collection - Scallop Circles (Creative Expressions), Festive Ticker Tape Wording (Creative Expressions), 'White Card, Gems, Glitter, Foam Pads, Glue, Double Sided Tape, Funky Foam, 'Mask It' Paper

Or why not join us on social media at  'We Love Lili Of the Valley' Facebook Group run by the Design Team, the official Lili Of The Valley Facebook page and on Instagram.  We'd loved to see you.

Thank you so much for dropping by, and please don't forget to say hi :)  I'll be back soon with more sneaky peeks of the fabulous new LOTV Christmas stamps. TTFN

Challenges entered:

Hugs

x Janine x

Wednesday, 21 August 2019

Craft Consortium - It's Snome Time Launch #4

Hi everyone ðŸ’œ

T
oday I'm sharing another card using the brand new collection from Craft Consortium 'It's Snome Time' collection (in partnership with Helz Cuppleditch). The collection launches on Create & Craft TV today time at 4pm (UK time), the products can also be purchased in crafts both here in the UK and in the USA. The collection contains fabulous stamps, a 12" x 12" paper pad, decoupage set and embellishments of Snomes (snowy gnomes) and their friends. 

For my card today I've coloured Mr Snome and friends with pencils onto Neenah card, with a stencilled frosty scene behind him. 

The links to the new products can be found below, or you can also go to the Craft Consortium's website using this link here. Why not sign up for update to product launches while you're there.


Here's What I Did   
I covered the front of a 7" x 7" card blank with a piece of dark red paper from the pad. Next I stamped Mr Snome and his reindeer friend onto desert storm Neenah colouring card and die cut it into a square. I stamped the image again onto masking paper, fussy cut it out and then covered the image with it.

Using a forest scene mask I covered the top portion of the square and image. I created another mask by cutting out a piece of copier paper to size and adding a slight curve in it, I covered the bottom section of the square with it. I added white distress ink over the trees mask several times to really make them white, then added another mask over the top to add my snowdrops. The bottom paper mask was removed and white ink was added to the area as well. When everything was dry, the masks were removed and cleaned. Blue and grey pencil was used on the top of the white ground area to pull it away from the white trees, and then just beneath the snome and toadstools to create shadow. Glitter was added along the edge of the trees and along the icy ground and below the snome.

The images were coloured using Prismacolor pencils and the white pencil from my Caran D'ache set. When the image was finished, dot were added to the sky and the snomes gown using a white pen. The completed image was then added to a square die cut from white card, the topper was attached to the card front using foam pads.

To complete the card I added twine and one of the charms, plus a few enamel dots from the collection. 

I Used
Stamps: It's Snome Time - Mr & Mrs Snome
Paper Pad: It's Snome Time - It's Snome Time
Embellishments: It's Snome Time - Snowflake Charm and Enamel Dots

For USA visitors - the collection will be available from Tuesday (13th Aug). and they will be distributed by Notions Marketing, you may be able to buy direct from them or you could ask your local craft store to order in direct from Notions Marketing. Alternatively here is a link to an Etsy shop that is selling all the ‘It’s Snome Time’ products —— Lotsofbubbles4me

Prismacolor Pencils & Carn D'ache (CD) 
Robin - Burnt Ochre, Poppy Red, Sienna Brown, Crimson Red, Dark Brown / Reindeer - Naples Ochre, Peach, Burnt Ochre, Dark Brown / Reindeer Reins - Light Aqua, Aquamarine / Snome Gown & Hat Poppy Red, Crimson Lake, Tuscan Red,  White (CD) / Skin - Terracotta, Burnt Ochre, Peach, Light Peach / Beard & Fur Trim - White (CD), 20% Cool Grey, 50% Cool Grey, 70% Cool Grey, White / Toadstool - White (CD), Poppy Red, Crimson Lake, Tuscan Red, Sienna Brown, 50% Cool Grey, 70% Cool Grey

Other

Desert Storm Neenah Card, 7” x 7” Card Blank, Doily Edge Square Die (Tattered Lace), Pierced Dot Square Die (Crealies), Pine Forest Mask (Clarity Stamps), Picket Fence Distress Ink, Falling Snow Mask (Simon Says Stamp), White Card, Funky Foam, Glue, Double Sided Tape, Intense Black Hybrid Ink (Picket Fence), White Pen, Glitter, Red Twine

If you purchase any Craft Consortium products could I politely ask that you give feedback on their facebook page or website and let them know what you think.  Please support our Craft suppliers. Thank you. xxx

Why not follow us on Facebook - Craft Consortium NetworkCraft Consortium Ltd or our our Instagram page. We'd loved to see you.

Thank you so much for dropping by, don't forget to say hi :)  I'll be back in the next day or so with more Craft Consortium samples and maybe a sneak preview :) So see you then. TTFN!

Challenges entered:

Hugs

x Janine x

Sunday, 18 August 2019

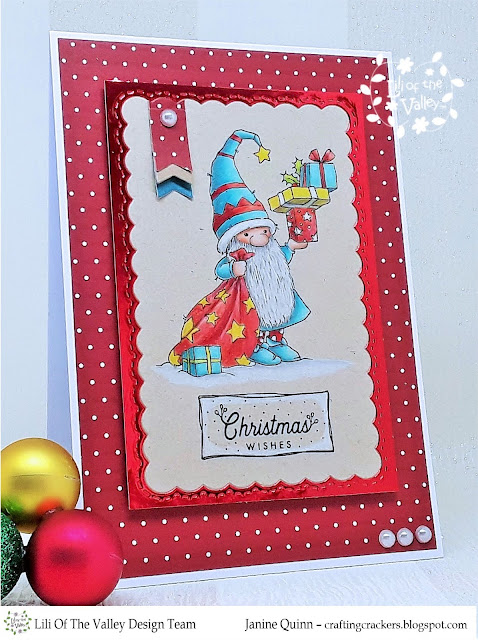
Lili Of the Valley - Christmas Digi Stamps Sneaky Peak #2

Hi everyone

Here's another sneaky peak of one of the new digis being launched by LOTV today (18th Aug). The new release has cute snow people and Tomtes (gnomes). So for today's card, I've used one of the new hand written sentiments and one of the sweet gnomes which I coloured using pencils. Isn't he the CUTEST! I hope you like it. x


For your information, here is the link to the LOTV Etsy Store to check out all the digi stampsand the LOTV online store to check out the rest of their goodies.

Here's What I Did
I trimmed down a piece of Christmassy paper and added it to the front of my card blank leaving a slim border around the edge. I imported the little gnome digi stamp  and sentiment into my graphics program, then resized it to fit my project. The image was then printed directly onto colouring card stock and die cut into a scalloped rectangle, and then coloured in using pencils. Next I cut down a piece of red mirror card and cut out the centre portion using the scalloped rectangle die to create a frame. I glued the frame to a piece of scrap card and glued the coloured in image into the aperture. The topper was then added to the card front using foam pads. 

I die cut 3 banners, one from the patterned paper and 2 from card and glued them together in varying lengths. So I could line the banners up with the scalloped edge of the topper I die cut the top edge of the banners using the same scalloped rectangle die. I glued the banners to the top of the topper.  To finish my card I added the pearls to the banner and the bottom of the card.

Here's What I Used

Prismacolor & Caran D'ache Pencils (CD)
Skin - Terracotta, Burnt Ochre, Light Peach, Peach, White / Gown & Shoes - Light Aqua, Aquamarine, 50% Warm Grey, White / Beard & Hat Trim - White, 50% Warm Grey, 70% Warm Grey, White (CD) / Sack - Poppy Red, Crimson Red, Tuscan Red, Lemon Yellow, Canary Yellow, Sunburst Yellow, White, 50% Warm Grey, 70% Warm Grey / Hat - Light Aqua, Aquamarine, 50% Warm Grey, White, Poppy Red, Crimson Red, Tuscan Red, Lemon Yellow, Canary Yellow, Sunburst Yellow / Socks - Poppy Red, Crimson Red, Tuscan Red, White, 50% Warm Grey / Presents & Holly - Poppy Red, Crimson Red, Tuscan Red, Lemon Yellow, Canary Yellow, White, 50% Warm Grey, 70% Warm Grey, Light Aqua, Aquamarine, Chartreuse, Apple Green / Ground - White, 20% Cool Grey, Silver, White (CD)

Other: 5" x 7" White  Card Blank, Desert Storm Neenah Card, Stitched Collection - Scallop Layered Rectangle Dies (Creative Expressions), Banner Dies (MF), Red Mirror Card, Kraft Card, Aqua Card, Pearls, Foam Pads, Glue, Double Sided Tape

Or why not join us on social media at  'We Love Lili Of the Valley' Facebook Group run by the Design Team, the official Lili Of The Valley Facebook page and on Instagram.  We'd loved to see you.

Thank you so much for dropping by, and please don't forget to say hi :)  I'll be back soon with more sneaky peeks of the fabulous new LOTV Christmas stamps. TTFN

Challenges entered:

Hugs

x Janine x

Friday, 16 August 2019

Lili Of the Valley - Christmas Digi Stamps Sneaky Peak #1

Hi everyone

So today I'm sharing a sneaky peak of one of the new digis being launched by LOTV as part of their Christmas release. The new snow people and Tomtes (gnomes) digi stamps will be available to buy in the LOTV etsy store from Sunday 18th....so not long to wait now I will add links to the stamps once they are launched.

So for my card today, I've used one of the new hand written sentiments and one of the cute snow people, which I coloured with Copic pens. I kept the card nice and simple to allow the snowman to pop. I hope you like it. x


For your information, here is the link to the LOTV Etsy Store to check out all the digi stampsand the LOTV online store to check out the rest of their goodies.

Here's What I Did
I trimmed down a piece of pretty patterned paper from an old LOTV Christmas paper pad, and added it to the front of my card blank leaving a border around the edge. From strong white card I die cut a fancy square and added glitter to the ornate corners. The die cut was rotated 90% to create diamond and attached to the card front using foam pads.

I imported the cute snow person digi stamp  and sentiment into my graphics program, then resized it to fit my project. The image was then printed directly onto colouring card stock and die cut into a square, and then coloured in using Copic Pens. The coloured image was then added to the centre of the die cut diamond using foam pads. To finish my card I added the printed out sentiment and 4 purple gems to the ornate diamond.

Here's What I Used
Digital Stamp: Snowman 8 & Hand Drawn Sentiment Collection

Copic Pens: Snow Person & Snow - C0, B000, B00 / Hat, Scarf & Gloves - BV000, BV00, BV02, BV04 / Arms, Noses, & Coals - C3, C5, C7, E31, E33, E35, YR00, YR04

Other: 6" x 6" White  Scalloped Card Blank, Make It Color Blending Card (thank you Jayne & Mary), 'Snow Princess' Paper Pad (LOTV), New York Collection - Union Square Dies (Creative Expressions), White Card, Gems, Glitter, Foam Pads, Glue, Double Sided Tape

Or why not join us on social media at  'We Love Lili Of the Valley' Facebook Group run by the Design Team, the official Lili Of The Valley Facebook page and on Instagram.  We'd loved to see you.

Thank you so much for dropping by, and please don't forget to say hi :)  I'll be back soon with more sneaky peeks of the fabulous new LOTV Christmas stamps. TTFN

Challenges entered:

Hugs

x Janine x

Wednesday, 14 August 2019

Craft Consortium - It's Snome Time Launch #3

Hi everyone ðŸ’œ

I hope you're having a fabulous summer....with lots of warm sunshine! If you live in the UK especially the North East you will know that I'm being sarcastic, because at the moment it's cold and cloudy and just plain blah! It's more like autumn than summer. Esh! Or because I'm making Christmas cards atm it's more like winter, but because there are gnomes involved it's all ok. Lol

Anyhow today I'm sharing another card using the brand new collection from Craft Consortium 'It's Snome Time' collection (in partnership with Helz Cuppleditch). The collection has now been launch in craft shops and here and in the USA, it will be launched on Create & Craft TV in a week's time. The beautiful collection contains adorable stamps, papers and embellishments of Snomes (snowy gnomes) and their friends. For my card today I've made a shaker using the very cute Mrs Snome from the 'Mr & Mrs Snome' stamp set, which I coloured with Copics. 

The links to the new products can be found below, or you can also go to the Craft Consortium's website using this link here. Why not sign up for update to product launches while you're there.


Here's What I Did
First I created a white scalloped card blank using folded white card and a scalloped circle die. I die cut another scalloped circle this time from red card and then die cut a circle into the centre. A frame die cut from white card was glued over the front of the aperture to create a pretty edge around it. On the back of the aperture acetate was glued into place to create a window, when this was dry foam tape was added around the aperture to create a well, ensuring there were no gaps.

A circle large enough to cover the back of the foam well and aperture was die cut from blue card and snowflakes were stamped onto it in blue ink. Silver and red star sequins were poured into the foam tape well and the blue circle was placed over the top to create the shaker. The red shaker portion was lined up and attached to the white card front.

Mrs Snome was stamped and coloured in using Copic pens, then fussy cut out. Glitter was added to her hat, and she was attached to the front of the shaker card using foam pads.

To complete the card I added white pen to some of the dots on her outfit, and a sentiment cut from red card was glued to the front of the shaker window.

I Used
Stamps: Craft Consortium - It's Snome Time Collection - Mr & Mrs Snome

All the new products including the 12" x 12" paper pad, stamps and embellishments are available at from good craft stores and will be available on Create & Craft TV shortly. (if you need help finding the products leave me a message with your email address and I will contact you)

For USA visitors - the collection will be available from Tuesday (13th Aug). and they will be distributed by Notions Marketing, you may be able to buy direct from them or you could ask your local craft store to order in direct from Notions Marketing. Alternatively here is a link to an Etsy shop that is selling all the ‘It’s Snome Time’ products —— Lotsofbubbles4me

Copic Pens
Skin - E000, E00, E11 / Gown, Hat, Stockings - R22, R29, R35, R59 / Hair & Shoes - YR00, E13, E99 / Basket - E41, E43, E47 / Scarf - B000, B00, B01, B02 / Petticoat - Y11 / Basket Content - E31, E33, E37, R22, R29, R35, R59, G17, G21

Other
White Card, Make It Color Blending Card (thank you Mary & Jayne), Red Card, Acetate, Copic Pens, Grand Scalloped Circle Die (Spellbinders), ‘Stitched Circle Scallop Frame Die (My Favourite Things), Circle Layering Die, (Tattered Lace), Seasons Greetings Die (Hunkydory Moonstone), Glue, Double Sided Tape, Intense Black Hybrid Ink (Picket Fence), White Pen, Glitter, Foam Pads, Star Sequins, Glitter, Tumbled Glass Distress Ink

If you purchase any Craft Consortium products could I politely ask that you give feedback on their facebook page or website and let them know what you think.  Please support our Craft suppliers. Thank you. xxx

Why not follow us on Facebook - Craft Consortium NetworkCraft Consortium Ltd or our our Instagram page. We'd loved to see you.

Thank you so much for dropping by, don't forget to say hi :)  I'll be back in the next day or so with more Craft Consortium samples and maybe a sneak preview :) So see you then. TTFN!

Challenges entered:

Hugs

x Janine x

Saturday, 10 August 2019

Craft Consortium - It's Snow Time Launch #2

Hi everyone ðŸ’œ

Today I'm sharing another card using the brand new collection from Craft Consortium 'It's Snome Time' collection (in partnership with Helz Cuppleditch). The collection has now been launch in craft shops and here and in the USA, it will be launched on Create & Craft TV in a week's time. The beautiful collection contains adorable stamps, papers and embellishments of snomes (snowy gnomes) and their friends. For today's card I've used the fabulous 'It's Snome Time' stamp set which I coloured with Copics. 

You can also go to the Craft Consortium's website using this link here and sign up for update to product launches.


Here's What I Did
I covered the front of a 6" x 6" card blank with a piece of teal card which I embossed with a snowflake embossing folder. Next I stamped the snome (snowy gnome) image onto the bottom of a square die cut piece of colouring card. The snome images was stamped again onto some masking paper and fussy cut out;, the mask was then placed over the top of the image on the colouring card.. The toadstools were stamped on the card slightly overlapping the masked snome image - this ensures that when the mask is removed the toadstools will appear behind the snome. To complete the scene I stamped the sentiment in the top left corner.

The images were coloured in using Copic pens and glitter was added to the 'snome' wording. To complete the topper, I die cut a slim border frame from the same teal card and glued it in place around the scene. The topper was then added to the card front using foam pads.

To complete the card I added white pen to some of the toadstool dots, and red gems to the bottom of the card. 

I Used
Stamps: Craft Consortium - It's Snome Time Collection - It's Snome Time

All the new products including the 12" x 12" paper pad, stamps and embellishments are available at from good craft stores and will be available on Create & Craft TV shortly. (if you need help finding the products leave me a message with your email address and I will contact you)

For USA visitors - the collection will be available from Tuesday (13th Aug). and they will be distributed by Notions Marketing, you may be able to buy direct from them or you could ask your local craft store to order in direct from Notions Marketing. Alternatively here is a link to an Etsy shop that is selling all the ‘It’s Snome Time’ products —— Lotsofbubbles4me

Copic Pens
Skin - E0000, E000, E00, E01, E11 / Gown & Hat - BG10, BG11, BG13, BG34, R17, R27, R37 / Red Toadstool & Berries - R17, R27, R37, R59 / Brown Toadstool - E40, E41, E43, E47, R17, R27 / Pinecone & Boots - E31, E33, E35 / Holly - YG05, YG09, YG17 / Beard & Fur Trim - C0, C1, C3, C5, C76 / Ground - B0000, B000, B01

Other
6" x 6" White Card Blank, Neenah Card, Teal Card, Doily Edge Square Die (Tattered Lace), Layer, Snowflake Lattice Embossing Folder (Creative Expressions), Frames, & Banner Square Dies (Julie Hickey Designs), Glue, Double Sided Tape, Intense Black Hybrid Ink (Picket Fence), White Pen, Red Gems

If you purchase any Craft Consortium products could I politely ask that you give feedback on their facebook page or website and let them know what you think.  Please support our Craft suppliers. Thank you. xxx

Why not follow us on Facebook - Craft Consortium NetworkCraft Consortium Ltd or our our Instagram page. We'd loved to see you.

Thank you so much for dropping by, don't forget to say hi :)  I'll be back in the next day or so with more Craft Consortium samples and maybe a sneak preview :) So see you then. TTFN!

Challenges entered:

Hugs

x Janine x

Wednesday, 7 August 2019

Craft Consortium - 'It's Snome Time' Sneaky Peak (#1)

Hi everyone ðŸ’œ

Oooo, have I got a treat for you today. I'm sharing a sneaky peak of the new collection from Craft Consortium (in partnership with Helz Cuppleditch), today and the rest of the week. The 'It's Snome Time' collection (release date and links tbc) has the most adorable stamps, papers and embellishments of snomes (snowy gnomes) and their friends. They're absolutely adorable and I love every single images....and so will you. Right, the first card I'm sharing made using the 'Robin Mischief' stamp set and I used pencils on desert storm neenah card. 

The collection will be available to buy in selected craft stores and the Craft Consortium's website very soon....so watch this space. You can also go to the Craft Consortium's website using this link here and sign up for update to product launches.


Here's What I Did
I covered the front of a 5" x 7" card blank with a piece of dark red card. Next I stamped the small toadstool image onto the bottom left of a die cut piece of desert storm colouring card. The toadstool images were stamped again onto some masking paper and fussy cut it out; the mask was then placed over the top of the image on the colouring card. The large snome image was stamped at the bottom of the card slightly overlapping the masked toadstool image - this ensures that when the mask is removed the toadstool will appear in front of the snome stamp. I stamped several snowflakes around the panel using a versamark ink to give a watermark effect to them.

The images were coloured using Prismacolor pencils and the white pencil from my Caran D'ache set. To add extra highlights I used my white pencil first, and then added colour over the top.  When the image was finished. The completed panel was attached to a piece of gold mirror card and a die cut red scalloped rectangular mat. The topper was then added to the card front using foam pads.

To complete the card I added white pen to some of the dots, and red gems in the centre of  all the snowflakes. 

I Used
Stamps: Craft Consortium - It's Snome Time - Robin Mischief 

All the new products including the 12" x 12" paper pad, stamps and embellishments are available at from good craft stores and will be available on Create & Craft TV shortly. (if you need help finding the products leave me a message with your email address and I will contact you)

For USA visitors - the collection will be available from Tuesday (13th Aug). and they will be distributed by Notions Marketing, you may be able to buy direct from them or you could ask your local craft store to order in direct from Notions Marketing. Alternatively here is a link to an Etsy shop that is selling all the ‘It’s Snome Time’ products —— Lotsofbubbles4me

Prismacolor Pencils & Carn D'ache (CD)
Skin - Dark Brown, Terracotta, Burnt Ochre, Peach, Light Peach / Beard & Fur Trim - White (CD), 50% Warm Grey, 50% Cool Grey, 20% Cool Grey, 70% Warm Grey / Hat -White (CD), Cool Grey 20%, Cool Grey 50%, Tuscan Red, Poppy Red, Crimson Lake / Gown -  Tuscan Red, Poppy Red, Crimson Lake, White (CD) / Boots - Black, 70% Cool Grey, 50% Cool Grey / Robin - Sienna Brown, Dark Brown,Crimson Red, Beige / Large Toadstool - 70% Cool Grey, 50% Cool Grey, 20% Cool Grey, White (CD), Dark Brown, Sienna Brown, Beige, Canary Yellow, Sunburst Yellow, Tuscan Red, Poppy Red, Crimson Lake / Small Toadstools - Sienna Brown, Dark Brown, White (CD), 70% French Grey, Tuscan Red, Poppy Red, Crimson Lake, Burnt Ochre / Pine Cones - Dark Brown, Burnt Ochre, White (CD) / Berries - Tuscan Red, Crimson Lake / Holly & Firs - Chartreuse, Apple Green, Dark Green / Bird House - Dark Brown, White (CD), Black, Sienna Brown, Beige, Tuscan Red / Yellow Parcel - Lemon Yellow, Sunburst Yellow, Burnt Ochre / White Parcel - White (CD), 20% Cool Grey, 50% Cool Grey, 70% Cool Grey / Ground - White (CD), Cool Grey 50%, Cool Grey 50%

Other

Craft Consortium - Grunge 'Dark Tones' Paper Pad, 5" x 7" White Card Blank, Desert Storm Neenah Card, Red Card, Gold Mirror Card, 'Stitched Collection - Scallop Layer Rectangle Die (Creative Expressions), Glue, Double Sided Tape, Intense Black Hybrid Ink (Picket Fence), White Pen, Red Pen, Red Gems, Versamark Ink

If you purchase any Craft Consortium products could I politely ask that you give feedback on their facebook page or website and let them know what you think.  Please support our Craft suppliers. Thank you. xxx

Why not follow us on Facebook - Craft Consortium NetworkCraft Consortium Ltd or our our Instagram page. We'd loved to see you.

Thank you so much for dropping by, don't forget to say hi :)  I'll be back in the next day or so with more Craft Consortium samples and maybe a sneak preview :) So see you then. TTFN!

Challenges entered:

Hugs

x Janine x

Monday, 5 August 2019

Lili Of The Valley - New Christmas Stamps #4

Hi there

Today I'm sharing another of the gorgeous new Lili Of The Valley Christmas digi stamps. The stamps are all so cute and have been a pleasure to colour up

For this card I used the cute digi stamp called 'Christmas Sled'. All the new Christmas stamps can be found in the LOTV Etsy store, the link is shown below the photos. To coloured this sweet stamp I used Copic pens on Neenah card, and then mounted it onto my card front. I hope you like it. x


For your information, here is the link to the LOTV Etsy Store to check out all the digi stampsand the LOTV online store to check out the rest of their goodies.

Here's What I Did
I trimmed down a piece of tartan patterned paper and added to the card front leaving a border around the edge.

I imported the cute bunny digi stamp into my graphics program, then resized it to fit my project. The image was then printed directly onto colouring card stock and die cut into a fancy square. The bunnies were covered over using a mask I'd created from a post-it note. A tree stencil was placed over the top over the top of the mask and pink and blue distress ink was applied to create a pretty sky. When the background was dry, the stencil and mask was removed. The image was then coloured using Copic pens. The coloured image was then added to the centre of my card front using funky foam.

A sentiment was stamped and die cut into a banner then attached to the card front using twine. To finish the card I added 3 pink gems to compliment my card.. 

Here's What I Used
Digital Stamp: Christmas Sled

Copic Pens: Bunnies - C0, C01, C2, C3, C5, C7, R30 / Jackets - BG10, BG11, BG13, BG34, BG72 / Scafves & Jumpers - RV000, RV02, RV13, / Sled - BG09, BG72 / B000, B000

Other: 6" x 6" Green Scalloped Card Blank, Neenah Card, 'Christmas Woodland' Paper Pad, (Hobbycraft), Zig Zag Square Dies (MFT), 'Layers, Frames & Banners' (Julie Hickey Designs), Tumbled glass & Worn Lipstick Distress Ink, Woodland Masks (Clarity Stamps), 'Mini Snowflakes' Stamps (Hero Arts), Glitter, Black Hybrid ink (Picket Fence), Twine, Gems

Or why not join us on social media at  'We Love Lili Of the Valley' Facebook Group run by the Design Team, the official Lili Of The Valley Facebook page and on Instagram.  We'd loved to see you.

Thank you so much for dropping by, and please don't forget to say hi :)  I'll be back soon with more sneaky peeks of the fabulous new LOTV Christmas stamps. TTFN

Challenges entered:

Hugs

x Janine x

Sunday, 4 August 2019

Craft Consortium - Little Fawn & Friends #1

Hi everyone ðŸ’œ

Hope you're having a fabulous Sunday, and the weather is nice enough for you to sit out and enjoy it. It's glorious here, it's nice and warm but not too hot that I can't sit in my craft room and play. So for  today's card I'm using a previously released collection from Craft Consortium - this one is called 'Little Fawn & Friends'. I've used the paper pad, a stamp sets and the beautiful coordinating enamel dots from the collection. The papers are double sided and a beautiful quality, and the stamps work brilliantly, and stamp with a lovely fine line perfect for colouring. 

All the links to the specific Craft Consortium products can be found below, and the link to the general store is here.


Here's What I Did
I covered the front of a 7" x 7" green scalloped card blank with one of the gorgeous pattern papers from the pad, leaving a slim border around the edge. I cut a strip of green card and attached a piece of coordinating patterned paper again leaving a border around the edge, this was attached flat down the card front. 

I stamp the bunnie image onto some colouring card and coloured it using Copic pens; the image was then die cut it into a square. The edges of the square were inked with green distressing ink and then stamped leaves using green inks. When dry the panel was attached to a green die cut square and mounted onto the front of the card using foam pads. I added a stamped sentiment (from my personal stash) to the front.  

To complete the card I added coordinating enamel dots and a little pine cone charm from the collection which I tied on with string.

I Used
Paper Pad: Craft Consortium - 12" x 12" Little Fawn & Friends Paper Pad
Stamps: Craft Consortium - Little Fawn & Friends - Best Friends
EmbellishmentsCraft Consortium - Little Fawn & Friends - Enamel Dots

Copics
Rabbit - E000, E00, E02, E43 / Grass & Foliage - G21, G94

Other

6" x 6" Green Scalloped Card Blank, Copics X-Press Card (Thanks Jayne x), Green Card, 'Pearl' Square Dies (Tattered Lace), 'Dot' XXL Square Dies (Crealies), Glue, Double Sided Tape, Label Maker Stamps (MFT), Intense Black Hybrid Ink (Picket Fence), Bundled Sage Distress Ink, Cottage Ivy & Bamboo Leaves Ink (Memento), String, Versafine Black Ink, White Card

If you purchase any Craft Consortium products could I politely ask that you give feedback on their facebook page or website and let them know what you think.  Please support our Craft suppliers. Thank you. xxx

Why not follow us on Facebook - Craft Consortium NetworkCraft Consortium Ltd or our our Instagram page. We'd loved to see you.

Thank you so much for dropping by, don't forget to say hi :)  I'll be back in the next day or so with more Craft Consortium samples and maybe a sneak preview :) So see you then. TTFN!

Challenges entered:

Hugs

x Janine x